Waterfall & Japanese Deer Scarer
prusaprinters
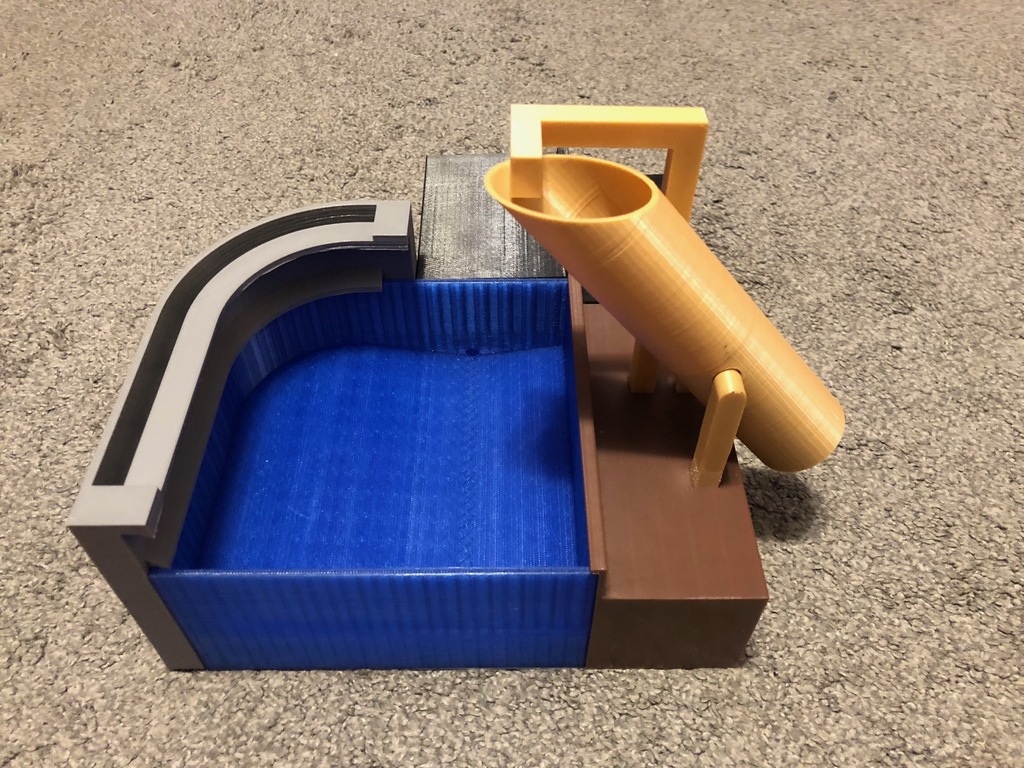
<p>This was inspired by Jelson's Shishi Odoshi "Deer Scarer" Japanese Water Fountain. The original design has a tendency to splash a few drops forward. This version increases the size of the reservoir and adds a waterfall to stop the splashes from the deer scarer, at least in theory.</p> <h3>Print Settings</h3> <p><strong>Printer Brand:</strong></p> <p>Prusa</p> <p><strong>Printer:</strong></p> <p>i3 MK3</p> <p><strong>Rafts:</strong></p> <p>Doesn't Matter</p> <p><strong>Supports:</strong></p> <p>Yes</p> <p><strong>Resolution:</strong></p> <p>0.2 mm/Fast</p> <p><strong>Infill:</strong></p> <p>20%</p> <p><strong>Notes:</strong></p> <p>These new parts can be on the larger size from some printers. A 170 x 175mm bed would be needed at minimum. Ideally a 200mm x 200 mm bed or larger would be idea. At minimum a 160mm of Z-axis height would be needed. Again 200mm or more would be ideal.</p> <p>The images from Slicer indicate how parts should be orientated. Two short barbs are needed, but everything else needs only one copy.</p> <p>The Base, Barb - Short, Barb - Long, and Splitter can print without supports. The remaining parts require supports in some form.</p> <p>The Deer Scarer base requires supports for the two tabs that jet out. If you have the option for manual supports these two tabs are the only spots that require it, the remaining spots should be able to print via bridging. Absent the option for manual supports, generate supports everywhere.</p> <p>The Electronics Box base requires supports for the one connecting tab. Generating supports everywhere will generate the needed support without excess.</p> <p>The waterfall portion requires supports for the two overhands and mounting tab. This part was designed with generating supports from the build plate only. It is critical not to generate supports everywhere as it is likely you will generate supports inside the internal channel for the water which will prevent it from operating correctly.</p> <p>In addition to the pieces included here, you will need the following from Jelson's original design: 1) Japanese Fountain Tube, 2) Japanese Fountain Supply Line, 3) Japanese Fountain Strut (2 copies). Follow the printing recommendations supplied by Jelson for these parts.</p> <h3>Post-Printing</h3> <p><strong>Components Needed</strong></p> <p>There are several components needed for the pumping of the water. These include several from Jelson's original design. The parts needed include:</p> <ul> <li>A pump such as this one: https://www.amazon.com/gp/product/B077ZTBWPV</li> <li>Some vinyl tubing with 7/16" (11 mm) outer diameter, such as this one: https://www.amazon.com/gp/product/B000E62TCC</li> <li>A DC power supply. Jelson originally design recommended this 3.3v one: https://www.amazon.com/gp/product/B00OZDY950. The low voltage was recommended for the lower volume of water the pump will push. This design may benefit from a higher voltage. The pump recommended is rated for up to 12v.</li> <li>Silicone Sealant suitable for kitchen, bath, etc will suffice. Clear is recommended such as this one: https://www.amazon.com/gp/product/B000PSE46S</li> </ul> <p>The electrons box features holes for a power switch/button and a power jack. Both of these are optional. You can directly wire the power cable to the pump but this allows you to keep the jack attached to the power supply and power off the device while plug in.</p> <ul> <li>Power Jack, if you are using the power supply recommended here a 2.1mm x 5.5mm jack is needed such as this one: https://www.amazon.com/gp/product/B01M1D5GIP</li> <li>A Power Button or Switch. For buttons you will need a latching style so it stays press when turned on such as this one: https://www.amazon.com/gp/product/B075VBV4QH</li> </ul> <p>Optionally, a couple of supplies may come in handy to handle leans.</p> <ul> <li>Zip ties will work as added insurance for keeping the tube on the barbs. One a few inches long, such as this one: https://www.amazon.com/gp/product/B01018DB2E, will suffice.</li> <li>Flex Seal or other similar spray sealant may be beneficial if the silicon is not enough. Clear color is recommended, especially if you are poor at masking things to avoid spraying the outside. https://www.amazon.com/gp/product/B00ECGTK4K</li> </ul> <p><strong>Assembly - Electronics</strong></p> <ol> <li><p>Cut some pieces of wire. Two longer (6 inches) and one shorter (3-4 inches).</p> </li> <li><p>Insert the button and power socket into the electonics box. Tighten the nuts down.</p> </li> <li><p>Attached a long wire to the negative side of the power jack and a short wire to the positive side. Heat shrine the joints if desired.</p> </li> <li><p>Connect the other end of the short positive wire to the button and heat shrink if desired.</p> </li> <li><p>Attached a long wire to the button and heat shrink if desire.</p> </li> <li><p>Solder the long wire from the power jack (negative) and the long wire from the button (positive) to the pump accordingly. Heat shrink is highly recommended for this spot.</p> </li> <li><p>Slide the pump and its mounting bracket into the slots of the electronics box.</p> </li> </ol> <p><strong>Body Assembly</strong></p> <ol> <li><p>Attached the long barb to the bottom of the deer scarer. The barb portion should point to the open short side of the scarer. (Photo included for guidance) . Seal the gap with silicone to prevent leaking.</p> </li> <li><p>Attached the short barbs to the base and waterfall portions. Seal the gaps with silicone to prevent leaking.</p> </li> <li><p>Slide the waterfall portion onto the base.</p> </li> <li><p>Cut a piece of vinyl tubing about 120mm/4.7 inches long. Attached one end to the barb on the waterfall portion. Leave the other side disconnected for the moment.</p> </li> <li><p>Cut a piece of the vinyl tubing about 100mm/3.9 inches long. Attach one end to the water pump outlet port and the other end to the center barb of the splitter.</p> </li> <li><p>Cut a piece of the vinyl tubing about 32mm/1.25 inches long. Attach one end tot he water pump inlet port and the other end to the barb on the base. This can be a tricky attachment as it it is the shortest connection and involves working the electronics box in place with the base as well. The electronics box should now be attached to the base at this point.</p> </li> <li><p>Attached the free end of the vinyl tube connected to the waterfall to one of the free ends of the splitter.</p> </li> <li><p>Attach the Deer Scarer to the base.</p> </li> <li><p>Cut a piece of vinyl tubing about 152mm/6 inch long. Connect one end to the deer scarer and the other end to the splitter. Ensure there are no kinks in any of the tubing. If there is work them out and tweak things as needed.</p> </li> <li><p>Attach the remaining parts (the ones from Jelson's original design) accordingly. Instructions can be found on Jelson's original project.</p> </li> </ol> <p>Completed project running</p> <h3>Updates</h3> <p>1: The deer scarer still splashes a few drops forward. Gothicgeek made a remix off of Jelson's original tube design (thing: 2979616 - Accessories for deer Scarer). Something to consider.</p> <p>2 (7/10/2018): The bottom edge of the waterfall comes to a point. This was originally done to to ensure that water did not collect on the underside and drip where it was unintended. This did not print as well as I hoped and took more to cleanup. A updated version is included that hopefully will print easier and be easier at cleanup. Both the original version (Waterfall) and the updated version (Waterfall_Rev.B) are included.</p> <p>3 (7/10/2018): The discharge port is slightly off axis with the inlet port of the pump. This original offset made sealing things a little more tricky. I've tweaked the alignment of the port to be better in line with the pump. Both the original base (Base.stl) and the updated version (Base_Rev.B.stl) are included.</p> <p>4 (7/15/18): Added versions of the Deer Scarer, Waterfall, and Electronic box with custom supports modeled in. Supports were built based on the method showed by Devin/Make Anything on youtube. I have not yet printed these new changes. Your feedback is appreciated. These files end "with supports" in the file name.</p> <p>5 (7/15/18): Added versions of the Base, Waterfall, Electronics Box, and Deer Scarer with rounded edges. These files have "rounded" added to the file name. I have not yet printed these new changes. Your feedback is appreciated.</p> Category: Outdoor & Garden
With this file you will be able to print Waterfall & Japanese Deer Scarer with your 3D printer. Click on the button and save the file on your computer to work, edit or customize your design. You can also find more 3D designs for printers on Waterfall & Japanese Deer Scarer.