Weather Station One Part 5 - the Wind Vane and Anemometer
prusaprinters
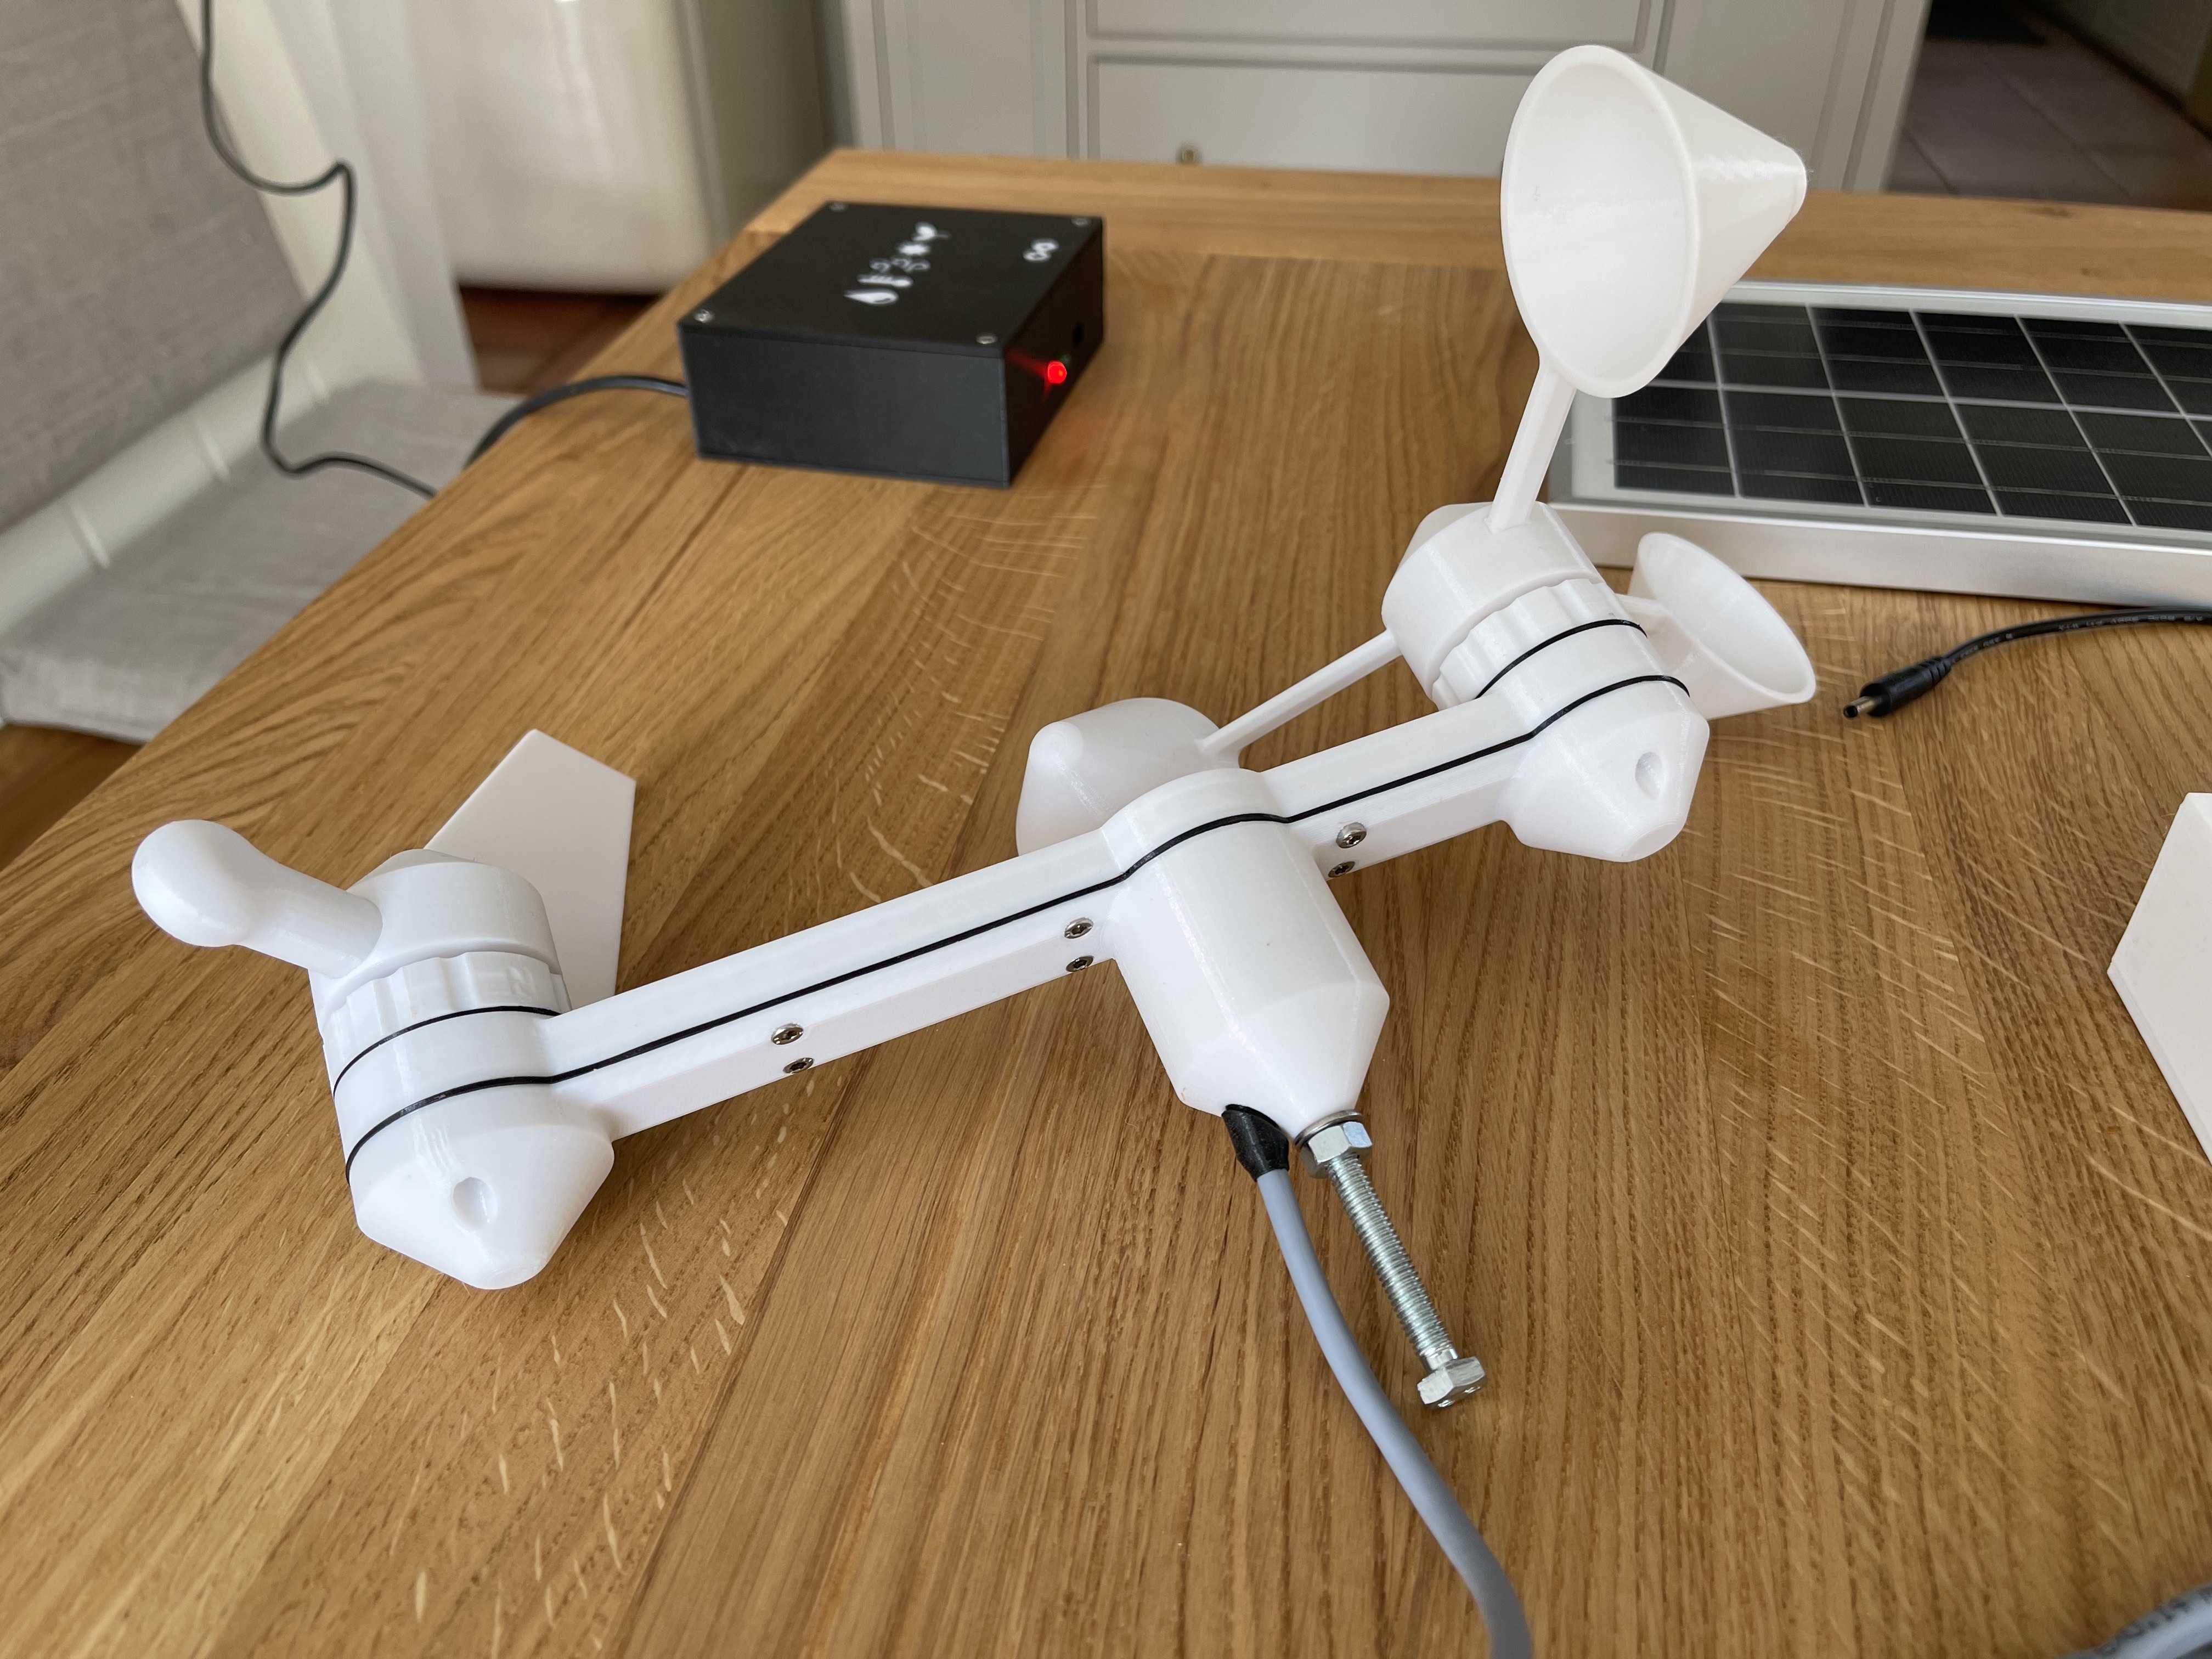
<h3>Overview on project</h3><p>This is part of the Weather Station One project, a complete and modular weather station. The design of the system has been driven by a number of requirements:</p><ul><li>collect all common weather channels including temperature, humidity, barometric pressure, rain, wind speed and direction, illumination / sun hours, ground humidity</li><li>modular design allowing one to implement part of it, or extend the range of sensors</li><li>high depth of production; DIY as much as possible</li><li>long range transmission support - with the point of measurement far from home</li><li>integration into a home automation system</li><li>functional, easy to print, and beautiful 3D design</li></ul><p>When considering a project like this, please be aware that even with all designs published, it will be some work to do. This includes not only 3D printing, but carpentry work, soldering / electronics, and software in addition.</p><p>The parts published are made up from:</p><ol><li><strong>Part 1: Central Station. </strong>This is the part all sensors are connected to. It is battery / solar powered to allow placing it in the best place to measure data. It sends data collected using a HC-12 / 433Mhz band (up to 1 kilometer distance) chip.</li><li><strong>Part 2: Base Station.</strong> This is the Central Station's counter part. It receives data using another HC-12 chip and is dispatching it to our home-automation system. In addition, it hosts a web server allowing direct access to weather data.</li><li><strong>Part 3: Temperature </strong>(and other) <strong>sensor</strong>. This sensor is designed to sit in a proper Stevenson Screen / Wetterhütte. The current version measures ambient temperature, humidity, and barometric pressure using a digital sensor. It is connected to the Central Station.</li><li><strong>Part 4: Rain Gauge.</strong> This is a rain gauge collecting rain and feeding it into commuting buckets. The number of commutes is measured using a reed contact triggered a bucket-moved magnet. It is connected to the Central Station.</li><li><strong>Part 5: Wind Vane and Anemometer.</strong> Probably the most complex printing part measuring 16 wind directions and wind speed. Similar to the rain gauge, it is a mechanical part. Wind directions are measured using either 8 reed contacts, or an magnetic angle measurement sensor. Wind speed is measured by a single reed contact closed every time the anemometer wings do a full rotation. It is connected to the Central Station.</li><li><strong>Part 6: Stevenson Screen / Wetterhütte.</strong> This part is not detailed further because we have built it based on a <a href="http://www.met.fu-berlin.de/%7Estefan/huette.html">tutorial published by DWD (Deutscher Wetterdienst)</a>.</li><li><strong>Part 7: optional Battery Pack.</strong> The solar module and charger chosen come with a mount for a 14500 sized Lithium battery. Depending on the power consumption of the Central Station (and sensors) you may want to use an external Battery Pack.</li><li><strong>Part 8: Software and Electronics.</strong> This part is published on <a href="https://github.com/HarrysLapTimer/WeatherStationOne">Github</a>.</li><li><strong>Part 9: Solar Panel Mount</strong>. This is a solar panel mount as used currently. It allows adjusting the elevation to optimize generation for Winter and Summer seasons. Mid term it will be replaced by a solar tracker following the sun azimuth.</li></ol><p>For your convenience, I have created a <a href="https://www.prusaprinters.org/social/92858-harry/collections/101642">WeatherStationOne</a> collection including all but parts 6 and 8.</p><p>End of overview common to all parts.</p><h3>Part 5 - Wind Vane and Anemometer</h3><p>This combined sensor measures wind direction and wind speed.</p><p><strong>19/2/2022 Update</strong>: added AS5600 Option</p><h5>Wind direction using reeds</h5><p>The initial version uses 8 reed contacts assembled as a ring to measure wind direction. A magnet moving with the vane triggers one, two, or three at a time. The two trigger situation in particular allows deriving 8 additional positions, resulting in 16 overall. So we do not only get N, NE, E, SE, S, SW, W, NW, but NNE, ENE, etc.</p><p>Using 8 reed contacts requires 8 wires plus one for VCC / GND contact. To reduce the number of wires, the electronic implementation adds a multiplexer chip into the wind mount. It allows Central Station to select one of the eight contacts, request its state, switch to the next and so on.</p><p>Overall, the multiplexing chip allows the reduction from 10 wires to 7 (see diagram), allowing us to utilize the 6 wire (plus shielding) cable we used throughout the project.</p><p>This option is named <strong>Reed Option</strong> in printing instructions.</p><h5>New option! Wind direction using angle sensor</h5><p>While the above version is working fine, mounting and soldering the 8 reed contacts on top of a multiplexer chip can be quite challenging. The second option presented here is based on a magnetic / inductive angle measurement sensor (AS5600) as proposed by a maker. It is the same low cost price class as the reeds and multiplexer.</p><p>The AS5600 features three interfaces, namely I2C, PWM, and analog output. While the former are better in general, they require more contacts and fine soldering (small contacts). As we use only 16 wind directions instead of degree or sub-degree measurements anyway, the current implementation uses the easy approach using the analog output and A2D conversion on the processing side.</p><p>This option is named the <strong>AS5600 Option</strong> in printing instructions.</p><h5>Wind speed</h5><p>Wind speed measurements using one reed is coming on top.</p><p>As most parts of Weather Station One, we use PETG filament. The 3D model includes seals to be printed using TPE or TPU filament. This is to keep the inner part of the wind sensors dry.</p><p>The anemometer requires calibration once it is assembled. The relation between axle rotations and wind speed can be set as a factor in the Central Station's ESP program.</p><p><strong>Reed Option</strong>: handling 8 reed switches made of glass proved to be quite hard to keep functional during assembly. They need to be glued in and can break nevertheless. After two attempts to get a working combo, we switched to plastic body reeds. These are by far easier to handle and work fine.</p><p><strong>AS5600 Option</strong>: this option requires hardware calibration; the magnet mount needs to be turned so the system reports North direction when VaneTip point to the N engraved in VaneMount. So the steps are: #1 glue magnet into MagnetMount, #2 press the mount on the screw - do not glue yet, #3 test direction and adjust mount, #4 once it matches, mark direction with a pencil and glue MagnetMount to the screw.</p><p>The wind mount has a M6 opening in the bottom to put it onto a threaded rod attached to the Stevenson Screen.</p><h4>Printing configuration</h4><ul><li>Layer height 0.2mm</li><li>0.4mm nozzle</li><li>15% infill</li><li>White PETG filament</li><li>Black TPE / TPU filament</li><li>as shown in the PrusaSlicer files included, we this is printed in four jobs</li><li>job #1 - mount: turn the upper part upside down</li><li>job #2 - vane: place the tip of the vane vertical; tip with 100% for weight balancing; this job differs depending on whether <strong>Reed Option</strong> or <strong>AS5600 Option </strong>is implemented</li><li>job #3 - anemometer: print 3 cups, and place them with the open side down</li><li>job #4 - seals: as is</li><li>automatic support (from building plate only)</li></ul><h4>Other parts needed</h4><ul><li>4x miniature steel bearing 3x8x4mm</li><li>2x long M3 screws or a M3 threaded rod to shorten for both axles</li><li>14x M3x10 screws</li><li>1x glass reed contact 2x14mm for anemometer (buy more, they break easily)</li><li><strong>Reed Option</strong>: 8x plastic reed contacts 3x14mm for wind vane</li><li><strong>Reed Option</strong>: 1 x HC4051 multiplexer chip</li><li>2x magnet 4x1mm (buy some more for fine tuning)</li><li><strong>AS5600 Option</strong>: 1x AS5600 sensor - version soldered to a “round” PCB</li><li><strong>AS5600 Option</strong>: 1x diametrically magnetized neodymium magnet 8x1mm</li><li>cable to run from wind mount to central station, outer diameter 4.7mm</li><li>1x MiniDIN (PS/2) 6 pin plug (shielding used as 7th wire)</li><li>2x M6 nut for the base and as counter nut</li><li>1x M6 threaded rod to as a mount to the Stevenson Screen</li></ul><h4>Closing</h4><p>This is another free 3D model made available for you. Designing, testing, preparing, uploading and maintaining my models is effort. In case you enjoy them, please send a donation using the coin button in the top right. Thanks a lot!</p>
With this file you will be able to print Weather Station One Part 5 - the Wind Vane and Anemometer with your 3D printer. Click on the button and save the file on your computer to work, edit or customize your design. You can also find more 3D designs for printers on Weather Station One Part 5 - the Wind Vane and Anemometer.