Weighted Shift Knob
thingiverse
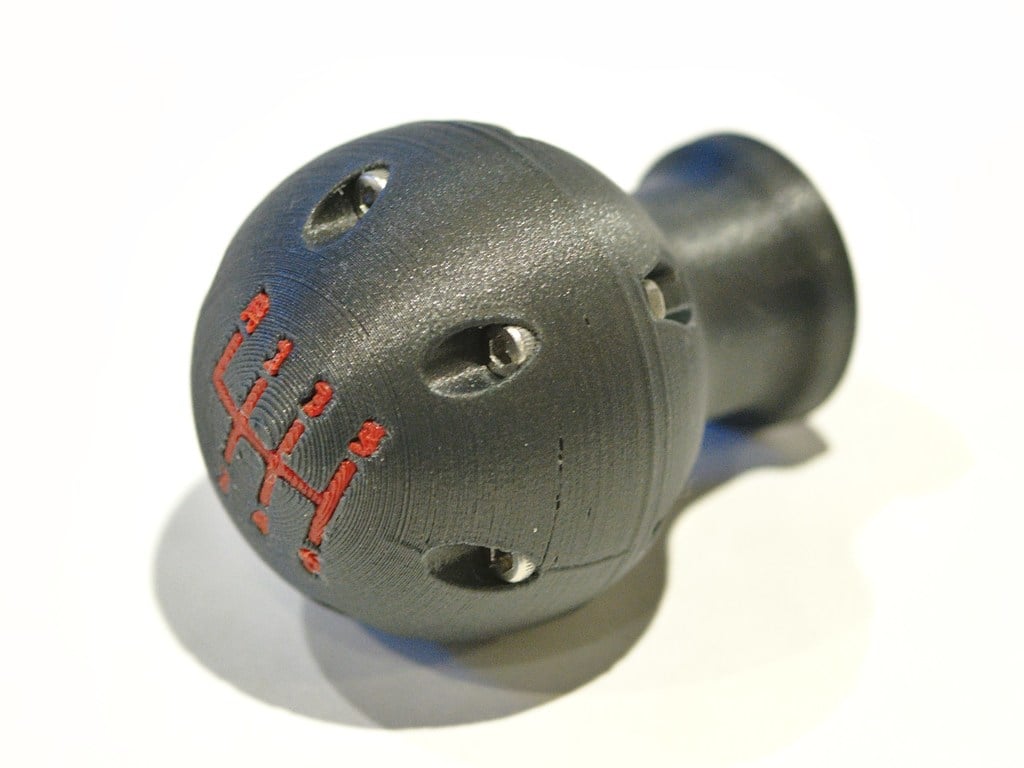
I wanted to make a replacement shift knob for my Mazda 3. I was loosely inspired by WillsWorld's [WRX Shift Knob](https://www.thingiverse.com/thing:977220), but I wanted a shift knob that would be at least as heavy as the factory knob which weighs a little over 100g. To achieve this goal I hollowed out the middle of the shift knob to accommodate 3/8" by 1-1/4" fender washers. I also designed the knob to be 20mm shorter than the factory knob (86mm to 66mm). The shorter knob, increased weight, and tighter mounting compared to the factory shift knob greatly improve shift feel in my opinion. This knob was designed for 3rd generation Mazda 3, but may work for other cars. Parts ------ 1x M10x1.25 Locknut (Some cars use M10x1.5 threads instead) 16x 3/8" x 1-1/4" fender washers (Metric washers are hard to find in the US, but 10mm x 30mm is the closest size to the one I used) 6x M3 x 16mm bolts 6x M3 Nuts Material Selection ---------- From my reading the interior of a car can reach around 90C under the worst possible conditions and 55C on a typical hot summer day. As such, the material used to print the shift knob should have good temperature resistance. I printed the knob with CF PLA with a 30% loading. This material has a low Tg of 60C, but will begin crystallizing when exposed to temperatures above it's Tg. The carbon fiber content should minimize dimensional changes that occur when the material crystallized. Once annealed this material should be resistant to temperatures beyond 120C. The CF PLA also looks good and feels less plastic-like. Alternatively, an amorphous material with a higher Tg such as PETG should work fine as well. Assembly ---------- See [Gear_knob_BOMv4.PDF](https://thingiverse-production-new.s3.amazonaws.com/assets/db/5c/aa/14/a9/Gear_knob_BOM_v4.pdf?AWSAccessKeyId=AKIAJ4LU5KWCMM7WB7YA&Expires=1609263510&Signature=dIbReH62VlUbBQT4N5ExfFoloTA%3D) for reference 1) Print the the upper and lower shift knob in on color and the H-pattern insert in a contrasting color. I used black and red. 2) Slide the H-pattern insert into the top of the knob making sure that the H-pattern is aligned correctly 3) Use a mallet and dowel or other similarly sized cylinder to tap the H-pattern insert until it sits flush with the top surface of the shift knob. 4) Inset the nylock nut with the locking ring facing the top of the shift knob. 6) Stack the desired number of washers into the bottom and top cavities of the shift knob. The maximum number of washers is 16, which will give the shifter a total weight of around 180g if using steel washers and typical print settings. To reduce the weight of the shifter 3D printed washer spacer can be used as a substitute for some of the washers. Simply scale this model vertically to replace the desired number of washers. 7) Place the top piece over the bottom piece and fasten the two together with 6 M3x16mm bolts and 6 M3 nuts. 8) Shake the shift knob to make sure the washers do not rattle inside. If they rattle use an epoxy or super glue to set them in place. 9) Screw the new shift knob onto the car's shifter bolt. Make sure that the nylock nut engages properly. 10) (Optional) Remove the shift knob and sand to the desired finished. The knob pictured was wet sanded with 160 grit, 240 grit, 400 grit, 600 grit, 1000 grit, and polished with Novus #2 polish.
With this file you will be able to print Weighted Shift Knob with your 3D printer. Click on the button and save the file on your computer to work, edit or customize your design. You can also find more 3D designs for printers on Weighted Shift Knob.