Welding Tool for PU-Belts and Filaments
thingiverse
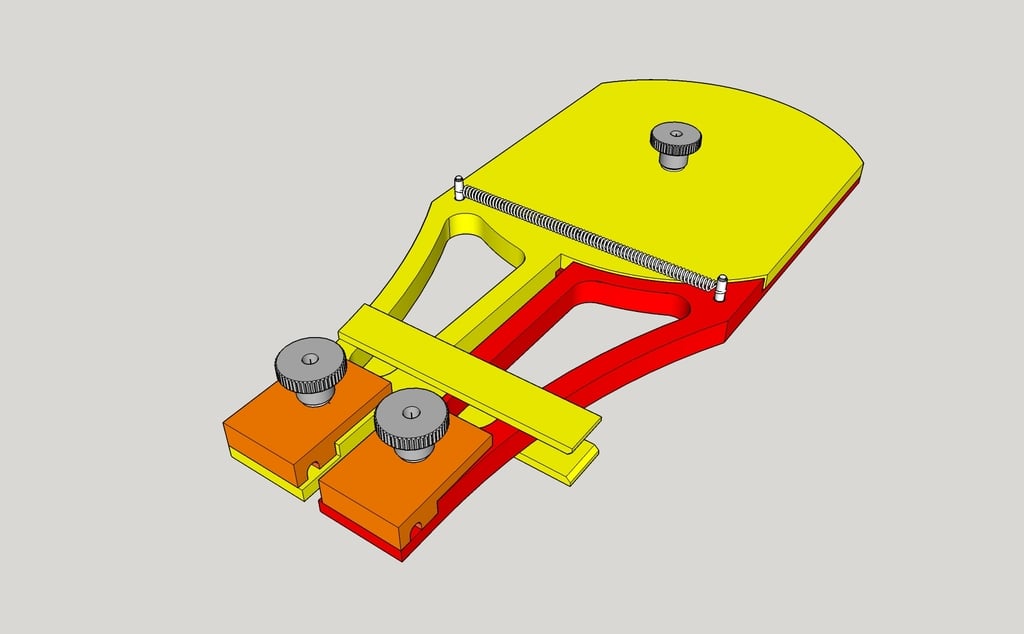
Belt and filament welding gauge ------------------------------------------- makes welding filament sections and PU belts child's play. The construction seems to be very complex, but it is easy to print. And very easy and safe to use: The belt or filament ends are fixed with approx. 5mm overhang with the appropriate inserts, then melted with a hot sheet (ideally a soldering iron with a flat tip at 300 °) and the welding gauge closed immediately. After a sufficient cooling time, the excess material on the weld seam can be removed with sharp pliers and a blade. Inserts are included in the design for 2mm round belt red 3mm round belt orange 4mm round belt yellow 5mm round belt green 1.75mm filament brown 3.5mm filament blue. The necessary support for the base plate is already integrated in the STL file (shown in purple in the sketch). This means that all parts can be printed in one pass without additional support. The centering clamp improves the accuracy when joining the heated material ends. It is glued to the upper part (yellow) as shown in the sketch. Additional material: 5 countersunk screws M3x15 3 washers M3 3 knurled nuts M3 1 tension spring (or rubber band) Have fun assembling and especially welding! ################################################################### Filament- und Riemen-Schweißlehre ------------------------------------------------- macht das Verschweißen von Filament-Teilstücken und PU-Riemen zum Kinderspiel. Die Konstruktion scheint sehr aufwendig zu sein, ist aber einfach zu drucken. Und sehr einfach und sicher zu handhaben: Die Riemen- oder Filament-Enden werden mit ca. 5mm Überstand mit den passenden Einsätzen fixiert, dann mit einem heißen Blech (optimal Lötkolben mit Flachspitze bei 300°) angeschmolzen und die Schweißlehre sofort geschlossen. Nach reichlicher Abkühlzeit kann der Materialüberschuss an der Schweißnaht mit scharfer Zange und Klinge abgetragen werden. Im Entwurf sind Einsätze enthalten für 2mm Rundriemen rot 3mm Rundriemen orange 4mm Rundriemen gelb 5mm Rundriemen grün 1,75mm Filament braun 3,5mm Filament blau. Der nötige Support zum Druck der Grundplatte ist in der STL-Datei bereits integriert (in der Skizze violett dargestellt). Damit können alle Teile in einem Durchgang ohne zusätzlichen Support gedruckt werden. Die Zentrierklammer verbessert die Genauigkeit beim Zusammenfügen der erhitzten Materialenden. Sie wird an das Oberteil (gelb) wie aus der Skizze ersichtlich angeklebt. Zusätzliches Material: 5 Senkkopfschrauben M3x15 3 Beilagescheiben M3 3 Rändelmuttern M3 1 Zugfeder (oder Gummiband) Viel Spaß beim Zusammenbau und erst recht beim Schweißen!
With this file you will be able to print Welding Tool for PU-Belts and Filaments with your 3D printer. Click on the button and save the file on your computer to work, edit or customize your design. You can also find more 3D designs for printers on Welding Tool for PU-Belts and Filaments.