Wemos D1 Environmental Monitor
thingiverse
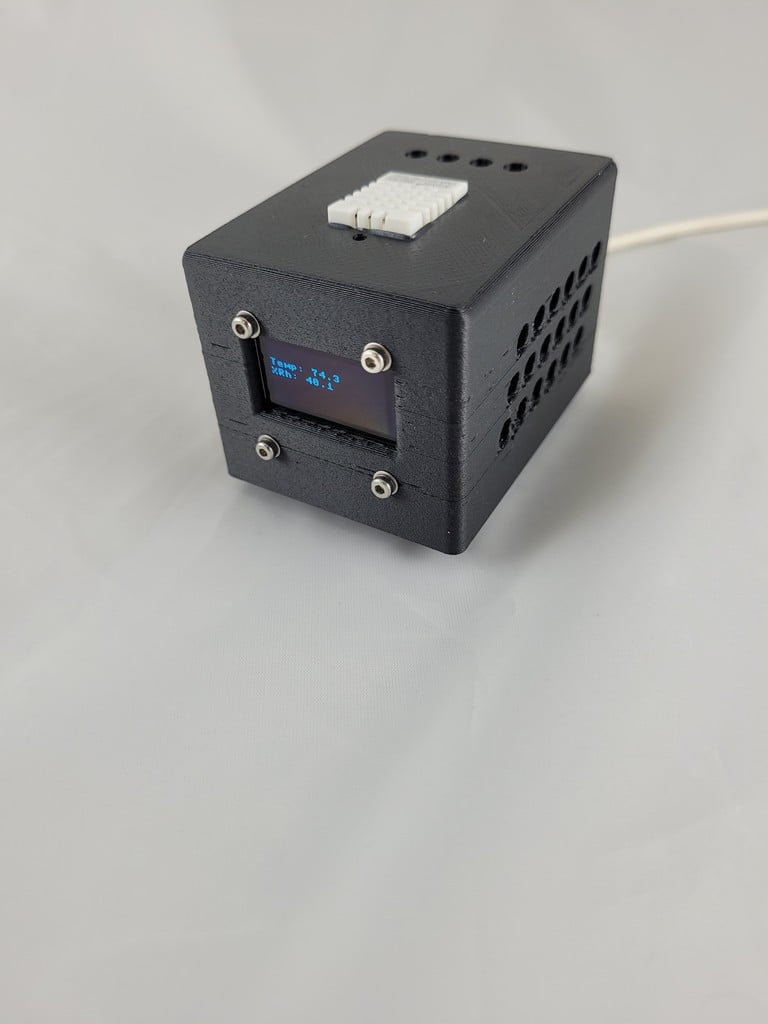
*The following is largely a copy/paste job from my [GitLab page](https://gitlab.com/jake-barbieur/esp8266-environmental-monitor). The instructions on Thingiverse should take you through the basic setup. For more information, including the Helm chart to deploy data collection and visualization, check out that page.* # ESP8266 Environmental Monitor ## Overview This project provides the code, STL files, and instructions for building a small temperature and humidity monitor. The basic version simply takes a temperature and humidity reading from a DHT22 sensor every minute and refreshes the OLED screen with that data. The STL files are designed to house a Wemos D1 Mini, but the code should work on other ESP8266 platforms as well, such as the NodeMCU. The more complex version includes a Helm chart to deploy some additional components to allow for collection of data over time as well as its display via Grafana dashboards. Deploying the Helm chart and setting up the infrastructure to do so are beyond the scope of this project. ## Tools List - 3D printer - Soldering Iron - Allen wrenches - Pliers ## Parts List - Printed part 'env-monitor-case.stl' (x1) - Printed part 'env-monitor-case-bottom.stl' (x1) - [Wemos D1 Mini Microcontroller (x1)](https://www.amazon.com/dp/B07W8ZQY62) - [DHT22 Temperature and Humidity Sensor (x1)](https://www.amazon.com/dp/B09JWLDK9F) - [.96in OLED Screen (x1)](https://www.amazon.com/dp/B072Q2X2LL) - [Breadboard with Wires](https://www.amazon.com/dp/B08Y59P6D1) *(Optional)* - [M2 Hardware - 12mm screws (x4), washers (x4), nuts(x4)](https://www.amazon.com/dp/B071KBVZVV) - *Can source anywhere, but this kit has been very useful for me* - [M3 Heat Insert Nuts (x4)](https://www.amazon.com/dp/B09KZSJS88) - [M3x8 Screws (x4)](https://www.amazon.com/dp/B071KBVZVV) - *From kit above* - Misc Wire (20-24GA) for connecting parts - Super Glue - [Blue Threadlocker](https://www.amazon.com/dp/B0002UEMZ2) (optional) ## Assembly ### Preparing the Wemos D1 Mini To run the Micropython script, the Wemos D1 Mini needs to have the Micropython firmware flashed to it. This process won't be covered in depth in this readme, as the [existing documentation](https://docs.micropython.org/en/latest/esp8266/tutorial/intro.html) is very thorough. The latest Micropython binary can be downloaded from [here](https://micropython.org/download/esp8266/). Before moving on to the next steps, verify Micropython has been installed successfully by opening a serial connection to the microcontroller using a program like Putty. ***Note: Baudrate = 115200*** #### Installing Python and Ampy [Install Python](https://www.python.org/downloads/) on your system if you don't already have it installed. Next, [install Ampy](https://github.com/scientifichackers/ampy). Ampy is an FTP-like utility we'll use for transferring files to and from the microcontroller. ### Transfer files to Wemos D1 Mini *(Note: if you're making the simple version, use the Python scripts from the 'simple-script' directory; if you're making the complex version, use the scripts in the 'monitor-scripts' directory)* Clone the repository or copy the python scripts from the appropriate directory onto your local machine. Next, using Ampy, copy each of the scripts to the microcontroller. For example, if using Windows and the Wemos D1 Mini is on COM5, the command might look like this: *ampy --port COM5 put .\simple-script\\** If using Linux and the Wemos D1 Mini is on /dev/ttyUSB0, the command might look like this: *ampy --port /dev/ttyUSB0 put ./simple-script/\** ### Build the Circuit Assemble the circuit according to the [Fritzing diagram](https://gitlab.com/chrundlethegreat/esp8266-environmental-monitor/-/blob/main/circuit-diagram/temp-humidity-monitor.pdf) found in the 'circuit-diagram' directory. It is recommended to assemble the components on a breadboard first to ensure everything works prior to mounting it in the case. Once the circuit has been tested and is providing accurate readings, solder the components together using enough wire they'll be able to be mounted in the case. The case has ample free space for extra wire. When soldering, be sure the wires come through the top of the Wemos D1 Mini to the bottom, so they can all be trimmed before mounting. ### Assemble the Case Using a soldering iron, heat the M3 heat insert nuts into the 5mm holes on the inside of the case taking care to ensure they are level. The Wemos D1 Mini should friction fit into the rectangular depression in the bottom piece of the case, but some small dabs of super glue can be used to provide additional security. The DHT22 sensor can likewise be friction fit into the rectangular hole in the top of the case. There is a hole provided to use additional M2 hardware if additional security is desired. The .96in OLED screen should be secured into the appropriate spot on the front of the case using the M2 hardware. Use threadlocker on the nuts if desired. ***CAUTION:*** It is very easy to overtighten the hardware and crack the screen; this is why threadlocker was chosen to secure this hardware over locking washers. However, since this is something that is unlikely to experience a lot of vibration, the threadlocker may not even be necessary. Insert the case bottom into the case so that the micro USB port on the Wemos D1 Mini is accessible through the hole on the case. Insert 3mm screws into the holes and tighten. ### Test At this point, the monitor unit is complete. If you're just building the simple version, you're done! If you're building the more complex version, please continue at my [GitLab page](https://gitlab.com/chrundlethegreat/esp8266-environmental-monitor).
With this file you will be able to print Wemos D1 Environmental Monitor with your 3D printer. Click on the button and save the file on your computer to work, edit or customize your design. You can also find more 3D designs for printers on Wemos D1 Environmental Monitor.