Westward 2HFR3 compartment box dividers, step dividers, and pull-out boxes with lids
thingiverse
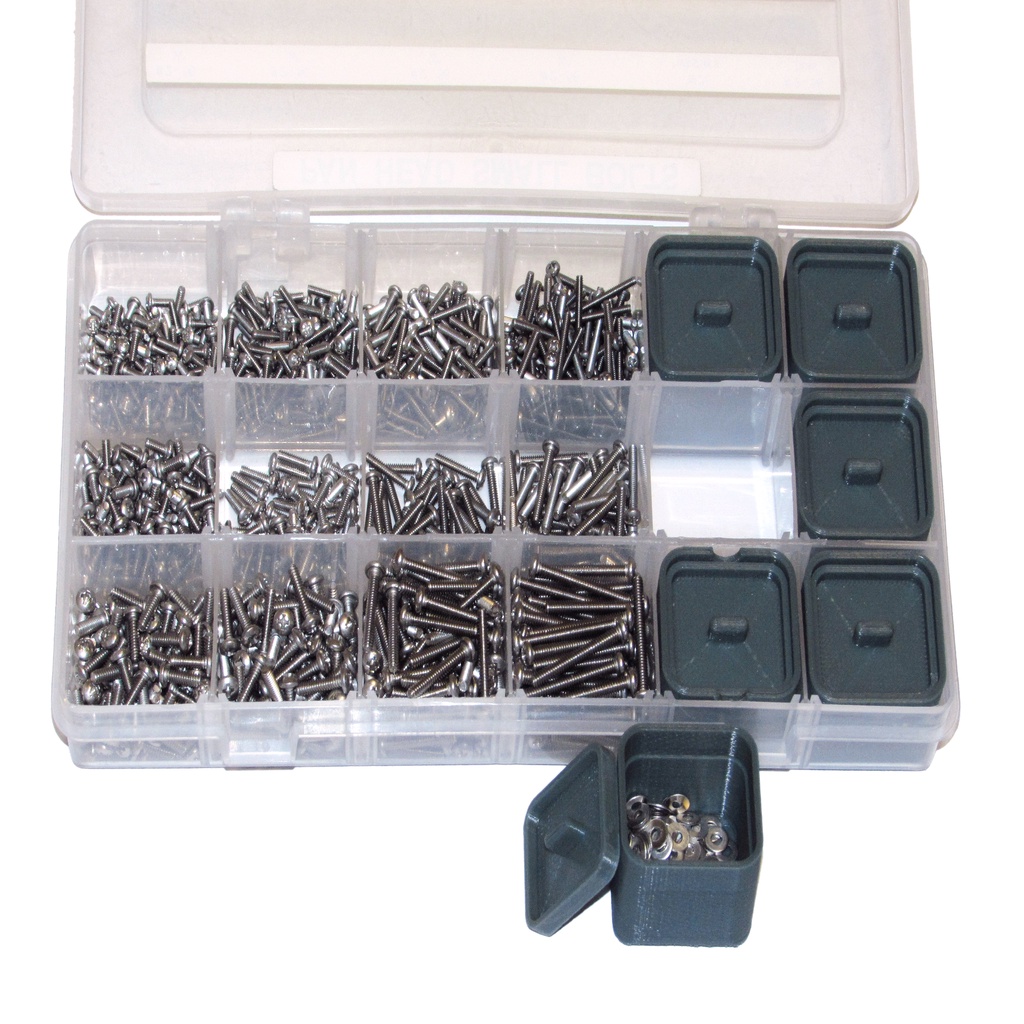
I find that small compartment boxes are an efficient way to store small screws, bolts, and nuts, along with some other small parts. This is a mobile solution too, as a nylon tool bag can fit quite a few of them (my DeWalt DCBAG3 can carry up to 20). Flambeau used to make them, but changed the design and now makes tackle boxes with different compartment sizes. They are not as good as before, in my opinion. What I buy now days are Westward 2HFR3 9" x 4.5" 18 compartment boxes that I pick up at Grainger Industrial Supply. While convenient, these boxes are not without deficiencies, some of which I will try to address with this thingiverse entry. 1. <i>Problem</i>: Black Westward logo is written across the box. It is annoying to look at, while I want to see through at the compartment content. <i>Solution</i>: Dampen a paper towel with acetone and wipe the logo off. Acetone will dissolve the paint easily without damaging the polypropylene box. 2. <i>Problem</i>: Dividers in some boxes are crooked. <i>Solution</i>: That's where I miss Flambeau's quality. Since you might not use every divider in every box, perhaps you can combine good looking dividers from several boxes. Or, just print them: STL is provided. 3. <i>Problem</i>: Sometimes, an item cannot fit neatly at compartment boundaries, and I need to remove a divider and sacrifice another compartment entirely. I wish there was a way to change the size of a compartment. <i>Solution</i>: That's what step dividers are for. See one of the pictures where long bolts (machine screws) are stored. Note how three bolt sizes can fit in one row. Without step dividers, only two sizes would fit in a row, wasting 33% of space. 4. <i>Problem</i>: Thin parts (washers, for example) slide under the dividers into different compartments. <i>Solution</i>: Use pull-out boxes as illustrated in the first picture. You can print a lid too, if needed. Note that the boxes behind the lid locks at the front of the compartment box need to have notches in order for the lid to close. <b>Printing</b> Tolerances are everything, especially with the lids. Use X-Y adjustment in the slicer software to slightly increase or decrease the size of the lid. A proper fitting lid should slide in and out with little effort, but have enough friction not to open on its own. If a lid is still slightly too tight, you may want to take fine sandpaper and rub the edges and the corners of the lid against it. I used grit 1000, but grit 400 will probably work too and is more readily available. That said, I will upload several lids, with different tolerances. For example, a lid with 0.1 mm tolerance means that 0.1 mm is subtracted from the lid's horizontal dimensions. You can test print each one to understand what do you need to start with before X-Y adjusting it. I find that for my printer I need 0.11 mm or 0.12 mm tolerance, depending on the filament. Pull-out boxes have fillets at the bottom to fit the contour of the compartment box. This is not the best design from the 3D printing perspective, but the fillets do not have to be and look perfect. Dividers can be printed up side down on a raft. <b>CAD Link</b> https://cad.onshape.com/documents/85c6304cced501c56cc5f927/
With this file you will be able to print Westward 2HFR3 compartment box dividers, step dividers, and pull-out boxes with lids with your 3D printer. Click on the button and save the file on your computer to work, edit or customize your design. You can also find more 3D designs for printers on Westward 2HFR3 compartment box dividers, step dividers, and pull-out boxes with lids.