WF81 3D Printed Woofer & Endeavour Cabinet
prusaprinters
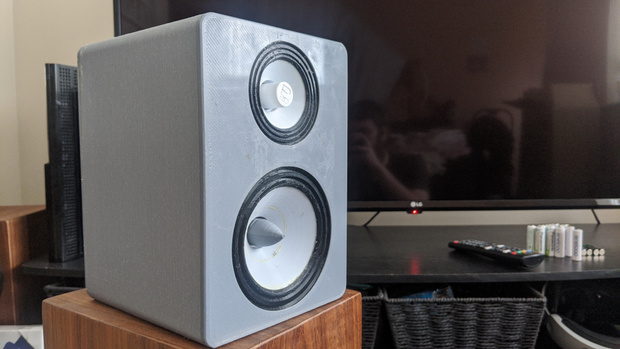
<p>Hello, and welcome to a big open source release, WF81 and its cabinet design, Endeavour!</p> <p>WF81 is a woofer to work with the FD51 series of 3D printed full range drivers to deliver more low end performance in a 3D printed design.</p> <p>WARNING: This design will require twice the amount of magnets / washers, along with a 22uF Bipolar Capacitor. Strongly suggest watching my Youtube video around this:</p> <pre><code> https://www.youtube.com/watch?v=m5tNKwmdTGU </code></pre> <p>This video gives details into why this is, along with views of how parts go together and performance data.</p> <pre><code> What do I need to make WF81 as a final release? </code></pre> <p>6M Copper wire 0.20mm suggested</p> <p>8M x 2 Copper wire 0.17mm in parallel is the alternative if you have 0.17mm wire already</p> <p>22uF Bipolar Capacitor (This acts as the crossover and is placed over the woofer wires)</p> <p>Contact Adhesive Glue</p> <p>2x 15x10mm disc magnets</p> <p>6x 15mm steel washers (Typically zinc plated)</p> <p>Do I use the dust cap or the phase plug?</p> <p>This is very much personal preference, but a flatter response is achieved with the dust cap. I however prefer the Phase plug, higher SPL on the woofer. Its subtle but there. Good thing is you can try the phase plug first the try the alternative if you desire!</p> <p>What is the suggested power handling?</p> <p>At this stage the safe region is 8<10W in music loads. Running straight 20Hz sine waves at that power may result in the voice coil softening. The PAM8403 amps will not over power this and I have been struggling to create problems on a TA2024 and YDA148 amplifiers, which achieve at best around 12W.</p> <p>Printing details below. Check out my website for more data soon, Polymate3d.com, and follow me on Twitter!</p> <p>www.twitter.com/polymate3d</p> <p>Like the work and want a deeper dive into the latest developments, and Patreon exclusive developments? Consider joining my Patreon and help steer the project to your own needs!</p> <p>Most of all, thanks for checking it out!</p> <p>Paul :)</p> <h3>Print instructions</h3><p>Normal PETG Components:</p> <p>Chassis<br/> Front Fascia<br/> Terminal mount<br/> Dust Cap (Optional)<br/> Phase Plug (Optional)</p> <p>0.15mm layer heights. 20% infill</p> <p>Vase Mode PETG Components:</p> <p>Woofer Cone</p> <p>0.4mm, vase mode, 0.15mm layers</p> <p>TPU 95A Components:</p> <p>Surround<br/> Spider</p> <p>1 Wall / Perimeter<br/> 0.4mm Nozzle<br/> 0.15mm layer height<br/> 20 top and bottom solid layers</p>
With this file you will be able to print WF81 3D Printed Woofer & Endeavour Cabinet with your 3D printer. Click on the button and save the file on your computer to work, edit or customize your design. You can also find more 3D designs for printers on WF81 3D Printed Woofer & Endeavour Cabinet.