Wheel Lacing Jig
thingiverse
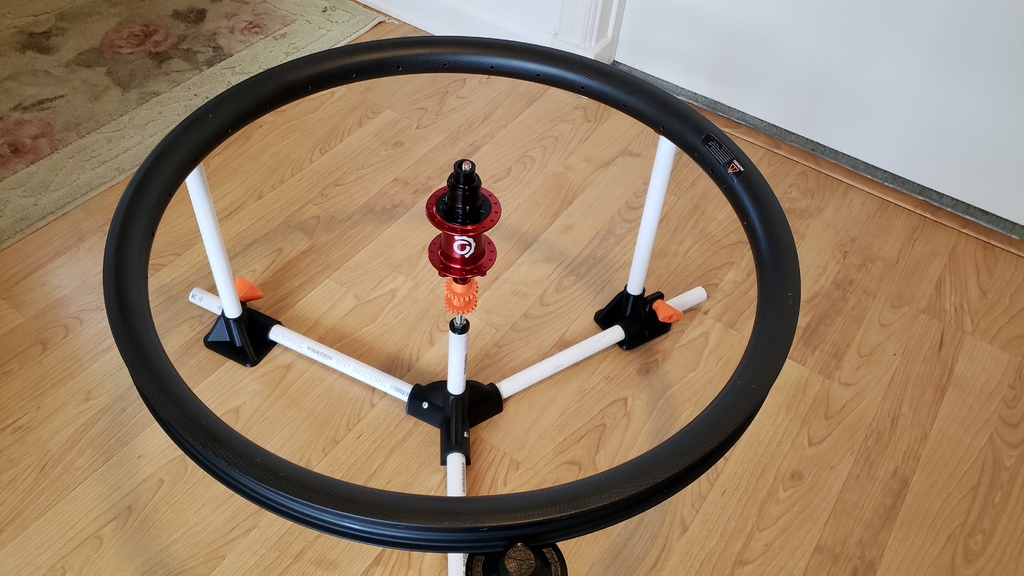
This thing was inspired by aiber and his jig: https://www.thingiverse.com/thing:3382498 which was based on the Noble jig; https://www.instagram.com/explore/tags/noblelacingjig/ . aiber's jig was a bit pricey for me for a once in a 3 year tool and the parts were not readily available. All the parts in my jig can be sourced at a Homedepot / Lowes except the 608 bearings . 608 is the skateboard bearing and can be found everywhere. All told there should be less than $15 to make this plus filament. The parts are so common that you may have scrap pvc, bolts and nuts laying around. Would I make this again? No. 1/2" pvc is too flexy. 12" of pvc feels stiff in your hand but when coupled with another 12" plus 2x 15" it flexes like a 54" length of pvc. I should have started with bigger OD pipe or square metal. Took my Anet a8 30+ hrs to print so i was not starting over. I added an inch and a retainer groove to the rim holder, a rim will not fall out the jig. It actually works pretty well. But still hoping someone else will remix this with stiffer material. Materials: 1 - 5/16" x 2' threaded rod (I cut mine too short, suggest load a wheel, then cut) 3 - 5/16" x 2" bolt (to hold bearing on pipe toppers) 7 - 5/16" nuts 3 - 1/4" flat washer (used as a bearing spacer with 5/16" bolt, make sure the hole is big enough and the washer is smaller than the OD of the bearing) 3 - 1/4" x 1" bolt (for wingnut) 3 - 1/4" nuts 3 - #8 sheet metal screw 1/2" to 3/4" in length. (use a 1/8" bit for pilot hole) 3 - 608 bearings (go ahead and get the cheapest ones you can find, no real load here) 7'3"- 1/2" pvc pipe sch40 PVC Cuts: 3 - 12" (outrigger risers) 3 - 15" (center base) 1 - 6" (center riser) My Homedepot had "Valencia" brand pipe and its what i designed around, the parts will have a slight press fit with this pipe. "JM" has a looser slip fit which is ok since gravity will hold it down but some teflon tape may give a tighter fit. Printing: I printed this in petg (pla will probably be fine) at 40% infill. I think 20% would be good enough or even 10% except for the Outriggers. They use a pinch bolt to hold the pipe and will be flexed, 40% or more would be good here. Supports everywhere. Outrigger; I found all the stress is towards the center of the jig so I made a 'Lite' version of the Outrigger that should save you 30% in time and material. Rim Holter; I recommend printing 3 'Grooved' rim holders, the ungrooved one was there just in case people did not like clicking the wheel in and out of the groove. Wingnut; The tight one is a press fit and can be a pita to seat the bolt through the hole. The looser one with a bit of glue on top to hold the bolt down might be easier to deal with.
With this file you will be able to print Wheel Lacing Jig with your 3D printer. Click on the button and save the file on your computer to work, edit or customize your design. You can also find more 3D designs for printers on Wheel Lacing Jig.