Wile E. Coyote
prusaprinters
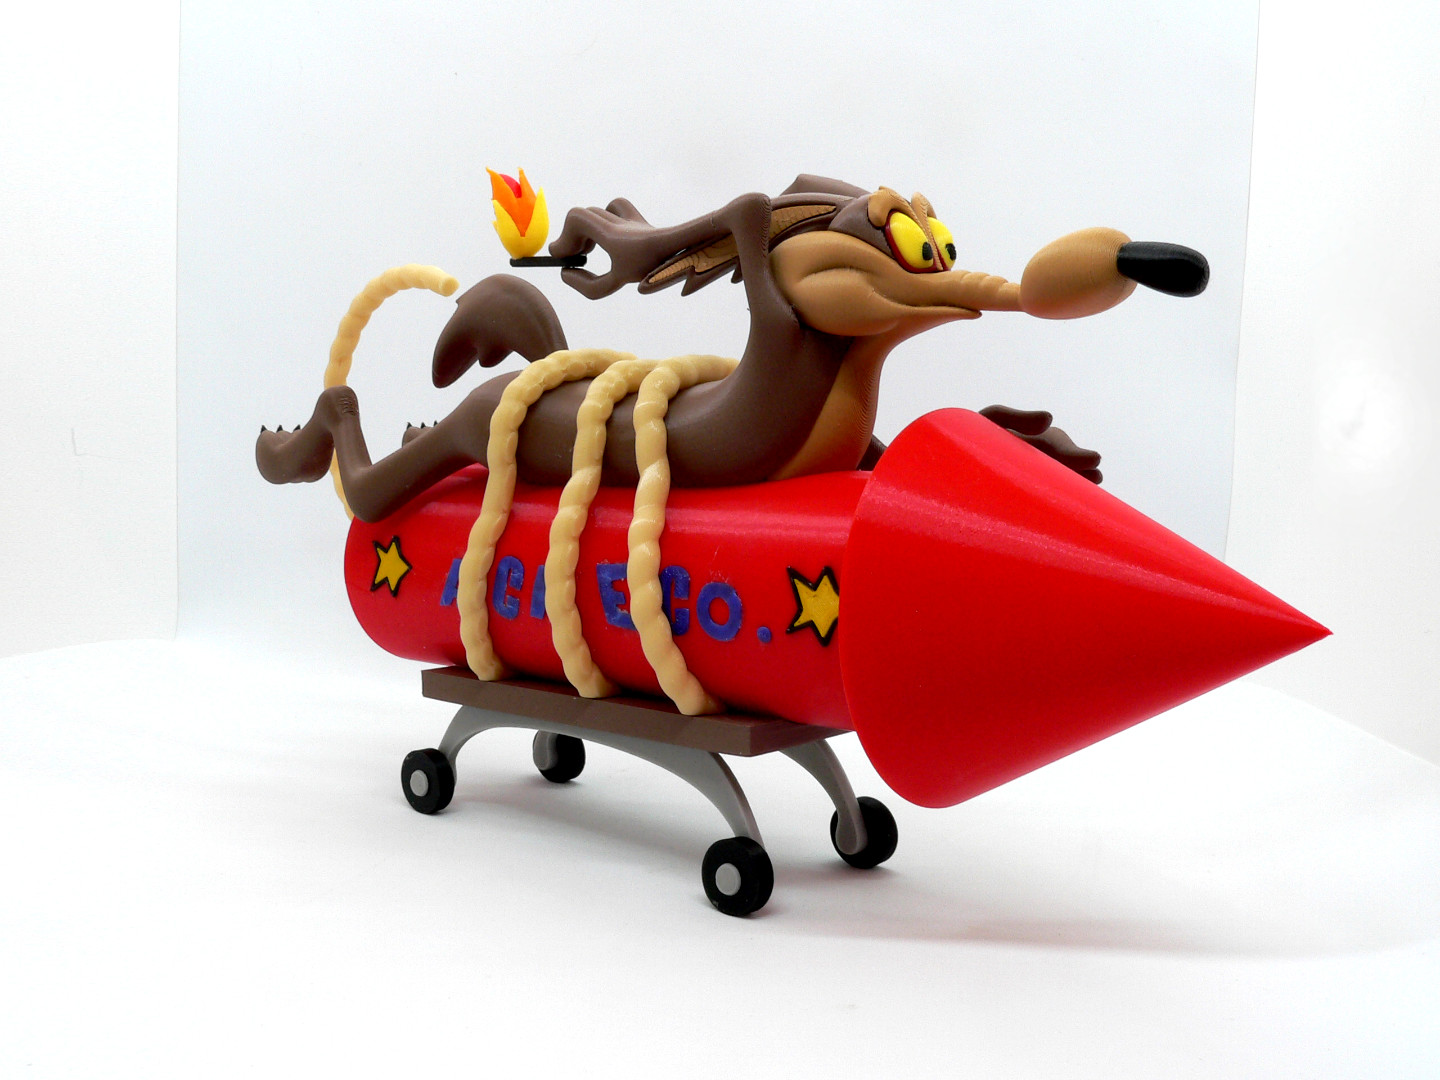
<p>Wile E. Coyote, a cartoon character in the Looney Tunes and Merrie Melodies series of short films produced by Warner Bros.</p><p>He is a cunning, devious and constantly hungry coyote repeatedly attempting to catch the Road Runner. Instead of using his animal instincts, the coyote uses absurdly complex contraptions to try to catch his prey, which comically backfire, with the coyote often getting injured in slapstick fashion.</p><p>No supports are required. One piece contains built-in supports and two other parts contain built-in braces. Optional parts without the built-in supports/braces are also supplied if you want to use your slicer supports (see notes below). If you have the proper filament colors, no painting is needed.</p><p>The assembled model is 175mm tall, 315mm long and is mostly in proportion to my previously released Looney Tunes models.</p><p>Enjoy!</p><p>...........................................................................................................</p><p>Special shoutout to maker Benoît Lussier for providing QA printing, helping me work through my mistakes and quality feedback.</p><p>...........................................................................................................</p><p>**Print Instructions:**<br>Supports: No<br>Resolution: .2mm<br>Infill: 10% (infill for body_front should be higher for strength in the arm, 20%)</p><p>Notes:**</p><p>Refer to the notes below for a few helpful printing and assembly instructions.</p><p>...........................................................................................................</p><p>**Building the model**</p><p>Colors</p><p>Black: (Paramount3D PLA - Black)<br>eyes_black_left<br>eyes_black_right<br>nose<br>cart_wheels (contains four identical pieces)<br>toe_nails (contains six identical pieces)<br>match_stick<br>star_black_back_left<br>star_black_back_right<br>star_black_front_left<br>star_black_front_right<br>..</p><p>Beige: (Paramount3D PLA - Universal Beige)<br>rope_back<br>rope_middle<br>rope_front<br>fuse<br>..</p><p>Yellow: Paramount3D PLA - Simpson Yellow)<br>flame_yellow<br>eyes_yellow_left<br>eyes_yellow_right<br>..</p><p>Orange: Paramount3D PLA - McLearen Orange)<br>flame_orange<br>..</p><p>Grey: Paramount3D PLA - Prototype Grey)<br>cart_leg_left<br>cart_leg_right<br>cart_pins (contains four identical pieces)<br>..</p><p>Blue: Paramount3D PLA - Autobot Blue)<br>acme (contains all the letters for ACME CO.)<br>..</p><p>Dark Yellow: (Paramount3D PLA - EggYolk Yellow)<br>star_yellow_back_left<br>star_yellow_back_right<br>star_yellow_front_left<br>star_yellow_front_right<br>..</p><p>Dark Red: (Paramount3D PLA - Iron Red)<br>eyes_red_left<br>eyes_red_right<br>..</p><p>Red: (Hatchbox PLA - True Red)<br>flame_red<br>rocket_nose<br>rocket_body<br>rocket_body_back (optional piece)<br>rocket_body_front (optional piece)<br>..</p><p>Light Brown: (Polyterra PLA - Wood Brown)<br>face<br>face_without_braces (optional piece)<br>ear_inside_left<br>ear_inside_right<br>eyebrows<br>..</p><p>Medium Brown: (Polymaker PLA - Army Brown)<br>cart_top<br>body_back<br>body_middle<br>body_front<br>bopy_front_without supports (optional piece)<br>ears (contains both ears with braces to make printing easier)<br>ear_left (optional piece)<br>ear_right (optional piece)<br>..</p><p>Any color: (hidden piece):<br>pin_rocket_body (optional part only needed if the two part rocket is printed)<br>pin_body (contains two identical pieces)<br>..</p><p>...........................................................................................................</p><p>**Printing and assembly tips**</p><p>Printing tips<br>1 - No supports are required. One piece contains built-in supports, body_front. An optional part without the built-in supports is also supplied if you want to use your slicer supports. The built-in supports are designed for a .4mm nozzle and for the size that the model is presented. Use your discretion for which part to use if you resize the model significantly.</p><p>2 - The right arm on body_front is a quite fragile, just below the elbow, (until the guling process which holds everything together). Be very careful when removing the supports and handling the part.</p><p>3 - Optional rocket body parts. Both a one piece rocket body as well as a split rocket body (with pin) is supplied in case your printer Z-height cannot print the one piece. My print contains the two piece rocket body, with the seam hidden by the middle rope.</p><p>4 - Optional ears parts. I tried printing the individual ears with a raft and still had a print failure due to the smallish base on the ear parts. So, I created a part that contains both ears with braces to hold them in place while printing.</p><p>5 - Face contains built-in braces to hold the part down while printing. An optional part without these braces is also supplied.</p><p>6 - There are some pieces that may need brims or rafts, use your discretion. When setting up my prints I prefer to be conservative to ensure the least chance of a print failure, especially since the base of many parts are hidden when inserted into another part. </p><p>*I used brims on:<br> - eye_right<br> - eye_left<br> - toe_nails<br> - flame_yellow</p><p>7 - When removing parts from the printer bed, it's a **VERY** good idea to place left/right parts into separate containers to help with the assembly process. Sometimes the difference between the left and right parts is very small but it is still worth keeping track of them and assembling them in their proper place.</p><p>..<br>Assembly tips:</p><p>1 - Take your time gluing the model together and enjoy the process. Dry fit all the parts and give some thought into which parts to glue together as groups and then gluing the groups together. Let the glue for each group set completely before combining groups.</p><p>2 - I used 3D Gloop and E6000 to put this model together. I am not affiliated with 3D Gloop but have experimented with different glues for my models and have found that this glue is a great option for my models. Each type of glue has different pros/cons and I found that 3D Gloop was far easier to use than superglue (for me). The E6000 sticky glue that I also use allows more time to position parts and is still the best for smaller parts. 3D Gloop covers the middle ground for me and really works wonders. It leaves enough time to set, so parts can be positioned correctly and it dries fast enough to hold awkward parts without the need for taping. I used the PLA version that comes in a tube. For both glues using a smaller amount is usually better than more glue.</p><p>3 - **important** The right ear (with insert) is inserted from below the right arm into the body_front. When glued, it should not only be glued at the attachment point but also to the arm to give the arm some support.</p><p>4 - The cart legs are taller in the front, to help tilt the model slightly upwards.</p><p>5 - The ropes should be flexible enough to be stretched to go over the body and rocket. Note that each rope is different and that they should fit all the indents perfectly, especially at the base. It a rope does not fit flush, flip it around.</p><p>6 - In order to get the flat ACME letters to glue properly to the rocket, I spread a thin layer of glue on the whole letter, placed it in position, and then used a heat tool or hair dryer (very low temp) to soften the letter enough that it could be pressed down. Note that one 'M' (right side) and one 'O' (left side) are cut so as not to interfere with the rope indent.</p><p>7 - Refer to the assembly diagrams in the pictures section as well as the uploaded pictures for putting the model together. The model is meant to be glued.</p><p>Do not hesitate to ask questions, feedback is essential to making better models.</p><p> </p><p> </p>
With this file you will be able to print Wile E. Coyote with your 3D printer. Click on the button and save the file on your computer to work, edit or customize your design. You can also find more 3D designs for printers on Wile E. Coyote.