Winding Earbud Case
prusaprinters
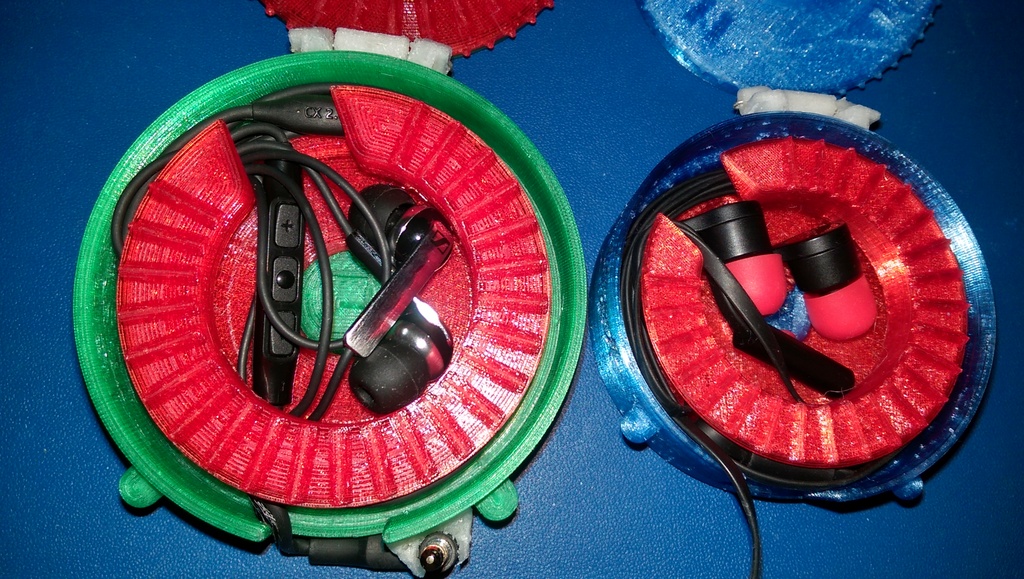
<p>A case for earbud type headphones with a cable winding system.</p> <p>Simply insert your earbuds, close the lid and wind the cable in using the free spinning wheel mounted within the lid. Finally, push the jack into the clip, and throw it in your bag or pocket for safe and stylishly contained earbuds!</p> <p>Suitable for earbuds with or without an inline control.</p> <p>02/10/2016 - Revision 2 added - features less parts for easier printing!</p> <h3>Print Settings</h3> <p><strong>Printer Brand:</strong></p> <p>RepRap</p> <p><strong>Printer:</strong></p> <p>Mini-Kossel</p> <p><strong>Rafts:</strong></p> <p>No</p> <p><strong>Supports:</strong></p> <p>Yes</p> <p><strong>Resolution:</strong></p> <p>0.2mm</p> <p><strong>Infill:</strong></p> <p>15%</p> <p><strong>Notes:</strong></p> <p>Lid: The lid will need support for the catch and hinge mounts. Print it upside down for a smooth topside.</p> <p>Case bottom: Support should be used for the catch mounts.</p> <p>Hub and nut: No support required.</p> <p>Winding Wheel: No support required.</p> <p>The catch and hinge assemblies are small and may require a raft if printing in Nylon based filaments as I did.</p> <p>02/10/2016 - Revision 2 added which has inbuilt hinges and catches. The separate part versions started to break after a few months of use, so I decided to make them part of the solid.</p> <h3>Post-Printing</h3> <p><strong>Assembly</strong></p> <p>Print the parts in your choice of material - I choose Taulman3d T-Glase for the examples in the photos. For the catches and hinge assembly I used Taulman3d Alloy 910 to give me lots of strength and a bit of flexibility.</p> <p>I've also printed these in both PLA and ABS for all parts with no issues.</p> <ol> <li>Install the hub into the bottom base - it should click into place on the retainer and spin freely.</li> <li>Push the hub post into the hole of the winding wheel - it should spin freely, and not catch on the thread of the hub post. If it does, remove some material from the centre hole of the winding wheel until it spins freely. The winding wheel teeth should point downwards, and the indent in the top of the hub post in the opposite direction to the teeth.</li> <li>Insert the hub post with the indent at the top, into the lid and screw it in until its solidly mounted - leave around 3mm poking out - when operating the winding wheel, you will rest your thumb in the indent.</li> <li>Screw the flat nut onto the hub, trapping the wheel in the middle. Ensure that the wheel spins freely, and once you're happy that nothing will fall out, put a dab of Superglue over the nut where it meets with the hub post.</li> </ol> <p>Gorilla Superglue works well with Taulman3D materials although it takes a few hours to fully cure - warning: It will stay wet for at least 3 hours, so don't move the part until it's cured! 5. Attach the two catches on either side at the front of the lid, and the larger hinge part on the rear of the lid. Again, Superglue will make this very durable. (Not required for revision 2) 6. Once the glue has set on the lid parts, place the lid on the case bottom and line up the catches with the posts on the case bottom. 7. Using some solid wire (I cut a leg off a resister), push the wire through the small hinge mounts with the larger hinge part in between them. Make a very small loop on either end to stop it falling out. 8. Glue the two hinge mounts either side of the larger hinge part, making sure you DO NOT glue the larger hinge part to either the mounts or the case bottom. (Not required for revision 2) 9. Choose the best place to mount the headphone jack clip and glue into place. Please refer to the pictures for my suggestions depending on the type of jack. (Not required for revision 2)</p> <p>Scaling: The model as is in the STLs will accommodate most types of earbuds, however it can be scaled down as much as 30-35% for smaller sets.</p> <p>If you use earbuds with an inline control, such as the ones shown in the pictures, the standard STL size is about as small as you can get away with. The larger Green/Red version is scaled up by 17% to accommodate a very large in-line control used on my Sennheiser earbuds. This is still small enough to fit into a coat pocket.</p> <p>Revision 2 is scaled to 15% of the original size - I've found this to be the most versatile size without it becoming too bulky.</p> <p>A couple of points if you decide to re-scale:</p> <ol> <li>I only scaled in the X/Y direction so that the case didn't get too bulky.</li> <li>Don't rescale the jack clip unless your jack measures much greater than 6.3mm on the plastic housing. (Not required for revision 2) This measurement using Alloy910 gives me enough flex to push the jack in and still have it hold firm.</li> </ol> Category: Containers
With this file you will be able to print Winding Earbud Case with your 3D printer. Click on the button and save the file on your computer to work, edit or customize your design. You can also find more 3D designs for printers on Winding Earbud Case.