Window Screen
thingiverse
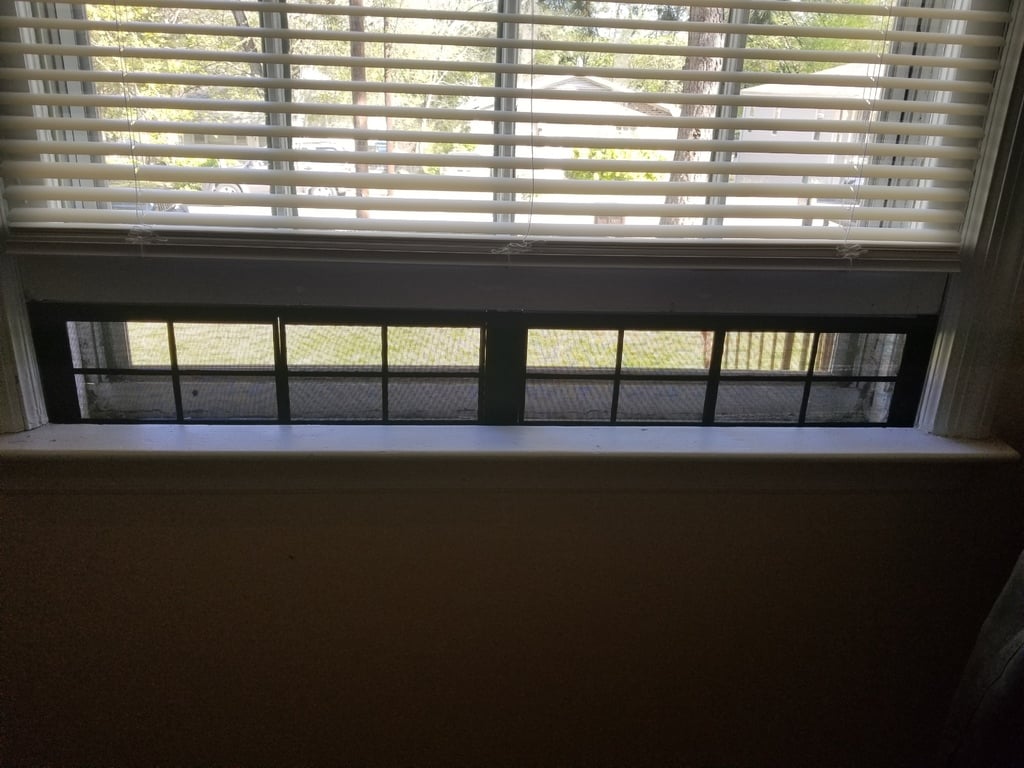
My current residence does not have any window screens or anything available to allow cool air to blow through the house. Being a tenant, I cannot modify anything without approval - which would also be costly. I developed this window screen to that I can have it sit in the window sill, while still allowing the window open. This has prevented bugs and critters getting in, while enjoying the evening breeze. This design is based on six components. The interconnecting keys (2 length sizes), end pieces (left & right), mesh window, and middle piece. The end and middle pieces are 1/16" taller than the window pieces, so that they can take the weight of the physical window. I placed weather stripping across the top of the mesh windows to accommodate for this gap and ensure no bugs could still enter. The mesh is printed in place by pausing the print on the middle layer of the frame. It is important that the preceding top and bottoms layers where the netting is placed should be a solid infill/layer. Otherwise, when you peel the print off the bed, it may de-laminate. Physical design: The internal dimensions of my physical window was 39.75", the design of these components are based on this information. However, I designed the whole assembly to be 39.625" to allow for expansion/ease of insertion. You will need to scale your components accordingly. Mesh screens: 6" tall and 9" long. The channel for the key is 1.5" long End pieces: 6.0625" tall and 1" wide. The channel for the key is 0.75" long Middle piece: 6.0625" tall and 1.625" wide. Keys: 0.24" x 0.24" The code I used for pausing at the desired layer, add this custom g-code at your desired layer: G92 E0.0 G1 E-3 F3600 G1 X0.000 Y200.000 E0; parking position M17; turn on steppers* M104 S0; set extruder temp to 0 M140 S0; set bed temp to 0 M1 PAUSED; stop and print message G28 X Y; home X and Y* M190 S75 ; set & wait for bed temp M109 S255 ; set & wait for extruder temp G1 E3 F3600 G92 E0.0 Assembly: - Use the 2.5" key to connect the mesh window to end/middle pieces. - Use the 3" key to connect mesh window to mesh window. - Place super glue in joints, insert key, then push and hold connecting pieces together. - Place weather stripping across the top of the the mesh window. Materials: Screen mesh: https://www.lowes.com/pd/Saint-Gobain-ADFORS-Small-Insect-3-ft-x-7-ft-Black-Fiberglass-Screen-Mesh/999908963 Weatherstripping: https://www.amazon.com/Stripping-Windows-Self-adhisive-Soundproof-Insulation/dp/B07DDD6N3R/ref=sr_1_9?dchild=1&keywords=weather+stripping&qid=1586120358&sr=8-9
With this file you will be able to print Window Screen with your 3D printer. Click on the button and save the file on your computer to work, edit or customize your design. You can also find more 3D designs for printers on Window Screen.