WIP Cheaper Gameboy Nano - Raspberry Pi Zero
thingiverse
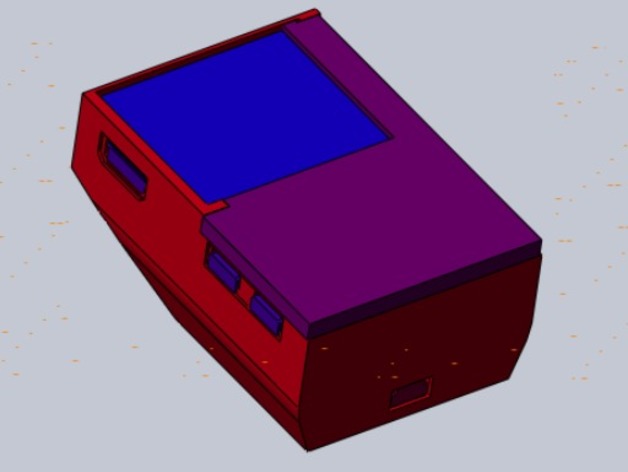
NOTICE: Work on this project is currently suspended until the SPI screen becomes fully functional. Read more about it here. WORK IN PROGRESS (WIP): Not all files have been uploaded, pictures are outdated, and additional details are still being added. The button panel prototype remains incomplete. As of 5/26, despite numerous attempts, I have not successfully utilized this screen to play games or use it as a display. However, I can send images and text through it. For more information, visit: https://www.raspberrypi.org/forums/viewtopic.php?f=44&t=143815 This project is a remix of Rasmushauschild's Game Boy NANO, utilizing affordable components from Chinese ecommerce sites to create a device that costs as little as $35, roughly the same price as the original Raspberry Pi. With upgraded storage and charging capabilities, the total cost can reach up to $60. You can source your parts from various suppliers, but I obtained most of mine from aliexpress.com. Preliminary tests suggest that despite its low resolution, this device could be used to play older games like arcade, NES, Gameboy, and similar titles. School will conclude next week, allowing me to dedicate more time to this project. A video showcasing one of my initial test runs can be found here: https://youtu.be/DjBTgE7AdzY (Note that this is a demonstration of sending commands to the screen, not from the actual console). The TFT LCD screen used in this device is identical to the one employed by Rashmushauchild but utilizes a different board and costs significantly less. My current focus is on getting the driver to work properly. I selected the battery for its compact size, which is almost identical to that of the Pi Zero, yet still provides enough power to sustain it for at least 2-3 hours. During testing, I successfully ran the device for over 2.5 hours with the screen enabled, Wi-Fi adapter plugged in, and the Pi running updates (max CPU) for most of that time. Tools needed: - 3D printer - Soldering iron - Hot glue gun - Small flathead screwdriver Parts list: - 1.44 inch SPI TFT with black board (the red board may work, but it has not been tested; I recommend purchasing the black version for safety: http://goo.gl/gaNI1B) - Raspberry Pi zero - 1000ma Lipo Battery (similar to http://goo.gl/C9mSdb) - Lipo charger/regulator all-in-one. I will soon upload adapted cases for three different types of chargers: a cheap Chinese model, an expensive Adafruit balancing charger (https://www.adafruit.com/products/2465), and an older, cheaper option from Adafruit (https://www.adafruit.com/products/259). - Micro SD card with Raspbian - Small slide or rocker switch (multiple versions will be uploaded) - USB OTG adapter - A means to connect to the Pi Zero (TV+Keyboard, USB Wi-Fi adapter, USB Ethernet, other pi, etc) Instructions: Coming soon, once this project is completed. Print Settings Rafts: Doesn't Matter Supports: Yes Resolution: 0.1-0.25mm Infill: ~15% for thicker parts; use 100% infill for shells. Note that pictures shown were printed with a 0.25 layer height at 15% infill on a Makerbot Mini, but the shell was printed horizontally due to vertical printing causing weak walls. Lower layer heights will improve aesthetic appeal but take longer. ABS is recommended over PLA if available, as PLA supports are harder to remove and can lead to part breakage.
With this file you will be able to print WIP Cheaper Gameboy Nano - Raspberry Pi Zero with your 3D printer. Click on the button and save the file on your computer to work, edit or customize your design. You can also find more 3D designs for printers on WIP Cheaper Gameboy Nano - Raspberry Pi Zero.