Work Light/Coolant Mount, Grizzly G0758 Milling Machine
thingiverse
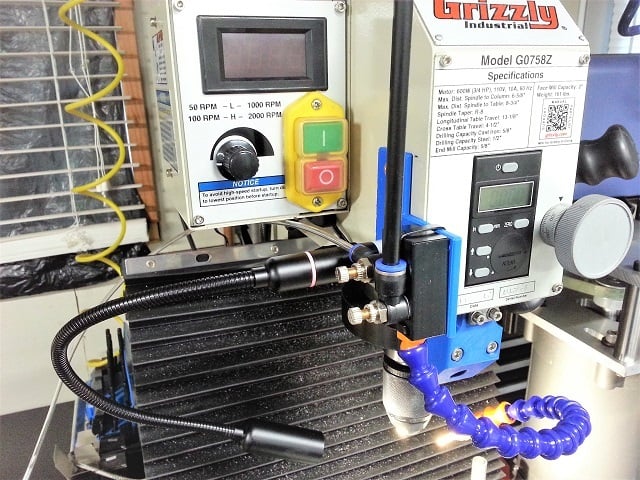
A mounting bracket for installing a flex work light and coolant system on a Grizzly G0758 milling machine. No drilling required, but requires the removal of the chip guard assembly and minor modification of the wiring. The bracket could also be used to mount a flex arm safety shield. Two models are provided; with and without the coolant block mount. The lamp that I used is an Aglaia 4W LED touch-control lamp that has a clamp base which I removed. A longer M6 x 20mm screw is required to mount it to the printed bracket, and the non-conductive bracket prevents the light from turning on or off when touching the bare metal parts of the mill. The coolant system shown in the photo is an OriGlam mist coolant system. It is attached with two M5 screws and nuts, or with two plastic ties (which resists torque better than with just the two screws along the bottom edge). 1. Turn off the milling machine and unplug the power cord. 2. Remove the two M5 screws that secure the chip guard assembly to the side of the milling head. Save these screws for use with the new bracket. Disconnect the two spade connectors from the safety microswitch inside the chip guard mount and remove the guard assembly. 3. Remove the four screws that secure the control panel to its enclosure. Carefully lower the control panel and let it hang by the wires as shown in the photo. 4. Unclip the chip guard wiring harness from under the milling head. Inside the control box, locate the inline terminal splice connecting a black wire to the brown wire from this harness and disconnect the brown wire of the harness from this splice. 5. The blue wire of the harness will connect the power switch to the splice, thus bypassing the microswitch. Make sure that there is enough of the blue wire to reach from the power switch to the inline terminal splice and cut the blue wire as shown in the photo. Remove the chip guard wiring harness from the control box. Strip 5/16" of the cut end of the blue wire, tin the wire, and connect it to the inline splice where the brown wire used to be. 6. Check that all connections are seated, tuck wires, and replace the control panel and four screws. Verify operation of the mill. 7. Install the plastic isolating washer on the lamp base. This washer comes with the lamp and is used to isolate the metal clamp from the touch base. The washer provides extra surface area for the base, and prevents the M6 screw from pinching the wiring in the lamp base. Attach the lamp to the bracket with the M6 x 20mm screw. 8. Attach the lamp/bracket assembly to the side of the milling head using the two M5 screws that originally secured the chip guard assembly. The protruding portion and head of the M6 screw should pass through the hole originally used for the wiring harness. Route the inline lamp power switch and power cable over the quill lock lever and then up and over the upper Z-axis lock lever. Also shown in the photos is the G0758 spindle lock: https://www.thingiverse.com/thing:2817068
With this file you will be able to print Work Light/Coolant Mount, Grizzly G0758 Milling Machine with your 3D printer. Click on the button and save the file on your computer to work, edit or customize your design. You can also find more 3D designs for printers on Work Light/Coolant Mount, Grizzly G0758 Milling Machine.