Workbench LED Lamp Mount
thingiverse
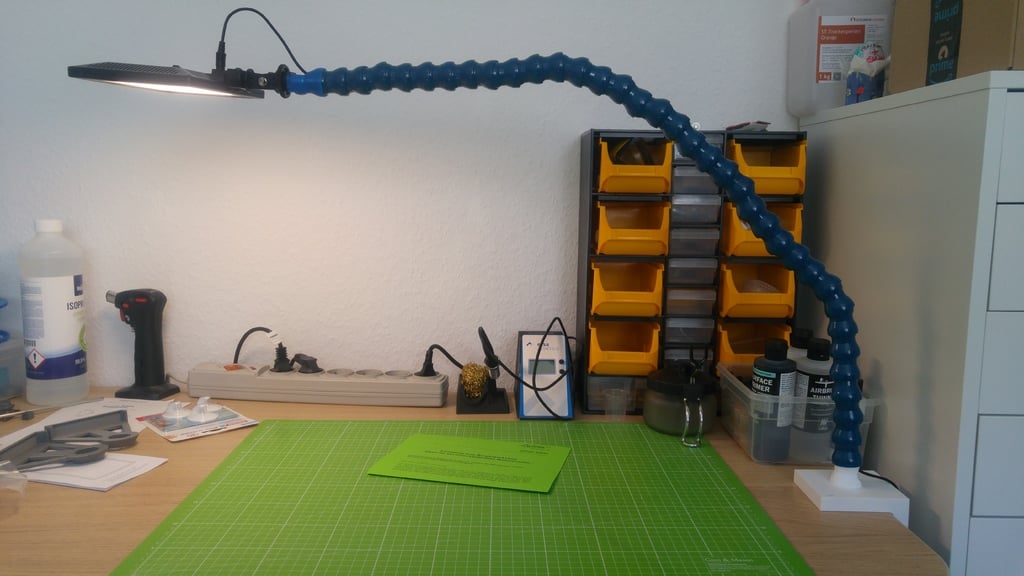
Updated: **January 21th, 2020 22:35 UTC+2** **Changes** - _Added Fusion 360 Files (*.f3d)_ - _Referred to a remix made by [madebymonkeys](https://www.thingiverse.com/madebymonkeys)_ **Have you already printed one?** _(Update)_ If you ran into issues with the cold shoe, then you should have a look into the remix made by [madebymonkeys](https://www.thingiverse.com/madebymonkeys) -> [LED Lamp mount for Loc-Line 3/4 inch x 3 inch Ball Socket](https://www.thingiverse.com/thing:4079188). Thanks for this remix! **Introduction** Do you know this one? [Adam Savage's One Day Builds: Custom Workbench LED Lamp!](https://www.google.com/search?q=Adam+Savage%27s+One+Day+Builds%3A+Custom+Workbench+LED+Lamp!&oq=Adam+Savage%27s+One+Day+Builds%3A+Custom+Workbench+LED+Lamp!&aqs=chrome..69i57j69i61&sourceid=chrome&ie=UTF-8). Well then here you have a tableclamp and a cold shoe. (You'll need some additional parts to build the actual lamp. Please watch the video and pay attention to the video description.) What else do you need? The Loc-Line cooling hose. How long? Well that depends on your needs. Do you want the more adventurous way by printing your own loc-line? Look down below in the "*Printing 3/4" loc line parts*" section where you'll find a link for them. I don't recommend this and you do it on your own! First five pictures are the new ones. STL files with *_3_4.stl are the ones you're looking for. ~~Update~~ My clamp broke just when I was finished with the assembly. So I had to strengthen my clamp design. Basically I've added some more meat (instead of 10 mm it's 15 mm thick). I've added some new pictures. It works so far. FYI: I had to put 2 5 mm aluminium rods inside the loc line elements in order to hold the LED lamp when it's put horizontally. _Keep in mind that those rods need to be bendable by hand!_ **Printing 3/4" loc line parts** ---------------------------------- I attached the 3/4" loc line elements to the clamp and the cold shoe. And yes.. I bought 3/4" loc line of the shelf. It can support itself and needs a lot more force to be bended. If you still want to print your own loc line, I used the models from [MinyMan644](https://www.thingiverse.com/MinyMan644) found here -> [Loc-Line Fittings (1/4", 1/2" and 3/4")](https://www.thingiverse.com/thing:3268462). _I strongly recommend buying loc line instead of printing it by yourself! I'm not sure if there is a way to print decent loc line elements by just using PLA or PETG. I guess you need to use TPU or a similar plastic like the original loc line parts. So you'll get more friction between the single elements._ If something goes wrong, please tell me! Have fun with this thing The white clamp shown on the pictures represents the last version! **INSTRUCTIONS** ================ You'll need to add custom infill settings for some sections. I recommend to add 25-35% infill for the threads and their base of the "head" (the thing that pushes against the table) part of the big screw. 25-35% also apply to the bottom of the loc line sitting on the clamp. Don't forget to apply this for the whole section of the clamp where the loc line segments sits. You should increase the infill for the whole loc line segment with cold shoe. * The clamp was printed on it's back. Added supports for the loc line segment and the threaded hole. I've added a OBJ file for supports based on a load simulation in Fusion 360. In Slic3r PE you add a modifier based on this OBJ file. Infill 50% works for me. The cold shoe was printed with a 100% infill modifier. *Additional Note: IMHO It should be a better solution if you print the clamp laying on the side. So when you look on your heatbed from above it looks like a "C". The layer lines will then provide more strength. My first clamp broke along those lines. This could happen for me again because I printed it on it's back. So I'll print it as i mentioned above if it breaks.* * The screw was printed upside down and the screw head with it's big part on the heat bed. You **don't** need supports for the threads! They print very well without. * Last but not least, the loc line segment with cold shoe was printed standing upright. Yes, removing the supports will be tricky but I needed it to get the advantage of the plastic strands going circular.
With this file you will be able to print Workbench LED Lamp Mount with your 3D printer. Click on the button and save the file on your computer to work, edit or customize your design. You can also find more 3D designs for printers on Workbench LED Lamp Mount.