Working ball robot
thingiverse
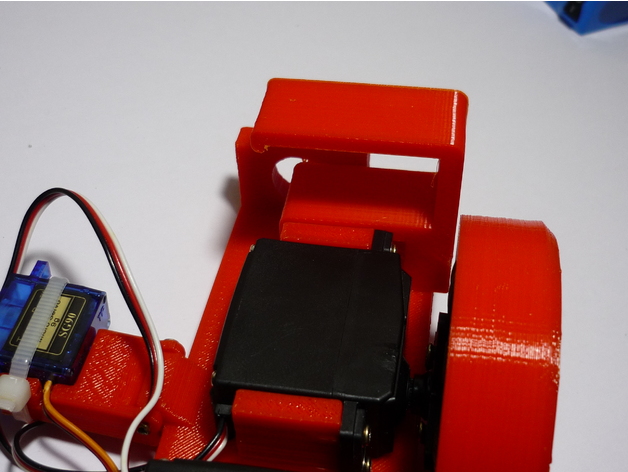
This is a 160mm wide ball robot prototype, which uses two modified servos as motors, an Arduino and a Bluetooth module for control, and a completely 3D printed frame. I will soon complete full instructions. If you want a smaller robot, check my version 2 here: http://www.thingiverse.com/thing:1458520 More projects can be found at https://juangg-projects.blogspot.ca. Print Settings: Rafts: No Supports: No Resolution: 0.3 Infill: 60% or above for the ball and 20-30% for the rest. Notes: I printed it with PLA, but ABS should work well. If printing with ABS, be careful with wrapping or the two sides of the ball won't fit properly. Instructions: 1) 3D printed parts: Print all of them, except the magnet support, where you have to choose between the simple one or the V2, which includes a servo. Also, you can print the central part of the sphere in two halves or all together. I printed all the parts (except the head) at 0.3 mm layer height, but 0.2 works well. Please use high infill for the ball, especially side 1 and side 2 (60-80%). 2) Non-3D printed parts used: Two modified Futaba S3003 servos or any standard servo modified for continuous rotation. One 9g micro servo Some magnets (I took one from a hard disk and the others from a magnet game, but use whatever magnets you want) 2x10mm wood screws for the internals 3x15mm wood screws for the ball Some zip ties Plastic glue (I used super glue) Some 6mm plastic BBs Control Board: Arduino Nano L293D motor driver Hc-06 Bluetooth module MPU 60-50 (I haven't tried it yet) USB connector 5-volt battery (any external phone battery will work) 3) The assembly: Sphere: The two halves of the central sphere (If you have printed it in one time, obviously skip this step). Glue them together. Put some weight on it. Screw the two sides to the central part. Sand it until it's smooth. Note where each side goes and in what position. Internals: Parts needed: Place the two modified servos in their place. Screw them in place. Attach the flywheel. Parts needed: Fix the magnet to the servo with zip ties. Screw the micro servo to the support. Add another zip tie. Fix it to the internal frame. Screw it to this side. Head Support: Parts needed: Place four BBs on their holes. Push them down until they go through their hole. With that result, Place the BBs again and cover it with that piece. Put your magnets there. Glue it to that. Add a cable to secure that cover or simply glue it. Remember to put the smooth side facing down.
With this file you will be able to print Working ball robot with your 3D printer. Click on the button and save the file on your computer to work, edit or customize your design. You can also find more 3D designs for printers on Working ball robot.