Working Stargate Mk2
thingiverse
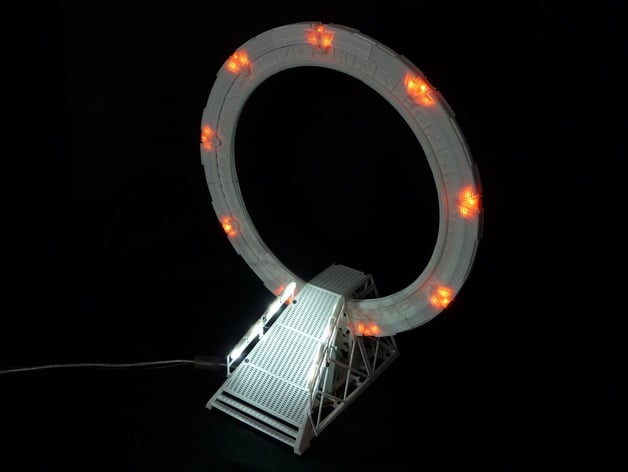
Estimated print time is 112 hours. There are 117 parts. This stargate model contains additional pieces to move the top chevron as part of the dialling sequence. Note: The model is slightly larger than the Working Stargate Mk1. Therefore the SGC base on this model will not hold the Mk1 gate firm. Please use the SGC Ramp for Working Stargate Mk1 http://www.thingiverse.com/thing:1603663 Due to the additional parts for the moving chevron. The space for wires and LED's is much less. I have used surface mount LED's in the model. Two stepper motors are required for the model. Since the two motors face each other, I have used mounting brackets. If you intend to use a different size motor, you only need to customize the 'stepper_mount_x2.stl' file and not the base. Besides the Arduino and Adafruit Motor Shield, there is also an optional bracket for an additional circuit board. I have used an additional board to mount the resistors and transistors for the LED's. The "x" number on the end of the filenames indicate how many times that part should be printed. For instance, "gate_1_a_x8.stl" should be printed eight times. There is a choice of three types of chevrons. "chevron_1" is on piece which can be printed as opaque or transparent. "chevron_2" is three pieces. "a" should be printed opaque and "b" as transparent. "chevron_3" is three pieces, but is dependant on the print quality. "a" should be printed opaque and "b" as transparent. In my experience, only the "chevron_4_x9.stl", "rail_l_1_x1.stl" and "rail_r_1_x1.stl" needed to be printed with supports. Two Arduino scripts are included. "stargate_mk2_full.ino" includes dialling, calibration and light display. "stargate_mk2_dial.ino" includes only dialling and calibration. Please see the youtube video for a complete assembly guide.https://youtu.be/6X2FbyxViao Videos of the Stargate in action Seven symbol address for Abydoshttps://youtu.be/Kvjv6q3YDGc Eight symbol address for Asgard homeworld.https://youtu.be/6TiuwvPgPVY Nine symbol address for Destiny with wrong ninth symbolhttps://youtu.be/Wdfw2u-thgw There are eight videos on my youtube playlist.https://www.youtube.com/playlist?list=PLv5wdS9O16OsT9xOpAUaj0T6JiPvgujXB Edit 15th Jan 2017 Some of you have contacted me or commented here about problems slicing the parts. Although all the files worked in Makerbot Desktop, they didn't all work in other programs such as Slic3r. Producing files that worked in both Makerbot Desktop and Slic3r was slightly more challenging than expected. Files fixed in Slic3r didn't all work in Makerbot Desktop or still had errors when re-imported into Slic3r. An unlikely application came to the rescue. Files fixed in Microsoft's 3D Builder (included in Windows 10) worked in both Makerbot Desktop and Slic3r. I've run all the files through 3D Builder, even the ones without an issue. If you've had an issue slicing the files then please download the new ones and try again. Comment here or contact me via my website if you have further issues. Note: The smaller file size is expected as the files are now in binary not ascii format. Estimated print time assumes standard quality with raft on Makerbot Replicator 5th Generation. Custom Section Electronics By popular demand. Here's my electronics parts list. Please see the reference circuit diagram. Note : Components can be swapped with equivalents. Also, LED and resistor values will need to be adjusted appropriately. 1 x Arduino 1 x Adafruit Motor/Stepper/Servo Shield for Arduino 2 x Adafruit Stepper motor - NEMA-17 size - 200 steps/rev, 12V 350mA (one stepper could be replaced with a servo). 27 x Kingbright KPT-1608SECK 2.1V 20mA 8 x Broadcom ASMT-YWB1-NGJB2 - 3.2V 60mA 1 x Lumex SLX-LX5093UWC/C - 3.4V 23mA 10 x BC548 NPN transistor 9 x 220 Ohms resistor 8 x 150 Ohms resistor (150R) 1 x 10K Ohms resistor 1 x 10.2 Ohms resistor (10R2) 1 x Photoresistor / light dependent resistor (I used one from the Arduino starter kit)
With this file you will be able to print Working Stargate Mk2 with your 3D printer. Click on the button and save the file on your computer to work, edit or customize your design. You can also find more 3D designs for printers on Working Stargate Mk2.