worlds first functional rc supercharger
thingiverse
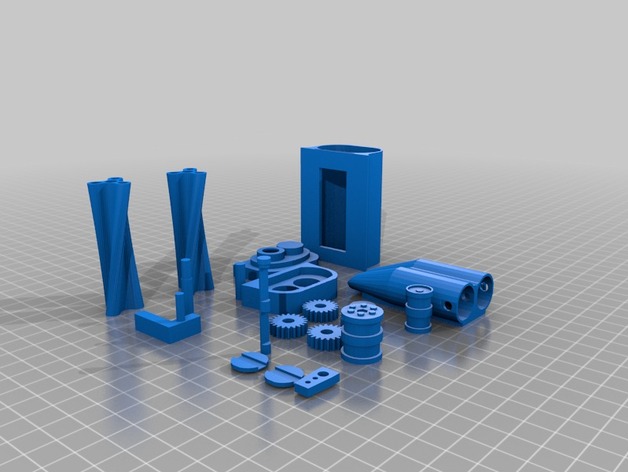
Complete WORKING supercharger. I modeled 100% of everything! only things that need to be bought are 4 ball bearings with: O.D 12.7mm (-1/2") I.D 4.8mm (-3/16"). if it is assembled correctly, it should push air. I have made 2 complete blowers and they both push air! MY OWN PERSONAL DESIGN, ANY RE-DESIGNS ARE RE-MAKES AND ARE COPIES OF MY DESIGNS! Print Settings Printer: XYZ Da Vinci Jr. Rafts: No Supports: No Resolution: high Infill: 20-50% How I Designed This The design is all based on my dad's 6/71 blower on his 1929 ford. came up with the idea and slowly modeled it and after numerous fail prints, i got it right! Instructions of build Steps to assemble YOU NEED All printed parts 4 bearings (O.D 12.7mm (-1/2") I.D 4.8mm (-3/16"). An electric drill with adjustable chuck. Superglue Once printed: Take all 4 pins and push one bearing onto each pin to the end of the pin. Then push the gear to each pin. The bearing for the pulley pin goes to roughly halfway. * Push the end of the pin with the gear NOT THE BEARING into each end of a rotor. Adjust the gear and bearing if needed for the gear to be pressed up against the rotor. Once the bearing and gear are in the correct location, remove the pin and superglue the gear to the pin and both the gear and the pin on/into the rotor. DO NOT SUPERGLUE THE BEARING IN CASE IT NEEDS TO BE REMOVED! * Once the rotors are finished, push one end into the back casing. It will be a tight fit and it should be removable if needed. Push the front face plate on and try spinning the rotors to see if they spin correctly. If they spin a little and stop, that's fine as well as spinning fully. * Remove the front face plate and slide the casing over the rotors and reattach the front plate and try spinning them. If they touch the sides, it is normal as they need to be literally broken in as well as the gears. If the bearing remains inside the casing, that means they are a good fit. DO NOT PULL THEM OUT. ONLY IF YOU ARE CHANGING THE WHOLE CASING. * Superglue the casing to the back face plate and also the front face plate. Attach the pulley pin into the chuck of the drill and pull the trigger. It should shake at first, but it's breaking in the rotors and gears. The pulley pin should spin very easily now. Which brings to the last step, supergluing the pulley to the pin and the tensioner pulley and bracket to the face plate. Slide the scoop shaft into the holes given into the scoop. ONLY GOES IN ONE WAY * You may need to drill out the hole a little to make it fit properly. * Superglue the shaft arm to the side of the shaft (smaller side not the bigger side) Test and see if the shaft rotates easily, if it doesn’t, drill out the holes a little bit bigger. If you want to print out some eyes, do so and stick them on now. * Glue the butterflies (round inserts) onto the flat face of the shaft inside the scoop. Last step, glue the back half the scoop to the front and it is finished. You can glue the scoop to the blower if you would like. *
With this file you will be able to print worlds first functional rc supercharger with your 3D printer. Click on the button and save the file on your computer to work, edit or customize your design. You can also find more 3D designs for printers on worlds first functional rc supercharger.