Worm Gear Lathe Tool
thingiverse
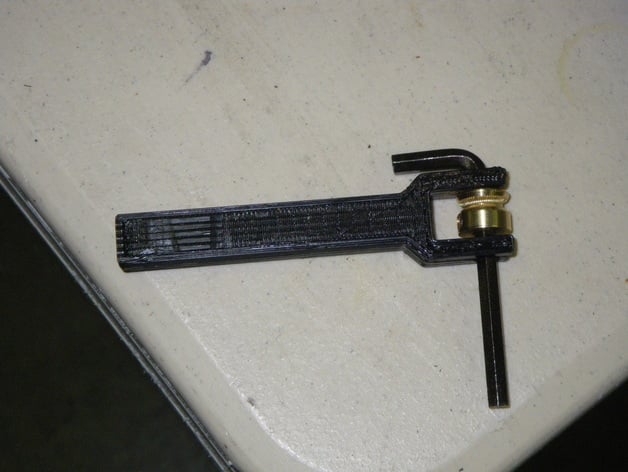
I decided that the timing belt gear in my plastruder was just too unreliable, so I wanted to try out a worm gear drive cog like I'd seen others have good success with. I have a cheap 9x20 lathe and a tap set, but I was missing something to hold the gear blank to the tap while letting it rotate. So I fabbed one. This isn't a robust thing, but it's good enough, and I've been able to make several small brass worm gears with it. Instructions Print tool with fairly solid infill. Dip the fork in acetone for just a second to make sure the layers bind to each other. Let re-harden overnight. Carefully ream out hole with 15/64's drill bit. Prepare a worm gear blank by lathing a brass or steel rod to 0.5 inches outside diameter. Make a flat bottomed groove right near the end, with angled walls. Like thus: \_/ Make the bottom of the groove be 0.4 inches diameter. Try to make the groove fit a 3mm 0.6 pitch tap snugly. Bore a 15/64 inch (0.235 inch) hole through the center of the end, and part off the piece at 0.45 inch length. Cool and wash the chip from the part, and de-burr any sharp edges. Take the plastic extruded holder and fit the part into the fork, and slip a 7/32 or slightly smaller allen wrench, or an appropriate sized bolt through the holes to hold the part in place. It should be able to rotate freely. load the 3mm 0.6 pitch tap into the lathe chuck, and mount the extruded part holder into the tool post so that the tap nestles nicely in the groove. Tighten the tool post screws gently. You don't need a lot of force. Just enough to hold it in place snugly. Set the lathe speed to its slowest speed, hopefully around 200 RPM. Start the lathe up, and feed the part into the tap slowly. The part should start rotating on its own as the tap feeds it. Drip cutting oil onto the tap as it cuts. Each time the part rotates fully around once, feed it into the tap another 0.005 inches or so. If you get much resistance to feeding it into the tap, stop and let it go around another time. TAPS ARE FRAGILE! They can snap easily. Once you can see that the bottom of the groove is fully rounded out and is fully threaded, you can stop. Now, you can take the newly made worm gear over to a drill press to drill a hole in its side, so that you can tap the hole for a set screw. I used a #10-32 set screw in the picture above.
With this file you will be able to print Worm Gear Lathe Tool with your 3D printer. Click on the button and save the file on your computer to work, edit or customize your design. You can also find more 3D designs for printers on Worm Gear Lathe Tool.