WS2812 matrix
thingiverse
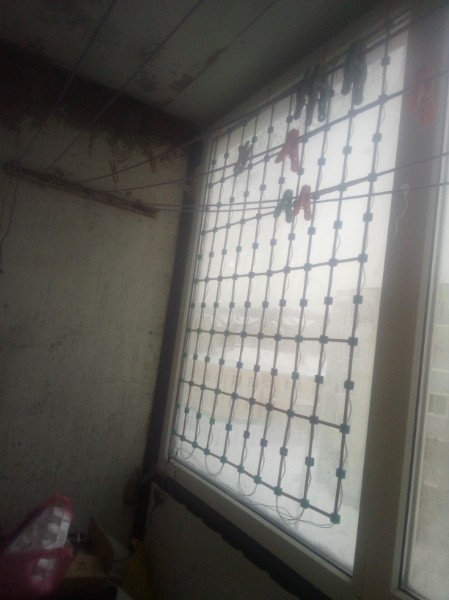
Крепление светодиодов ws2812 для матрицы на окно по проекту AlexGyver -> https://www.youtube.com/watch?v=MgRmiXxYL5g Шаг выбран для адресной гирлянды 100мм (довольно популярной на алиэкспресс), но получилось немного меньше (чтоб провода небыли в натяжке). Файлы cdr сделаны в coreldraw 2020 и режутся из фанеры (либо чего другого) 3мм! Для сборки матрицы потребуется большое ровное место (либо собирать на весу) и плоскогубцы (пожалейте пальцы). Порядок сборки на полу: * Подложите деталь base под светодиод. * Возьмите деталь cap. * Наденьте на неё 2 детали jumper. * Наденьте всю эту конструкцию на деталь base, следя за центровкой светодиода в окошке. Так же при сборке придётся удлинять провода идущие на соседний столбец (строку). Всегда буду рад обратной связи! ---------------------------------------------------------------------------------------------------------------- Mounting of ws2812 LEDs for the matrix on the window according to the project Alex Gyver -> https://www.youtube.com/watch?v=MgRmiXxYL5g The step is chosen for an address garland of 100mm (quite popular on Aliexpress), but it turned out a little less (so that the wires were not in a stretch). cdr files made in coreldraw 2020 and are cut from plywood (or something else) 3mm! To assemble the matrix, you will need a large flat place (or assemble by weight) and pliers (spare your fingers). The order of assembly on the floor: * Put the base part under the LED. * Take the cap part. * Put 2 jumper parts on it. * Put all this construction on the base part, watching the alignment of the LED in the window. Also, during assembly, you will have to extend the wires going to the next column (row). I will always be glad to receive feedback!
With this file you will be able to print WS2812 matrix with your 3D printer. Click on the button and save the file on your computer to work, edit or customize your design. You can also find more 3D designs for printers on WS2812 matrix.