Wyze Cam V2 Outdoor Case
prusaprinters
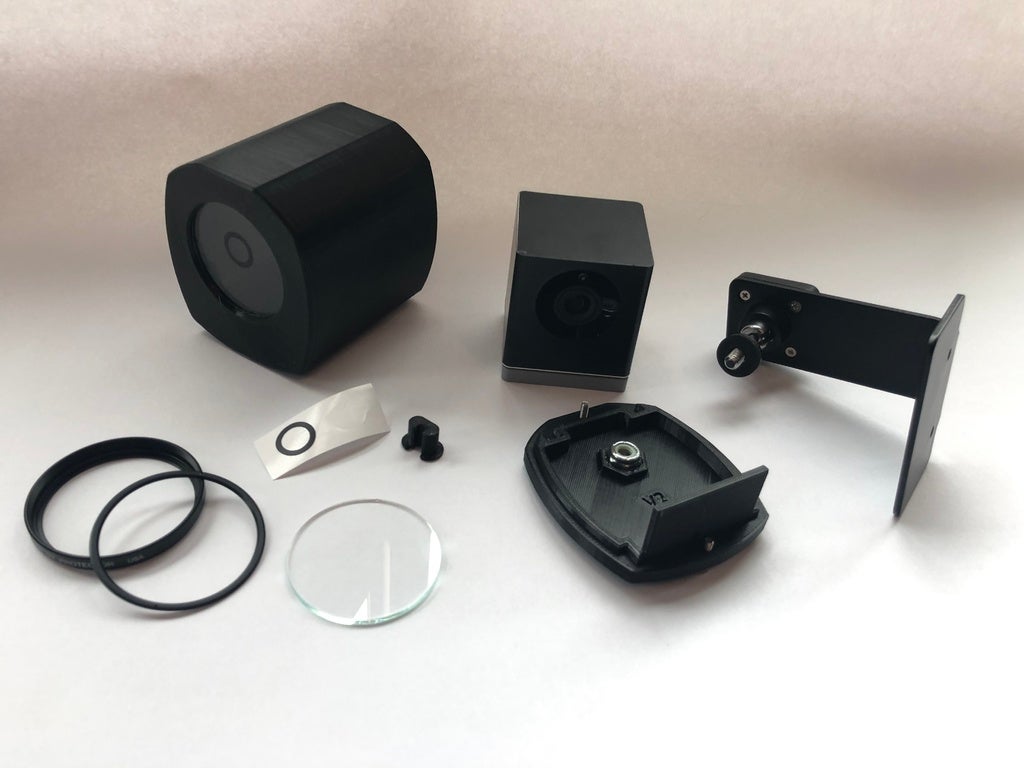
<p><strong>Update 5-11-19</strong><br/> I added the 3 versions of the case that fit the 34mm lens. With this smaller lens, it only shows the black of the Wyze cam and not of the white case. I will put a link to the 34mm lens below in the Parts Needed.</p> <p>Also, I found some inexpensive wall mounts. 4 for $12. https://www.amazon.com/gp/product/B0776RVX64/ref=ppx\_yo\_dt\_b\_asin\_title\_o02\_s00?ie=UTF8&psc=1</p> <p><strong>Description</strong><br/> Outdoor camera case for Wyze cam V2 (not the Pan one) that works with most camera mounts. I also included a Wyze cam wrap template which can be used no matter if you use this case or not.</p> <p>Use this case at your own risk. If something happens to your camera, that is on you.</p> <p>There is a seal/gasket .stl if you want to print in a flexible material to provide a watertight seal for the back cover. You don't need the seal as I made the back cover a tight fit and I put a ridge on the inside to help with more plastic on plastic so it is harder for water to get in.</p> <p>There are # versions of the case and 2 versions of the back cap. The file names are self explanatory. You only need to print one with a nut hole.</p> <p>The flat piece on the bottom of back cap is so when you put the cap on, it will push the cam forward to the front.</p> <p>V2 - this is my second revision. I never uploaded V1.<br/> V3 - future. I would like to make a sun shade that would snap on super simple<br/> future. Model the case to use the smaller lens.</p> <p>Parts Needed:<br/> <strong>52mm Lens Cap - $6.37</strong><br/> Used for the front glass. I took the glass out of the ring which just screws together.<br/> https://www.amazon.com/Tiffen-49mm-UV-Protection-Filter/dp/B00004ZCJG?th=1</p> <p><strong>34mm Lens Cap - $7.99</strong><br/> Used for the front glass. You will take the glass out of the ring by unscrewing the center ring. Use only the 34mm cases if you use this lens.<br/> https://www.amazon.com/gp/product/B000F4OIKY/ref=ppx\_yo\_dt\_b\_asin\_title\_o07\_s00?ie=UTF8&psc=1</p> <p><strong>Mount - $7.99</strong><br/> Any mount will do, but I would get one with a rubber washer on the screw to reduce the possibility of water getting in.<br/> https://www.amazon.com/Security-Mount-Adjustable-Outdoor-Compatible/dp/B01I985WRK/ref=sr\_1\_2\_sspa?keywords=outdoor+camera+mount&qid=1553564220&s=electronics&sr=1-2-spons&psc=1</p> <p><strong>Two M3 x 10mm bolts</strong><br/> These will hold the back cover on. I had extras from my Prusa printer builds.</p> <p><strong>One nut for the mount screw</strong><br/> I am not sure the stats of the nut, but I am guessing you have some nuts around your house that will fit.</p> <p><strong>Clear silicone</strong><br/> I put a VERY TINY amount of silicone to hold/seal the glass. Again, you probably have some of this laying around your house</p> <p>Optional Parts<br/> <strong>Wyze cam black vinyl wrap</strong><br/> I have a vinyl cutter so I made a template for a top piece and a full wrap around the sides. I suppose you could print out the PDF file a lay it over some matte black vinyl and cut it with a scissor.<br/> You won't need this if you use the 34mm glass. This case only shows the black around the lens so you don't need wrap the camera.</p> <p><strong>IR LED vinyl ring</strong><br/> This greatly reduces the IR LED reflection you get on the glass at night. This would stick to the inside of the glass and be dead center around the lens. I placed this one correctly by putting the glass in the case (before silicone) and the camera. I then placed the vinyl ring on the outside of the glass but int the correct position. The just take the cam out and flip the glass around so that the vinyl is on the inside. Silicone away.</p> <p><strong>Credits</strong><br/> Finally, I have to give credit to<strong>Devin Montes</strong> from the Make Anything Youtube channel. He made a kick ass outdoor Wyzecam mount and I highly recommend you check out his at <a href="https://www.myminifactory.com/object/3d-print-83854">https://www.myminifactory.com/object/3d-print-83854</a> . It is well engineered and looks the part of what a outdoor camera should look like.</p> <p>I took the idea from him and made my own (even though there are many outdoor models for Wyze cams). Mostly, I used his idea for the cable plug, mine is for a round cable and his is for the flat one that comes with the Wyze camera. I am not going to put any of his parts up, because that would not be right. But honestly, just buy his for $1.99... it is nice.</p> <h3>Print instructions</h3><p>Unassociated tags: home cam</p> <h3>Category: Other Summary</h3> <p><strong>Update 5-11-19</strong><br/> I added the 3 versions of the case that fit the 34mm lens. With this smaller lens, it only shows the black of the Wyze cam and not of the white case. I will put a link to the 34mm lens below in the Parts Needed.</p> <p>Also, I found some inexpensive wall mounts. 4 for $12. https://www.amazon.com/gp/product/B0776RVX64/ref=ppx\_yo\_dt\_b\_asin\_title\_o02\_s00?ie=UTF8&psc=1</p> <p><strong>Description</strong><br/> Outdoor camera case for Wyze cam V2 (not the Pan one) that works with most camera mounts. I also included a Wyze cam wrap template which can be used no matter if you use this case or not.</p> <p>Use this case at your own risk. If something happens to your camera, that is on you.</p> <p>There is a seal/gasket .stl if you want to print in a flexible material to provide a watertight seal for the back cover. You don't need the seal as I made the back cover a tight fit and I put a ridge on the inside to help with more plastic on plastic so it is harder for water to get in.</p> <p>There are # versions of the case and 2 versions of the back cap. The file names are self explanatory. You only need to print one with a nut hole.</p> <p>The flat piece on the bottom of back cap is so when you put the cap on, it will push the cam forward to the front.</p> <p>V2 - this is my second revision. I never uploaded V1.<br/> V3 - future. I would like to make a sun shade that would snap on super simple<br/> future. Model the case to use the smaller lens.</p> <p>Parts Needed:<br/> <strong>52mm Lens Cap - $6.37</strong><br/> Used for the front glass. I took the glass out of the ring which just screws together.<br/> https://www.amazon.com/Tiffen-49mm-UV-Protection-Filter/dp/B00004ZCJG?th=1</p> <p><strong>34mm Lens Cap - $7.99</strong><br/> Used for the front glass. You will take the glass out of the ring by unscrewing the center ring. Use only the 34mm cases if you use this lens.<br/> https://www.amazon.com/gp/product/B000F4OIKY/ref=ppx\_yo\_dt\_b\_asin\_title\_o07\_s00?ie=UTF8&psc=1</p> <p><strong>Mount - $7.99</strong><br/> Any mount will do, but I would get one with a rubber washer on the screw to reduce the possibility of water getting in.<br/> https://www.amazon.com/Security-Mount-Adjustable-Outdoor-Compatible/dp/B01I985WRK/ref=sr\_1\_2\_sspa?keywords=outdoor+camera+mount&qid=1553564220&s=electronics&sr=1-2-spons&psc=1</p> <p><strong>Two M3 x 10mm bolts</strong><br/> These will hold the back cover on. I had extras from my Prusa printer builds.</p> <p><strong>One nut for the mount screw</strong><br/> I am not sure the stats of the nut, but I am guessing you have some nuts around your house that will fit.</p> <p><strong>Clear silicone</strong><br/> I put a VERY TINY amount of silicone to hold/seal the glass. Again, you probably have some of this laying around your house</p> <p>Optional Parts<br/> <strong>Wyze cam black vinyl wrap</strong><br/> I have a vinyl cutter so I made a template for a top piece and a full wrap around the sides. I suppose you could print out the PDF file a lay it over some matte black vinyl and cut it with a scissor.<br/> You won't need this if you use the 34mm glass. This case only shows the black around the lens so you don't need wrap the camera.</p> <p><strong>IR LED vinyl ring</strong><br/> This greatly reduces the IR LED reflection you get on the glass at night. This would stick to the inside of the glass and be dead center around the lens. I placed this one correctly by putting the glass in the case (before silicone) and the camera. I then placed the vinyl ring on the outside of the glass but int the correct position. The just take the cam out and flip the glass around so that the vinyl is on the inside. Silicone away.</p> <p><strong>Credits</strong><br/> Finally, I have to give credit to<strong>Devin Montes</strong> from the Make Anything Youtube channel. He made a kick ass outdoor Wyzecam mount and I highly recommend you check out his at <a href="https://www.myminifactory.com/object/3d-print-83854">https://www.myminifactory.com/object/3d-print-83854</a> . It is well engineered and looks the part of what a outdoor camera should look like.</p> <p>I took the idea from him and made my own (even though there are many outdoor models for Wyze cams). Mostly, I used his idea for the cable plug, mine is for a round cable and his is for the flat one that comes with the Wyze camera. I am not going to put any of his parts up, because that would not be right. But honestly, just buy his for $1.99... it is nice.</p> <h3> Print Settings</h3> <p><strong>Printer Brand:</strong></p> <p>Prusa</p> <p><strong>Printer:</strong></p> <p>i3 MK3 MMU 2</p> <p><strong>Rafts:</strong></p> <p>No</p> <p><strong>Supports:</strong></p> <p>No</p> <p><strong>Resolution:</strong></p> <p>.20</p> <p><strong>Infill:</strong></p> <p>20%</p> <p><strong>Filament:</strong> Amazon Petg Black<br/> <strong>Notes:</strong></p> <p>It took about 7 hours to print on my Prusa MK3 with default .20mm print quality</p> <h3> Post-Printing</h3> <p><strong>Placing the vinyl ring onto the glass</strong><br/> Put the glass in the case and the Wyze cam. Put the back cap on to hold it into place. Now carefully put the black vinyl ring on the outside of the glass so that it goes around the camera lens of the Wyze cam. REMEMBER! Once you put the glass in the case with the silicone, the ring should be on the INSIDE of the case.</p> <p><strong>Adding silicone to the case for the glass</strong><br/> I used a small length of filament to lightly dab silicone onto the inside face of where the glass goes. It doesn't need alot of silicone, but I would put enough to make sure it seals.</p> <p>Once the glass is in, slide your Wyze cam into the housing and rotate the glass to where the vinyl ring on the glass is directly around the camera.</p> <p>Let the silicone dry overnight.</p> <p><strong>Adding a small dab of silicone around the nut</strong><br/> This will hold the nut in place and if you do it well, it will give a bit more protection against water.</p> <p><strong>Vinyl cutouts</strong><br/> I included two PDFs of the wraps I created. One for the wrap and one for the ring. I am definitely not a professional at this so while they do work, they are not perfect. At least in my eyes.<br/> If you want an SVG file you can go here to convert the PDFs to SVG<br/> <a href="https://www.google.com/search?q=pdf+to+svg&oq=pdf+to+sv&aqs=chrome.0.0j69i57j0l4.3412j0j1&sourceid=chrome&ie=UTF-8">https://www.google.com/search?q=pdf+to+svg&oq=pdf+to+sv&aqs=chrome.0.0j69i57j0l4.3412j0j1&sourceid=chrome&ie=UTF-8</a></p> <p><strong>Removing glass from ring</strong><br/> You will notice on the top of the lens housing there are two tiny holes on either side of the case. Stick something into one of the holes and start to rotate it counterclockwise. This will start to remove the ring that is holding the glass into the outer ring. It is not on tight. Unscrew and you got yourself a nice piece of glass</p> <h3> How I Designed This</h3> <p><strong>OnShape model</strong></p> <p>Anyone with an OnShape acount (which is free) can copy and edit my models.<br/> Anyone can view and download without an account here.<br/> <a href="https://cad.onshape.com/documents/cf014c5c35703b6a6d382631/w/4220e8d85e873f757f12766a/e/c1ae4f8f56e7b0f60568d8a7">https://cad.onshape.com/documents/cf014c5c35703b6a6d382631/w/4220e8d85e873f757f12766a/e/c1ae4f8f56e7b0f60568d8a7</a></p>
With this file you will be able to print Wyze Cam V2 Outdoor Case with your 3D printer. Click on the button and save the file on your computer to work, edit or customize your design. You can also find more 3D designs for printers on Wyze Cam V2 Outdoor Case.