X-107 - 2" Micro Brushless Drone Beta Testing

X-107 - 2" Micro Brushless Drone Beta Testing

thingiverse

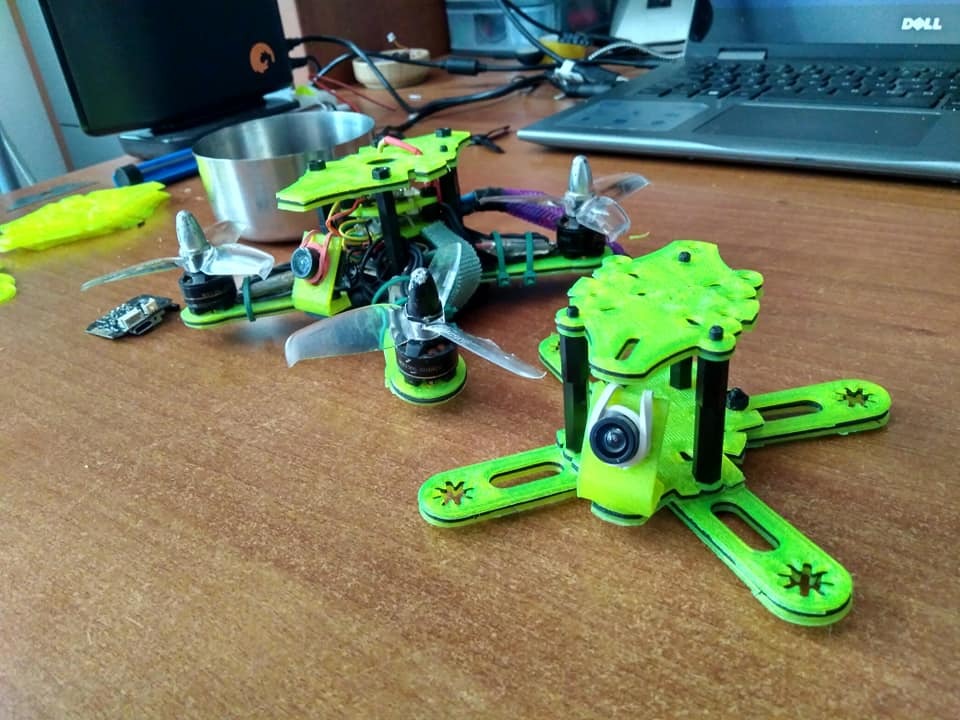
**X-107 - Micro Brushless 2" 11xx Compatible Drone Frame - Beta Testing** **13.09.2018 - IMPORTANT UPGRADE TO CAMERA MOUNTS** Note: This mount is internally cleared for 20 x 20 mm to ensure a clean fit for the camera. The mount can easily be bend to accommodate for any looseness and or you can use thin washer to resolve any issues if you encounter any. Picking the right file: There are several files here, they are as follows: 1. RunCam 19 x 19 Mount - Has a M2 hole on each side to mount 19 x 19 cameras or the provided adapters. 2. RunCam 19 x 19 Mount - Has M2 slots on each side to mount 19 x 19 cameras or the provided adapters. 3. Drop Head RunCam 19 x 19 Mount - Is labelled as such and is smaller than the other mounts. It is such that you should be able to now mount off the roof. 4. Universal Camera Adapter - By looping a rubber band around the front of the lens, twisting, pulling behind and over your camera and back onto the lens will secure your FPV camera. This is suitable for Tiny Whoop style cameras and offers adjustable tilt. The lens is cleared for 13.8 mm lenses. 5. Universal Camera Adapter TPU - This is the same as the above file with a smaller lens opening. If printed in TPU you can push fit in your camera. The mount should stretch and grip it. If you have difficultly carefully and safely cut a small slit to expand the hole. Print Advice: Place the piece on the bed so that when looking directly down it appears as a C or a U. You should have the print lines running along the long edge of the piece where the camera bolts in. For the adapter print vertically with the lock points point up off the bed. Files have been updated and included. Separate files can be found at: https://www.thingiverse.com/thing:3098162 real_darKing kindly made and shared an attractive mount to use on my frames. You can check it out at: https://www.thingiverse.com/thing:3094068 **Update: 11.09.2018** New RunCam 19 x 19 - Some users kindly reported that they were having issues with fitment of their RunCam cameras. This new mount has added clearance and should now clearance adequately. It mounts to the frame in the slot with M3 hardware. For the most strength, print so that the mount: 1. Appears like a C or U flat on the bed. 2. Has the layer lines running up the vertical edges with camera mount holes. real_darKing kindly made and shared an attractive mount to use on my frames. You can check it out at: https://www.thingiverse.com/thing:3094068 You can join the Facebook group at: https://www.facebook.com/groups/254825821981391/ **Facebook Group & Entry Page: https://www.facebook.com/groups/254825821981391/** Hi there and thanks for volunteering to help me with my X-107 project! I was unable to afford the parts I needed to get it into the air this month and so really do appreciate your help. I had quite a response on Facebook and so decided to turn the opportunity into a little fun competition to help encourage people to get interested. I will likely make a page in the next few days where you can post your builds and videos for consideration. I will then most likely put the entrants into a poll where a group pf Facebook will vote for best pic and video! I really appreciate your time and effort in assisting me. Everything else aside I wanted to release the frame to beta test to see if there were any major issues with fitment etc. If there are please do let me know so I can make the necessary modifications. I also appreciate any feedback or ideas you might have. The camera mounts are included for tiny whoop style cameras and also I have included mounts for run cam 19 x 19 camera. There are blanks for the former if you have a particularly weird lens size. Alternatively the frame accepts accessories in M3 hardware sizes so you can use any mount and just drill a hole in. The standoffs are 30.5 mm x 30.5 mm and you could also use a TPU mount off the standoffs like mini quads do. **Things to note and observe:** 1. See where the quad breaks and snaps and see what kind of crash causes this. Helps me to add strength to sections etc. 2. See if you quad with the same set up runs more quietly and with less vibration. You may also note less need to PID tune and less electrical interference. 3. The frame is a true X so if you haven't flown one before this will likely feel a little strange at first. Once you get used to it, nothing else flies as evenly. Please take note of stability and balance in rolls and flips etc. **Build advice:** 1. Reference the X-132 page for better instructions and ideas. 2. You can build in a number of formats so have fun and perhaps try a split frame or a pusher frame. 3. If you go fully modular you will need long M2 and M3 bolts to secure your stack/components. 4. I would reccomend printing in the 1.1 mm plates and stacking 3 in whatever combination of materials you want to try out, even in the same material this works well. I also had good success with PLA/TPUPLA and noted this might be improved b using PETG. 5. For camera mounts print so the lines vertically run up the part. 6. Stack plates have been included from the X-132 so you can have a nice neat build with protected and secured parts. 7. Bottom mounting the battery will save you a lot of broken arms. **Frame specifics:** 1. True X-107 mm frame. 2. 9 mm motor mount in x and +. 3. Can be printed in uni-body or modular. 4. Can be built as standard config, pusher, puller and split front/rear. 5. Active Vibration Dampening Geometry - fully proportional design including accessories should help to increase strength and reduce vibration. **Important Legal Information:** Legal Declaration – Originality of design: I hereby state that I am the sole author of this work, that it is an original creation and not a duplication in any form. Legal Disclaimer: I accept no liability for damage, harm, injury or death caused to anything by the use of this design. You use this design at your own risk and are responsible for any consequences as such. **Designers Note:** Thank you very much your interest and for your participation should you wish to engage in the project! Karamvir Bhagat

Download Model from thingiverse

With this file you will be able to print X-107 - 2" Micro Brushless Drone Beta Testing with your 3D printer. Click on the button and save the file on your computer to work, edit or customize your design. You can also find more 3D designs for printers on X-107 - 2" Micro Brushless Drone Beta Testing .