X-26 Evo: Brushed Micro Racing & Freestyle Quadcopter Drone & Tiny Whoop Conversion Frame
thingiverse
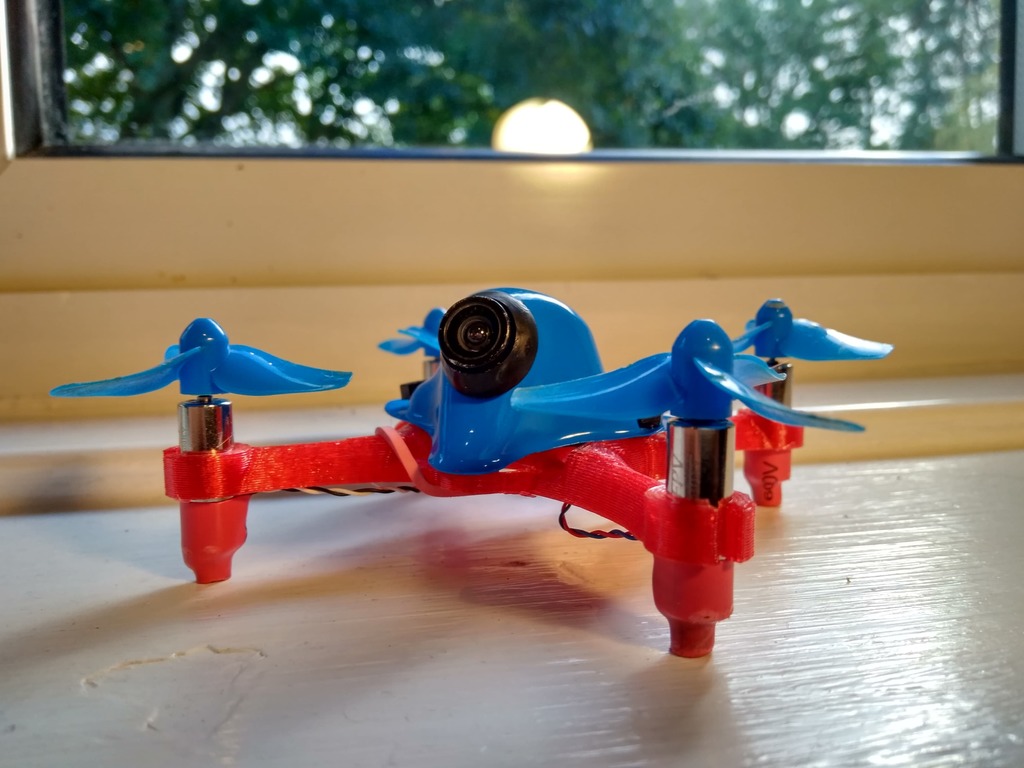
**X-26 Evo: Brushed Micro Racing & Freestyle Quadcopter Drone & Tiny Whoop Conversion Frame** **Tips & Design Appreciation:** If you enjoy using my designs I would really appreciate it of you could please kindly take a minute to show your appreciation with a small "tip". Your contributions can assist in filament and parts purchases that can help me to design and make better multi-rotors frames. So if you can show your appreciation with a tip or a share, it would be fantastic as it would really help me out. If not, no worries! I just hope that you have a fantastic time using the X-26 Evo frame kit to build your own FPV Freestyle & Racing Micro Quadcopter Drone! **Social, Media & Sharing:** If you are proud of your creation please do take a picture of your build and share it with a the link for this page online so that others can also find out and enjoy using the design also. To me personally it is very satisfying to see someone take the time to use my work and I would love to see what you make! You can join the below Facebook groups where you can meet other people interested printing and FPV: - 3D Printed Homemade Drones Group: https://www.facebook.com/groups/homegrowndrones/ - Smaller group for users of my frames: https://www.facebook.com/groups/254825821981391/ - Tiny Whoop Group: https://www.facebook.com/groups/tinywhoop/?ref=br_rs If you would like to see some footage of my designs in actions you can check out my Youtube page: https://www.youtube.com/channel/UCqneA_mBsOMC4p-IToCraYA?view_as=subscriber **Project Aims:** I list my designs here on Thingiverse for free so that others can enjoy a reduction in the cost of the hobby and so they can have something fun and unique to fly. 3D Printing and drone building and flying can provide fun avenue to learn about mathematics, science and technology and can also help people find a sense of community. Part of providing free access is to help the young and those in education by providing a tool that can be utilized cheaply and easily. Creativity is a great tool for well-being and I also hope that by providing people a cheap route to a fun hobby they can enhance their lives. **Specs:** Flight Controller: 26 x 26 Tiny Whoop & SP Racing F3 Evo Brushed style boards. Motors: 0720 (7 mm Diameter x 20 mm Height) Propellers: 40 mm Battery: 230 mah - 550 mah 1s Hi-Volt Build & Print Guide: There are 12 frames to choose from and it is important that you choose the right one for your set up. There are 2 basic versions of the frame, one that accepts hardware in M1 and one that accepts hardware in M3. The M1 frames have holes that have been left at 1 mm diameter. This is to allow screws to thread themselves into the plastic when being used to ensure a tight fit. If you have larger screws you can with a bit of force thread them into the frame to use them. The M3 frames have a 3 mm hole and you should ideally use hardware made of nylon to keep AUW at a minimum. To use this with your regular Whoop canopies, simply poke or bore out a 3 mm hole and secure with a nut to the frame. The M1 & M3 frames comes with variants bearing the designation "USB". These are exactly the same as the base versions except for the fact that the rear mount hole has been removed to allow for easier fitment of boards that have USB ports. You should not generally have any issues using boards with USB ports, but in case you have fitment issues these frames offer extra clearance. All the above frames are offered in various clearances to allow for precise and tight motor fitment. Not all calibrate their printers and everyone has different margins with regard to tolerances. Each of the frames has therefore been offered with the following clearance options: - Exact measurement of 7 mm - Clearance of 0.05 mm for diameter of 7.05 mm - Clearance of 0.1 mm for diameter of 7.1 mm **Build instructions:** This frame was designed so that if used on one side can fit a standard Tiny Whoop 26 x 26 mm Flight Controller and if flipped around a board with no mounting holes such as a the SP Racing F3 Evo can be attached to the recessed section. This will allow for a lower profile build and also for standard canopies and accessories to be attached simultaneously. Build as you would build a Tiny Whoop and feel free to use whatever accessories and canopies etc that you want. To protect your motors, cut a small length of heat shrink and shrink over the ends of the motors. This will also give you X-26 Evo little landing legs to stand on. To mount your battery, pull a rubber band across a pair of arms for a simple and light weight method of attachment. It is recommended that you use the frames with clearance of 0.05 mm to begin. You can then chose another if you have fitment issues. **Printing Guide:** The frame should be printable in all common filament materials such as PLA, PETG, ABS & NYLON. I use an infill at 15% with the "Tri-Hex" pattern to maximize strength. This is a good starting point, but feel free to experiment and see what works best for your setup. The frame may be viable in flexiable filament, but this has not been tested. To print, lay the pieces down on the bed flat so that largest flat side is on the bed. **Flying Advice:** Printed frames are not carbon frames, it’s easy to forget that when you are flying. It is advised to treat a printed frame like that of a Tiny Whoop and to avoid landing on the motor bottoms or corners of the arms. When you first get it into the air, treat it gently until you get used to it. Since there frames are designed to balance perfectly and are actually “true X” this may feel a little strange at first. You may note that your sticks will be more even across all the axis of movement. It is recommended to bottom mount the battery for the longevity of the frame and arms. Of course, once you are proficient and comfortable flying with the frame mount as you wish. Plastic frames will protect your components very well, particularly from current and voltage spikes that normally kill components during crashes. Secondarily the frame breaking during an impact absorbs a great deal energy which would otherwise damage your components. The frames are designed to fully enclose the key components as much as possible of the drone so you should hopefully enjoy parts that last for a long time. ALWAYS CHECK FLYING REGULATIONS AND RESTRICTIONS LOCAL TO YOU BEFORE ATTEMPTING TO FLY YOUR CRAFT. **Originality of Design** Of key importance to me is that my designs are original works. I always make my designs from scratch and try and make them as distinct as possible. I have taken great care make sure that my design does not take directly from anyone else’s work or infringes on any copyrights or patents. The unique geometry of this design alongside its unique design features identifies it as an original design and also builds in copy protection. If there is any duplication of any part of this design, a measurement can be taken of any two points and by simple calculation it can be proved. I am a British citizen and this design was produced in the United Kingdom. The natural design rights reside with me as accorded by European Union law. **Legal Disclaimer:** In no event shall I the designer be liable for any direct, indirect, punitive, incidental, special consequential damages, to property or life, whatsoever arising out of or connected with the use or misuse of any of my designs. In using my work you acknowledge that any and all liability is with you the user. You use this design at your own risk and are responsible for any consequences as such.
With this file you will be able to print X-26 Evo: Brushed Micro Racing & Freestyle Quadcopter Drone & Tiny Whoop Conversion Frame with your 3D printer. Click on the button and save the file on your computer to work, edit or customize your design. You can also find more 3D designs for printers on X-26 Evo: Brushed Micro Racing & Freestyle Quadcopter Drone & Tiny Whoop Conversion Frame.