X-82 "Monster Whoop" - 1.9 - 2.5 Inch Micro Brushless FPV Racing Drone Quadcopter
thingiverse
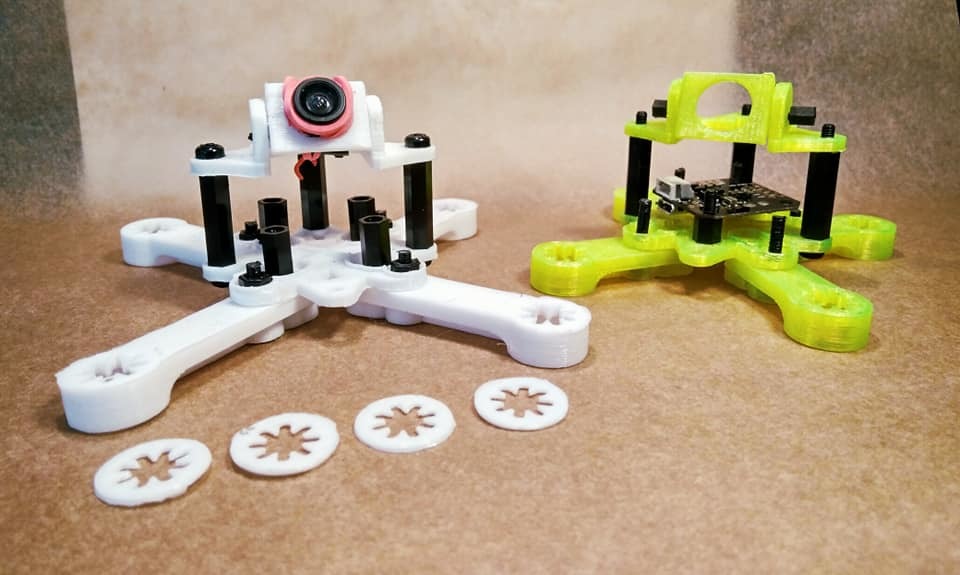
**Update - 13.09.2018** - 19 x 19 Camera Mounts This frame has an inbuilt mount and this is not affected by the update as there are no issues with clearance. This is for builds where you may want to use a separate mount and further adapters have been included. Files have been updated to that end. Otherwise clearances for this frame appear to be fine. Note: This mount is internally cleared for 20 x 20 mm to ensure a clean fit for the camera. The mount can easily be bend to accommodate for any looseness and or you can use thin washer to resolve any issues if you encounter any. Picking the right file: There are several files here, they are as follows: 1. RunCam 19 x 19 Mount - Has a M2 hole on each side to mount 19 x 19 cameras or the provided adapters. 2. RunCam 19 x 19 Mount - Has M2 slots on each side to mount 19 x 19 cameras or the provided adapters. 3. Drop Head RunCam 19 x 19 Mount - Is labelled as such and is smaller than the other mounts. It is such that you should be able to now mount off the roof. 4. Universal Camera Adapter - By looping a rubber band around the front of the lens, twisting, pulling behind and over your camera and back onto the lens will secure your FPV camera. This is suitable for Tiny Whoop style cameras and offers adjustable tilt. The lens is cleared for 13.8 mm lenses. 5. Universal Camera Adapter TPU - This is the same as the above file with a smaller lens opening. If printed in TPU you can push fit in your camera. The mount should stretch and grip it. If you have difficultly carefully and safely cut a small slit to expand the hole. Print Advice: Place the piece on the bed so that when looking directly down it appears as a C or a U. You should have the print lines running along the long edge of the piece where the camera bolts in. For the adapter print vertically with the lock points point up off the bed. Files have been updated and included. Separate files can be found at: https://www.thingiverse.com/thing:3098162 **Update: 11.09.2018** New RunCam 19 x 19 - Some users kindly reported that they were having issues with fitment of their RunCam cameras. This new mount has added clearance and should now clearance adequately. It mounts to the frame in the slot with M3 hardware. THIS IS NOT THE TOP PLATE WITH IN BUILT MOUNT! FITMENT FOR THIS IS FINE. For the most strength, print so that the mount: 1. Appears like a C or U flat on the bed. 2. Has the layer lines running up the vertical edges with camera mount holes. real_darKing kindly made and shared an attractive mount to use on my frames. You can check it out at: https://www.thingiverse.com/thing:3094068 You can join the Facebook group at: https://www.facebook.com/groups/254825821981391/ **Update: 10.09.2018** **If you would like to use a Magnum Mini Stack (as in the Emax Babyhawk R) you will need to use the M2 to M3 adapters. You can mount via the arm holes or by rotating the stack to have one corner facing forward like a Tiny Whoop.** **Adapters: https://www.thingiverse.com/thing:3093369** **X-82 "Monster Whoop" Specifications:** Fully modular Multi Config (Pusher, Puller & Split) True X Ultra small at 82 mm and also configurable for 94.7 mm Flight Controllers & Stacks: 16 mm x 16 mm & 20 mm x 20 mm Motors: 11xx in M2 hardware Cameras: Fits 19 mm x 19 mm and lens sizes in 12 mm & 10.8 mm. Propellers: 2 inch Prints without supports in basically all materials and designed to be super stiff/strong. **Update - 05.09.2018** Support has been added for 88.4 mm arms for those needing a little more clearance for their builds. This arm is mid way between the stretch and shorty arms in length. **Update - 27.08.2018 - Flight Footage Available at - https://www.youtube.com/watch?v=HrvSoZgPl_M&t=11s** **Update - 16.08.2018** Following release the correct size smaller shims from the X-107 have been included. These now fit motors and the arm better. This was an error in upload done by me. Files are now all fine :) **IMPORTANT - PLEASE READ CONFIGURATION GUIDE CAREFULLY!** Configuration: There are additional arms included to allow you to build the frame with a motor to motor distance of 94.7 mm. The 82 mm version would be advised for lower power setups below 3s where most stacks will be 16 x 16. Though there is clearance it would be advised to use 1.9 inch props. It is advised that this is will be a tight build so only for the advanced builder. The 94.7 mm arms allow for greater clearance and also easier builds. The longer arms should allow for better airflow and disk loading properties. The increased distance will also modify the mass distribution and would probably suit those looking for a freestyle/acro experience rather than zipping around. **Build:** 1. Bottom Plate + 4 arms Bottom Plate File Note: "Reinforced" plate has beams for added strength. 2. The arms are locked to the frame with two bolts. Place accordingly depending on your setup. Namely whether you run standard config, pusher, puller or split. 3. Mount your stack in the mount in the holes provided. The corner of your stack will likely be facing forward to accommodate the props. 4. Camera mounting can be done in 3 ways: a) You can use the internal mount plate (20 mm x 20 mm) and one of the camera mounts provided to mount your camera directly above and on your flight stack. You can then use the 30.5 mm x 30.5 mm to mount the top plate with stand offs. b) You can use the 30.5 mm x 30.5 mm top plate and do the same to have it above your stack but not directly mounted. c) You can use the canopy with the 19 mm x 19 mm in built mount for a Run Cam style camera or you can use the adapter with a rubber band to have a soft mount for any other kind of camera including AIO. Lens sizes are 10.8 mm and 12 mm. **Print advice:** Print the parts in the settings that suit the material you choose to use in your printer. All parts have been designed to print without the need for support and to accommodate easy printing. Camera mounts: Lay them on the bed on their side to get the print lines running up the long edge of the part this will give you the most strength. Arms: Lay arms with the flat area on the bed. Everything else: See what works! **Important Legal Information:** Legal Declaration – Originality of design: I hereby state that I am the sole author of this work, that it is an original creation and not a duplication in any form. **Legal Disclaimer:** I accept no liability for damage, harm, injury or death caused to anything or anyone by the use of this design. In using my work you acknowledge that any and all liability is with you the user. You use this design at your own risk and are responsible for any consequences as such.
With this file you will be able to print X-82 "Monster Whoop" - 1.9 - 2.5 Inch Micro Brushless FPV Racing Drone Quadcopter with your 3D printer. Click on the button and save the file on your computer to work, edit or customize your design. You can also find more 3D designs for printers on X-82 "Monster Whoop" - 1.9 - 2.5 Inch Micro Brushless FPV Racing Drone Quadcopter.