X-Axis Belt Tensioner (for Elegoo Neptune 2 3D Printer)
thingiverse
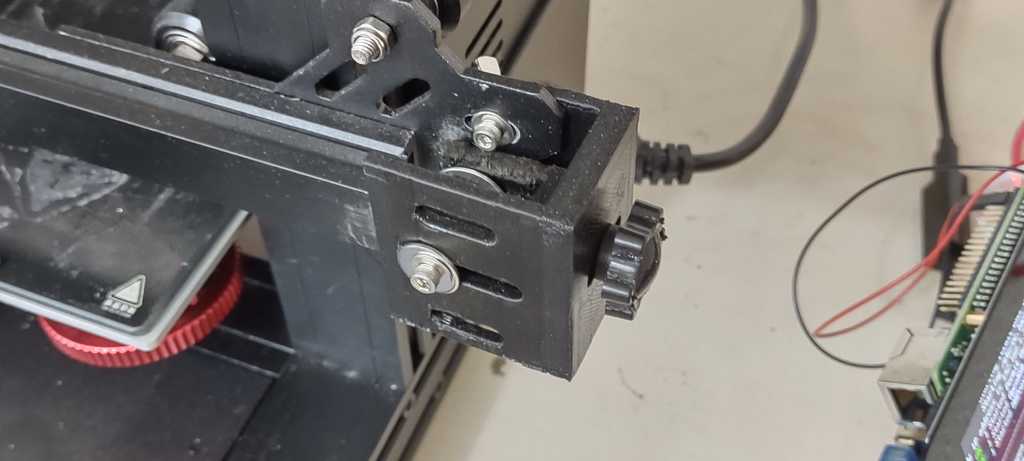
This is an X-axis belt tensioner assembly to replace the original one on the Elegoo Neptune 2 printer. At the time of its posting, the Elegoo Neptune 2 printer did not have a simple way of increasing the tension on the X axis belt should it have come loose. The normal "turn knob" upgrade X-axis tensioner assembly for the Ender 3 does not fit the Elegoo Neptune 2 and I was unable to locate any spare part for this function that did fit, so I designed my own. This assembly allows for an approximate 7mm additional tensioning of the X-Axis belt (equivalent to that of using the normal "upgrade belt tensioner" part for the Ender 3) To increase tension, simply rotate the tension knob to the right (clockwise) while facing it The main parts of the assembly are the X-Axis tensioner Mount and the Pulley Partner. You may be able to source an aluminum gear pulley and tensioner knob with bolt attached. The gear pulley and tensioner knob (without bolt) are here only as an option if you are unable to source a higher quality aluminum part from somewhere else. The complete assembly goes together as follows: 1. "Gear Pulley" slides in between sides of "Pulley Partner" 2. "Pulley Partner" slides in between sides of "X-Axis Tensioner Mount" 3. "Tensioner Knob" with bolt gets inserted into the hole at the back of the "X-Axis Tensioner Mount" and screws into the hole at the back of the "Pulley Partner" 4. M3 size bolt (length xx) gets inserted through the Elegoo Neptune 2 from the back toward the front of the printer through the side of the "X-Axis Tensioner Mount," the "Pulley Partner," the "Gear Pulley," and out the other side toward the front of the printer very similar to how the original part on the Neptune 2 is installed. Secure the bolt with an M3 nut (perhaps add a washer or two). 5. Secure the "X-Axis Tensioner Mount" to the Elegoo Neptune 2 apparatus with M3 bolts & nuts very similar to how the original assembly is installed NOTES: 1. All holes & slots on both the X-Axis Tensioner Mount and the Pulley partner are 6mm in diameter to ensure ability to accommodate M3 bolts after printing 2. The hole at the back of the Pulley Partner is a threaded 6mm hole to accommodate the standard M5 bolt from the Tensioner Knob 3. I used a 6/32" hex head bolt 2 1/2" long to go through the gear pulley center, Pulley partner, and X-Axis Tensioner Mount. secured with 6/32" nut. 4. I used 2 6/32" bolts with wing nuts to secure the X-Axis Tensioner Mount to the Elegoo Neptune 2 carriage assembly using the top and bottom slot holes of the X-Axis Tensioner Mount Supports may be required when printing for the holes and slots in the assembly components depending on how you position the components on the printer bed. I have printed both the X-Axis Tensioner Mount and the Pulley Partner with GeeTech PLA
With this file you will be able to print X-Axis Belt Tensioner (for Elegoo Neptune 2 3D Printer) with your 3D printer. Click on the button and save the file on your computer to work, edit or customize your design. You can also find more 3D designs for printers on X-Axis Belt Tensioner (for Elegoo Neptune 2 3D Printer).