X-Carve Dual Drag Chain for Water Cooled Spindle
thingiverse
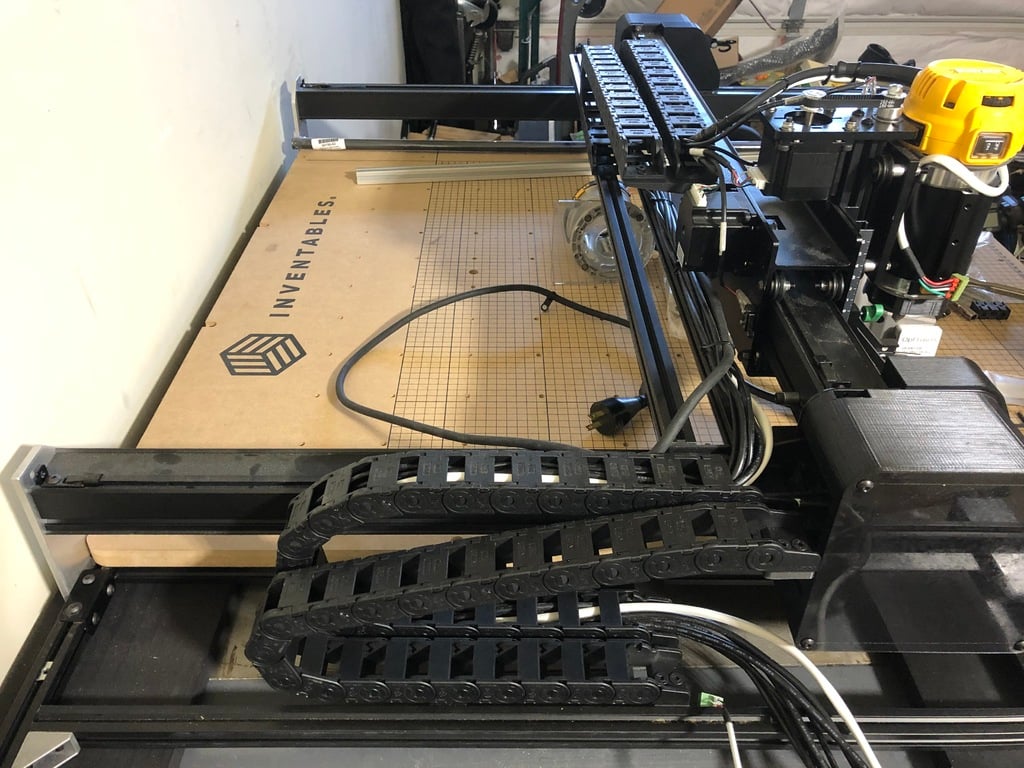
Update 5 May 2020: I redesigned both gantry brackets and the X-carriage bracket to tighten the tolerances on the M4 bolt holes to eliminate play and sag/droop from the weight of two drag chains. I also reduced the overall height of these two and added a chamfer toward the X-Controller. There was already clearance with the X-Controller, but this will make the closest approach 6mm without load in the drag chain, so there should be plenty of clearance with the X-Controller. That said, double check your distances and clearances prior to running the machine. There are two version of this bracket, "short" and "extended". The extended will require moving the opposite end of the drag chain toward the back of the X-Carve to make the bend when the gantry is full aft. The normal one should not require any movement. I am upgrading my X-Carve with a water cooled spindle and wanted a clean and effective way to get the power cord and water lines to my new spindle. I have been unable to find quality drag chains that would meet my needs and because the new spindle is AC powered, I decided to separate the power line and the liquid coolant from the existing wiring to help with EMI and risk. To start, I ordered a drag chain kit from Inventables, about 25 extra M5 x 8mm Button Head Cap screws, and about 20 extra M5 Post Assembly T-Slot nuts. I already had a drag chain on my X-Carve, but it was easier and more affordable to order another kit from them to make this mod. The kit comes with most of the hardware that you'll need. The only screws that I was unable to reuse were the two M4 screws on the X-Axis gantry that support the bracket for the y-axis drag chains. I swapped them for button head screws that were 2mm longer to get some bite on the nylon lock nuts (M4x12, but M4x14 will work as well). I have designed replacement brackets for the drag chain support stretchers that will now hold two cross-bars. There is a new bracket for the X-carriage, a new bracket for the X-gantry, and a new bracket for the base of the X-Carve. I designed these brackets to fit around 3D printed covers that I already had on my machine and I designed them to clear the X-Controller on the extension. You'll notice that the X-Gantry bracket moves the drag chain out from the end plate. This allows me to keep my covers and allow the wires to more easily make that turn. It also allowed me to remove a link from both the of Y-Axis drag chains to free up some wire length. Disclaimer: I plan on keeping my X-Controller extension, but in order to make it work with the extra Y-axis drag chain, I had to trim 1 5/8 inches off the upper right hand side of the board down to the existing notch (see picture). This also required that I re-drill a mounting hole in the upper right hand corner, so I used a 1/2" Forstner bit to start and eyeballed the 6mm depth for countersink. Then followed that with a 15/64" drill bit for the through hole (with a backer board to prevent tear-out). I also removed the 4 M5 threaded inserts before cutting to avoid metal-on-metal contact with my router bit. I used a 2-flute cutting bit in my trim router to make this cut because of the radius and the finished face. This collection of brackets re-position the y-axis drag chain and add an additional chain, so there is not sufficient room on the stock X-Controller extension. So I removed the top board and the existing aluminum bracket between the X-Carve base and extension, then loosened and moved the right stretcher to the left by approximately 63mm. Print at least two of the "X-Controller Extension Mount and Y-Axis Drag Chain Brackets". These brackets have 5 holes in the top. The 5th hole is to be used with the mounting hole on the extension board top at the notch (see picture). Use these brackets as spacers between the X-Carve base and the right side stretcher of the X-Controller extension base. Place the second one about 6 inches behind it toward the back. The drag chains are heavy and the second one provides support (in the pictures, I used 4 of these with a 3rd to secure the X-Controller extension board top at the notch, and a 4th halfway between the notch and the front of the x-Carve for additional bracing). Moving to the X-Gantry, The X-Gantry bracket moves the drag chains about 65mm aft to make them even with the furthest aft cross-bar. This makes it easier for the cables and wires to make the turn. Because of the angles this causes, I had to keep the drag chains full length and move the cut surface mount aft by about 20mm. The stock X-Carve X-Gantry brackets were cut for M5 so the same bracket could be used in two locations. I tightened the tolerances on this one to work only with the intended M4 screws. This eliminates droop or sag which is necessary due to the tolerances with the X-Controller. Now, for the X-Gantry and X-Carriage, start by removing the existing cross-bar support bracket and replace them with the brackets included above. The bend in the brackets point down if you need a reference. Add the additional cross bar in the process. On the X-Carriage, remove the stock bracket and replace with the X-Carriage bracket above. Make sure the flat side is up. The rest of the assembly matches what is on the Inventables site. One difference on mine is I moved all the existing wiring (minus the router cord) and drag chain to the aft cross-bar. This is so the spindle drive wiring and water lines will exit the left y-axis drag chain to meet my cooling setup that is mounted behind my X-Controller. But you can use either. If you found this useful, tips help me cover time and expenses. Thanks and enjoy!
With this file you will be able to print X-Carve Dual Drag Chain for Water Cooled Spindle with your 3D printer. Click on the button and save the file on your computer to work, edit or customize your design. You can also find more 3D designs for printers on X-Carve Dual Drag Chain for Water Cooled Spindle.