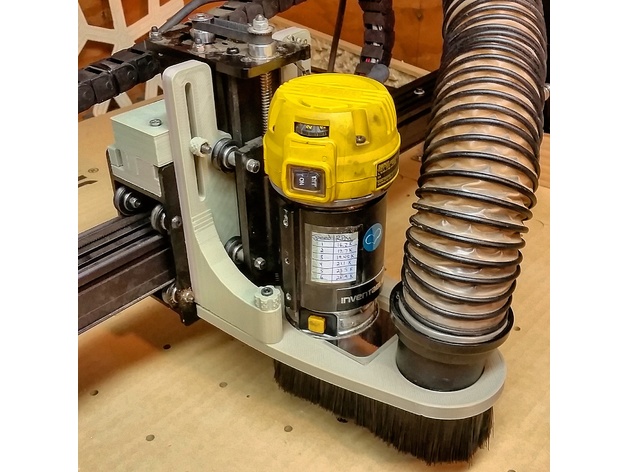
X-CARVE Dust Shoe (NewBrit Design) - big hole
thingiverse
Update: 2017-04-15 : Check out the latest updates below. Videos of it in action: https://www.instagram.com/p/BTM8AcpgM1f/ https://www.instagram.com/p/BTxDf14AxJj/ This dust-shoe is specifically designed for the Inventables X-Carve. Its main advantage lies in its independence from the router, allowing the router to move freely within it. The design is a remix of jzhvymetal's creation, which was inspired by an impressive dustshoe design by "New Brit Workshop". You can find his original YouTube video here: https://www.youtube.com/watch?v=PUcAXgsdk3U Additionally, the Inventables forum post for this design is available here: https://discuss.inventables.com/t/fully-3d-printed-newbritt-dust-shoe/30026 On a side note, if you're looking for a single-piece 3D printable dust shoe, I have my own design available here: http://www.thingiverse.com/thing:1259385 jzhvymetal kindly provided me with the CAD files, which allowed me to modify the base to accommodate my 2.5" line in Fusion 360. Furthermore, I modified it to accept a plexiglas window (cut on my X-Carve), enabling you to observe the cutting action. If you don't want to deal with the plexi, simply run some tape over both sides. I've included STLs, F3D (Fusion 360), and STEP files for the modified parts: newbrit_base_bigHole.stl is my addition, while everything else was created by jzhvymetal . If you want to cut the plexi window, extract the CAD files and generate your toolpath. UPDATE 2017-04-15: I discovered that the "SIDE_LEFT.stl" and "SIDE_RIGHT.stl" prints would rub against the bolts holding the z-gantry into its channel, causing friction. As a result, I modified those files to allow for ample space without compromising the design. Please find new side_right_channeled.stl / step & side_left_channeled.stl & step files. I've removed the original files from this page. Things I learned while putting this together: You'll need: A printer capable of printing something 9"x5" (size of the new base). Four M5 x45mm bolts to assemble the arms and base. Four M5 nuts. You can either use four more M5 x45mm bolts for the topblocks (you'll need to drill them out first), or four machine screws of a similar length (what I ended up doing). The design has space for eight 3mm x 12mm magnets to help hold the shoe in place. These are not required, but make it easier when screwing it in, providing an extra hand to hold things in place. Some parts need sanding to ensure a proper fit: The original wood design has some bevels that the printed version does not. The 'top back' piece is held in place by the two M5 bolts securing the X stepper. My bolts were just barely long enough, but I ordered two more at 20mm to guarantee no chance of slip. The brush it uses can be found here: https://www.mcmaster.com/#7900t5/=16g0r06 I used hot-glue to secure the magnets and plexi. You will want to print one piece of each except for the following items: TOP_MOUNT : x2 TOP_KNOB : x2 BOTTOM_KNOB : x2
With this file you will be able to print X-CARVE Dust Shoe (NewBrit Design) - big hole with your 3D printer. Click on the button and save the file on your computer to work, edit or customize your design. You can also find more 3D designs for printers on X-CARVE Dust Shoe (NewBrit Design) - big hole.
