X-Carve elegant dust boot / collector
thingiverse
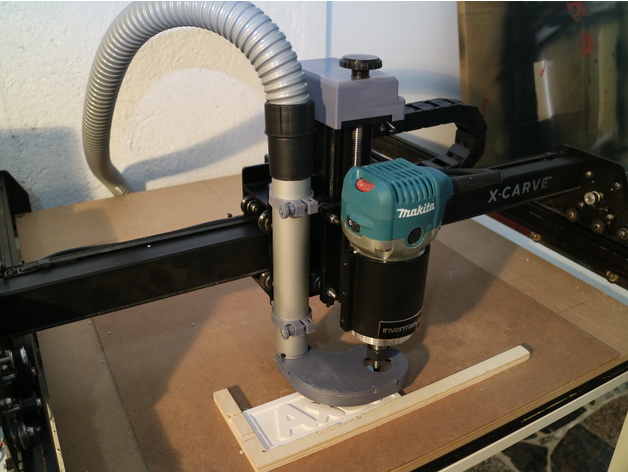
X-Carve Dust Collector\nThere are several dust collectors available for the X-Carve, but most of them are too complex or bulky. I've found a design that meets my needs - it's small yet effective.\nThe collector is mounted on the X-carriage, which means it doesn't follow the Z-axis movements. This eliminates the need for brushes, but requires a flat surface on the stock being carved. Sheet material works best, as I mostly use it.\nTo build this dust collector, you'll need the following 3D printed parts:\n1. Dust Collector Bottom\n1. Dust Collector Lid\n2. Pipe Holder X-Carriage\n2. Tightening Knob\nYou'll also need the following components:\n2 M4 30mm screws with heads ground to fit inside the tightening knobs\n2 M4 washers\n2 M4 nuts\n4 M4 10mm screws\n3 tiny screws to secure the pipe to the Dust Collector Lid\n1 35 mm pipe, wall thickness 1mm, length 200mm\nA M4 tap is required to create threads in the X-carriage for the pipe holder.\nAssembly and Mounting:\nGlue the lid and bottom pieces together.\nMount the pipe holders with double-sided tape to the X-carriage. They should be flush with the left edge of the carriage and the upper and lower edges. Drill holes and make threads, then secure the holders in place with 4 10mm screws.\nNext, attach the pipe to the collector. Drill three equally spaced holes near one end of the pipe, large enough for the tiny screws you've selected. Make holes in the sleeve of the collector for the screws, but don't mount the pipe yet.\nPlace the pipe in the holders and secure it with tiny screws.\nInsert a nut into each holder, followed by 30mm screws and washers. Tighten the knobs to secure them.\nIf you're using homing switches, you may need to adjust the X-carriage stop slightly to the right.\nTo use the dust collector effectively, position it at least 3-5 mm above the surface. Lowering it will reduce airflow and efficiency.\nYou're now ready for dust-free carving! If this design has been helpful, please consider giving me a tip.\nUsing the Dust Collector:\nSwing the collector to the left side.\nMount the router bit.\nSet Z-zero position and XY position.\nJog the Z axis up so the collector can swing under the router bit.\nCenter the collector under the router bit and adjust the level over your material 3-5 mm.\nTighten the knobs securely to fix the collector in place.\nStart carving!\nPrint Settings:\nPrinter Brand: Robo 3D\nPrinter Model: R1 ABS + PLA Model\nRafts: No\nSupports: Yes\nResolution: .2 mm\nInfill: 60% or more\nNotes: Print with ABS (preferred) and PLA. Use at least three perimeter shells and three top and bottom layers. Supports are only necessary for the pipe holder and tightening knob.
With this file you will be able to print X-Carve elegant dust boot / collector with your 3D printer. Click on the button and save the file on your computer to work, edit or customize your design. You can also find more 3D designs for printers on X-Carve elegant dust boot / collector.