X-Maxx Big Paddle Tires
prusaprinters
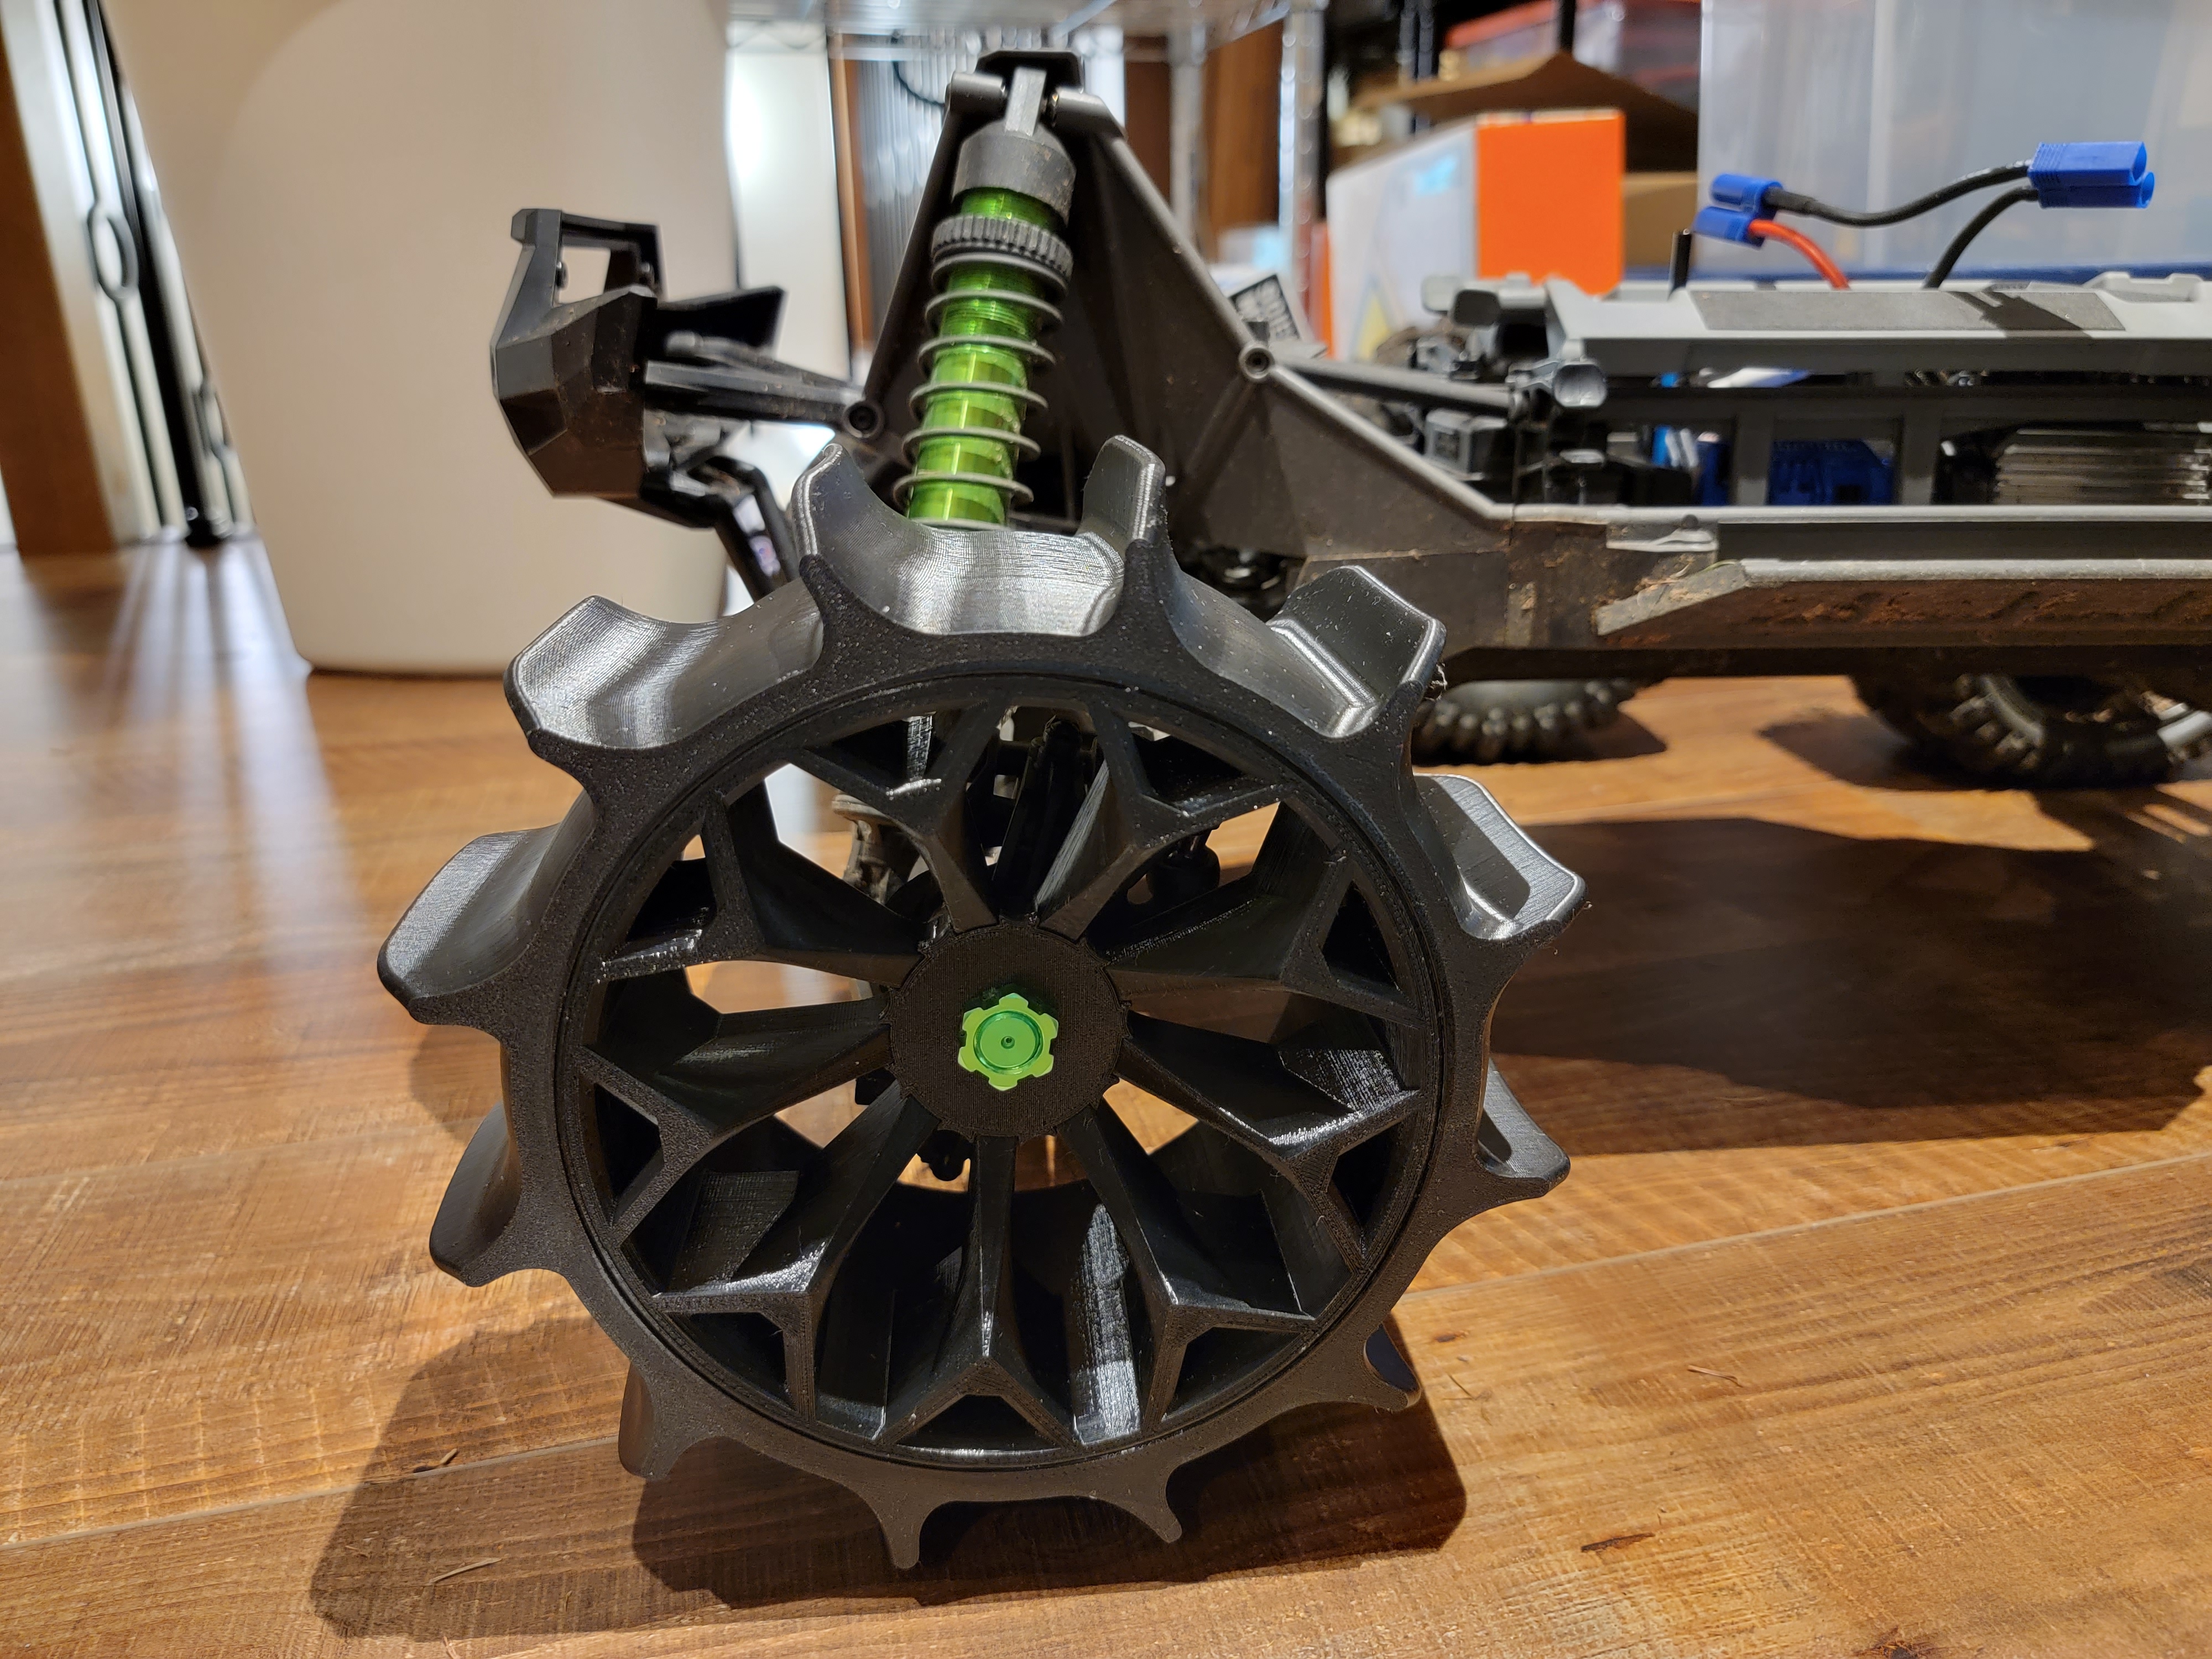
<p>These tires fit on the Traxxas X-Maxx, which I think is an awesome RC truck:</p><p><a href="https://traxxas.com/products/landing/x-maxx/">https://traxxas.com/products/landing/x-maxx/</a></p><p>If you want tires that last a reasonable duration, here are links to Traxxas tires that will last far longer:</p><p><a href="https://m.traxxas.com/products/parts/7773">https://m.traxxas.com/products/parts/7773</a></p><p><a href="https://m.traxxas.com/products/parts/7772x">https://m.traxxas.com/products/parts/7772x</a></p><p>The Traxxas paddle tires have paddles that aren't as big as I had in mind, so I made some 3D printed tires with bigger paddles. To fit within the overall wheel and tire volume, these tires are a bit low-profile if you ignore the paddles, and may ride a bit lower than the Traxxas ones especially on soft surfaces.</p><p>I haven't tested these tires on water, nor do I intend to. I've used them on soft dirt and soft grass, and I'll try them on snow when I get a chance. As for water, if anyone tries them on water (even a really deep puddle), please comment whether it worked at all, and whether it seemed stable or unstable (tracked straight or drifted, got too wobbly, etc).</p><p>On pavement these tires are useless. They're loud, drift like crazy, have very low traction, and tend to get eaten up by the pavement quickly (TPU is no match for the Traxxas wheel material). On rocks the TPU would probably get eaten up fast in comparison to Traxxas tires. On soft grass or soft dirt, they're roughly comparable to the normal non-paddle Traxxas tires in grip, but can get a bit of extra traction depending on the surface, and can throw more dirt. They also can tear up grass more than non-paddle Traxxas tires (careful). Overall, don't expect these to last as long or work as well as Traxxas tires (normal or paddle). In the long run, the cost of filament to re-print these each time they wear out could easily add up to more than the Traxxas tires cost. I'd encourage anyone who is actually serious about having good tires just get Traxxas ones - these are just for experimentation / curiosity's sake / fun watching the tires get gradually destroyed by the fury of the X-Maxx not giving a sh*t about its cr*ppy printed tires.</p><p>The glue I use to hold the tire on the wheel is “Henkel Loctite 406 Super Glue”, which did the best when I tested a low number of glues between TPU and PETG. In my tests with fully de-greased test parts, the Loctite 406 was able to delaminate TPU layers (not easy - had to use pliers and peel by twisting the pliers with substantial force) instead of ripping the glue off the TPU or PETG.</p><p>The only option I know of that might be “better” than Loctite 406 is Tetrahydrofuran, which can dissolve both TPU and PETG, but that stuff is <i>way</i> too scary and pretty expensive, and Loctite 406 is entirely sufficient. Don't get Tetrahydrofuran for this (totally unnecessary), but if you do, please comment how it goes and whether you're still ok after being near it. Seriously it's dangerous don't do it; the Loctite 406 works great.</p><p>I didn't have much luck with Gorilla Glue in tests for this purpose. The TPU was able to peel away from the glue without much force. Probably Gorilla Glue is great for other materials but for bonding TPU to PETG, it was not as good as Loctite 406 in my limited testing.</p><p>The Loctite 406 does seem to hold the tire on the wheel at full throttle in soft grass or soft dirt at full throttle with two full batteries (8S), but I didn't try just holding the X-Maxx in the air and punching the throttle. Franky that's likely to destroy normal X-Maxx tires and might destroy these as well; I strongly recommend not spinning these (or the regular tires) that fast.</p><p>Make sure to fully degrease the wheel and tire contact surfaces with isopropyl especially if you've touched them at all since printing, let fully dry, put the tire on the wheel <i>first</i> using a flat surface under them, and <i>then</i> apply a continuous bead of 406 into the small chamfer V where they meet. It'll wick into the gap a little bit, and that seems to be plenty to hold the tire on (so far - and if it falls off later, just sanding and re-gluing seems pretty easy). Let that dry then flip over and do the other side, then let sit for ~8 hours or until you're sure any excess is fully set.</p><p>I think it looks best to have the print bed side facing outward for both the wheel and tire. There's a mirrored tire .3mf included to make that easier, but if you're not picky about the appearance you can just print 4 wheels and 4 tires and flip the tires around to make the paddles go the right way. The tire model itself isn't chiral. The tire part is only chiral after printing with one side down, and only appearance-wise. Functionally the tire should still be non-chiral until you attach the tire to the wheel at which point the assembly is chiral. Ideally, print two left tires, two right tires, 4 wheels, and 4 hubcaps.</p><p>The hubcaps are optional. The intent is to avoid ripping up the PETG of the wheel with the wheel nuts each time the wheels are installed or removed. Re-printing more hubcaps is <i>way</i> faster than printing more wheels and tires. The hubcap is a little bit of extra thickness but the wheel nuts still seem to go on far enough to work fine. Running without the hubcaps may reduce the chances of losing a wheel nut, but will wear the wheel more where it's held by the wheel nut.</p><p>I've test fit this for both plastic and aluminum hex wheel hubs. For aluminum hex wheel hubs, the fit is pretty tight at first, but ends up perfect (from my printer) after a few force-fits using an aluminum hub to basically shave off any bits of extra PETG that were sticking out. It may make sense to set extrusion multiplier to 0.98 or so to make sure you won't be getting any smooshed-out extrusion for the perimeters, and to make sure you don't get extrusion build-up on the 100% infill portions.</p><p>The “lightweighted” .3mf has some carefully-placed modifier volumes to get 100% infill in just the right places (in my opinion), and less infill where it's not really as critical. So far the “lightweighted” wheels seem to hold up, but it's possible even more lightweighting could also work, maybe.</p><p>I used Tecbears black PETG (nothing particularly special; sometimes a little stringy even when dried thoroughly; sometimes maybe a little brittle depending; often a good deal) for the wheels and Priline black TPU for the tires (Priline TPU is super nice to print as long as you keep the speed within reason for TPU - <a href="https://www.amazon.com/PRILINE-TPU-1KG-Filament-Dimensional-Accuracy/dp/B0928B97F5">https://www.amazon.com/PRILINE-TPU-1KG-Filament-Dimensional-Accuracy/dp/B0928B97F5</a>). I printed both on the textured sheet. The TPU sticks pretty well to the Prusa textured sheet (while still being reasonable to remove), so I wouldn't recommend the satin sheet and definitely wouldn't recommend the smooth sheet, at least not without a separating agent.</p><p>Regarding the tires, the included .3mf files leave a little gap between inner-most perimeters inside each paddle. When I re-print mine, I'm planning to remove that gap, as I think the paddles could be more durable without that gap. A rock or something has ripped a corner off of one of my paddles - maybe without the gap that wouldn't have happened, or wouldn't have happened as soon.</p><p>The wheel requires support for the flat part where the wheel nut goes. “Snug” supports seem to work great for this.</p><p>I think the gyroid infill is a good choice for the tires since the squish seems pretty isotropic. If you're beefing up the tires, keep in mind you probably still want some squish in the base tire, and probably still want just a bit of flex for the paddles. But eliminating the internal gap in the paddles seems probably better.</p><p>Other TPU / flexible materials may be better for this purpose. Please post any makes especially if you try alternate materials for the tire part.</p><p>The wheel to tire interface is 145 mm diameter, in case you want to create+post a print of other tire or wheel options that are compatible.</p><p>The .f3d files are included for both wheel and tire. To some degree the tire paddles are adjustable in the .3mf if you're handy with F360, but keep in mind there are effectively physical constraints on overall wheel+tire size when you're turning hard to either direction, etc. The angle of the paddles can be adjusted to some extent.</p><p>Please post any makes, especially any makes where you used the tires and they ripped to shreds in a blaze of glory (it might help us zero in on the best tire material / best tire print settings). Please post any remixes, including ones that are just adjustments to print settings / modifier volumes / etc, especially any that are informed by testing out a previous print. Those could be very useful to others.</p><p>These will take a long time to print. They're big and TPU is inherently even slower than usual to print. Maybe try printing a left and a right and try that out before you commit to printing all 4.</p><p>Good luck adjusting these to not have the TPU get ripped up during the first run. Printing tires for an X-Maxx might just be asking a lot of TPU… Maybe too much…</p><p> </p>
With this file you will be able to print X-Maxx Big Paddle Tires with your 3D printer. Click on the button and save the file on your computer to work, edit or customize your design. You can also find more 3D designs for printers on X-Maxx Big Paddle Tires.