X-Shot Turbo Advance Drum
thingiverse
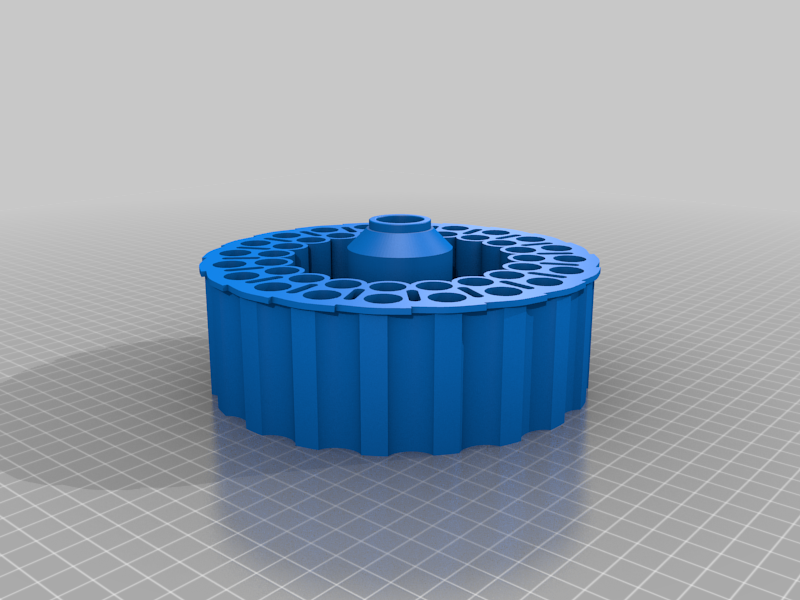
**EDIT 1/17/2022: MK2 version. I refined the initial design by making drum diameter slightly smaller, and making some changes to the post and added a brace. Post still fits via friction but the brace may want a drop of glue to keep it from sliding off the back of the post once assembled, or it could fall off in the heat of battle between reloads. I fixed the "dry fire" failure I had with the MK1, as well as easier to seat and remove whole barrel from weapon. I opted for short posts inside the foam chambers, and they all printed fine. I am now happy with it and recommend printing only MK2 parts. I will keep legacy MK1 parts up for now as well, but they are functionally obsolete.** I got my son a Turbo Advance X Shot foam dart gun for Christmas. I was outraged :) to find that you can not buy additional 40 round drum magazines separately. Never mind that a whole gun, with a full complement of foam darts is like only $35. Buying a second gun would be the sensible thing to do. So of course that is exactly what I did not do. I spend way too much time reverse engineering the drum that came with the weapon, and doing test prints etc. Ok, some notes: I printed mine with 20% infill oriented as the .stl indicates. You could probably get away with less infill as it weighs more than the OEM at 20%. Also, this print takes a LONG time. like a day and a half. I printed with supports on build plate (which you need for the escarpment on the outer edge and the inner hole.) The central little posts are a bitch to print without failure. About half failed on my print. No huge impact on weapon firing. I have included an .stl where the posts are shorter and likely will be less likely to fail. I have not tested that. If you would like to see how well your printer does, I have included a "pie slice" sample that will take far less time to print that lets you test both inner and outer rings through two firings. The central pins are long on that, so you can see how well your printer does before you commit to a day and a half print. Once you get the supports knocked out of central hole, and filed off any elephant foot you got going on on your central post, just slide it in until it seats. No glue required, it should friction hold. I have noticed occasionally the outer ring may not rotate completely in position. If that happens and you fire an empty chamber, the pin on the gun will think there is a round in there and make a loud report. That pin is supposed to sense when the chamber is empty, but if it can't pop through the back of the drum it can be fooled. if that happens, or it bothers you, you could ever so slightly file the leading edge of all 40 escarpments and see if that helps. But as I rotate the drum by hand it seems to seat properly, so I am not going to redesign and print to fix that, at least until I am convinced it would fix it. I am probably done with this design, but please report back with any issues or suggestions. Who knows, I might even do something about it.
With this file you will be able to print X-Shot Turbo Advance Drum with your 3D printer. Click on the button and save the file on your computer to work, edit or customize your design. You can also find more 3D designs for printers on X-Shot Turbo Advance Drum.