X Y & Z Limit switch mount covers for Openbuilds Sphinx CNC
thingiverse
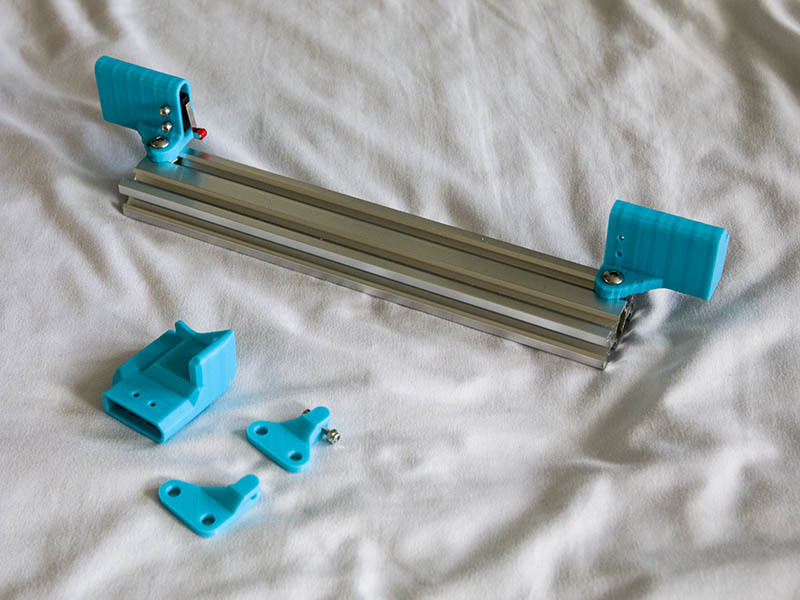
These are the ways I mounted my X, Y & Z Limit switches on my Sphinx CNC to give them a cover and also give the most cutting space, especially in the Z-axis. I mount the limit switches in the covers using M2.5x12mm screws and locknuts. I use three - M5x10mm to mount the Z-axis cover and carriage arms. The Z-axis M5 screws can't be longer than 10mm. You can mount the X & Y axis covers with M5x10 or M5x12 screws. There is an openscad source file for the XY axis combined in one file. The Z-axis has two openscad files - one for the Z-axis Limit switch cover and one for the Z-axis arm that hits the limit switch. You can micro adjust the height of the Z limit switch using an M3 screw with a locknut on the end or use the plastic nut in the file. To use all these mount covers, print Sphinx_X_LimitSwitch_Rev70.stl, Sphinx_Y_LimitSwitch_Rev70.stl, Sphinx_Z_Top_LimitSwitch_Rev56.stl, Z_Carriage_Arm_Rev17.stl and Z_Carriage_Arm_ZNeg8_Rev17.stl. I say print both of the carriage arms to see which works best for you. The ZNeg8 version with M3 screw gives more adjustment. If you are using openbuilds micro limit switches or similar, you will need to drill out those two holes with a 7/64" drill bit or use M2 screws instead of M2.5. The two parts for the Z limit switch should also fit the openbuilds mini-mill and probably any machine that uses that combination reduction plate and c-beam double wide gantry plate. My build log for this machine can be found at https://openbuilds.com/builds/sphinx-55-with-3d-printed-addons.7923/
With this file you will be able to print X Y & Z Limit switch mount covers for Openbuilds Sphinx CNC with your 3D printer. Click on the button and save the file on your computer to work, edit or customize your design. You can also find more 3D designs for printers on X Y & Z Limit switch mount covers for Openbuilds Sphinx CNC.