XAC joysticks and universal adapter
prusaprinters
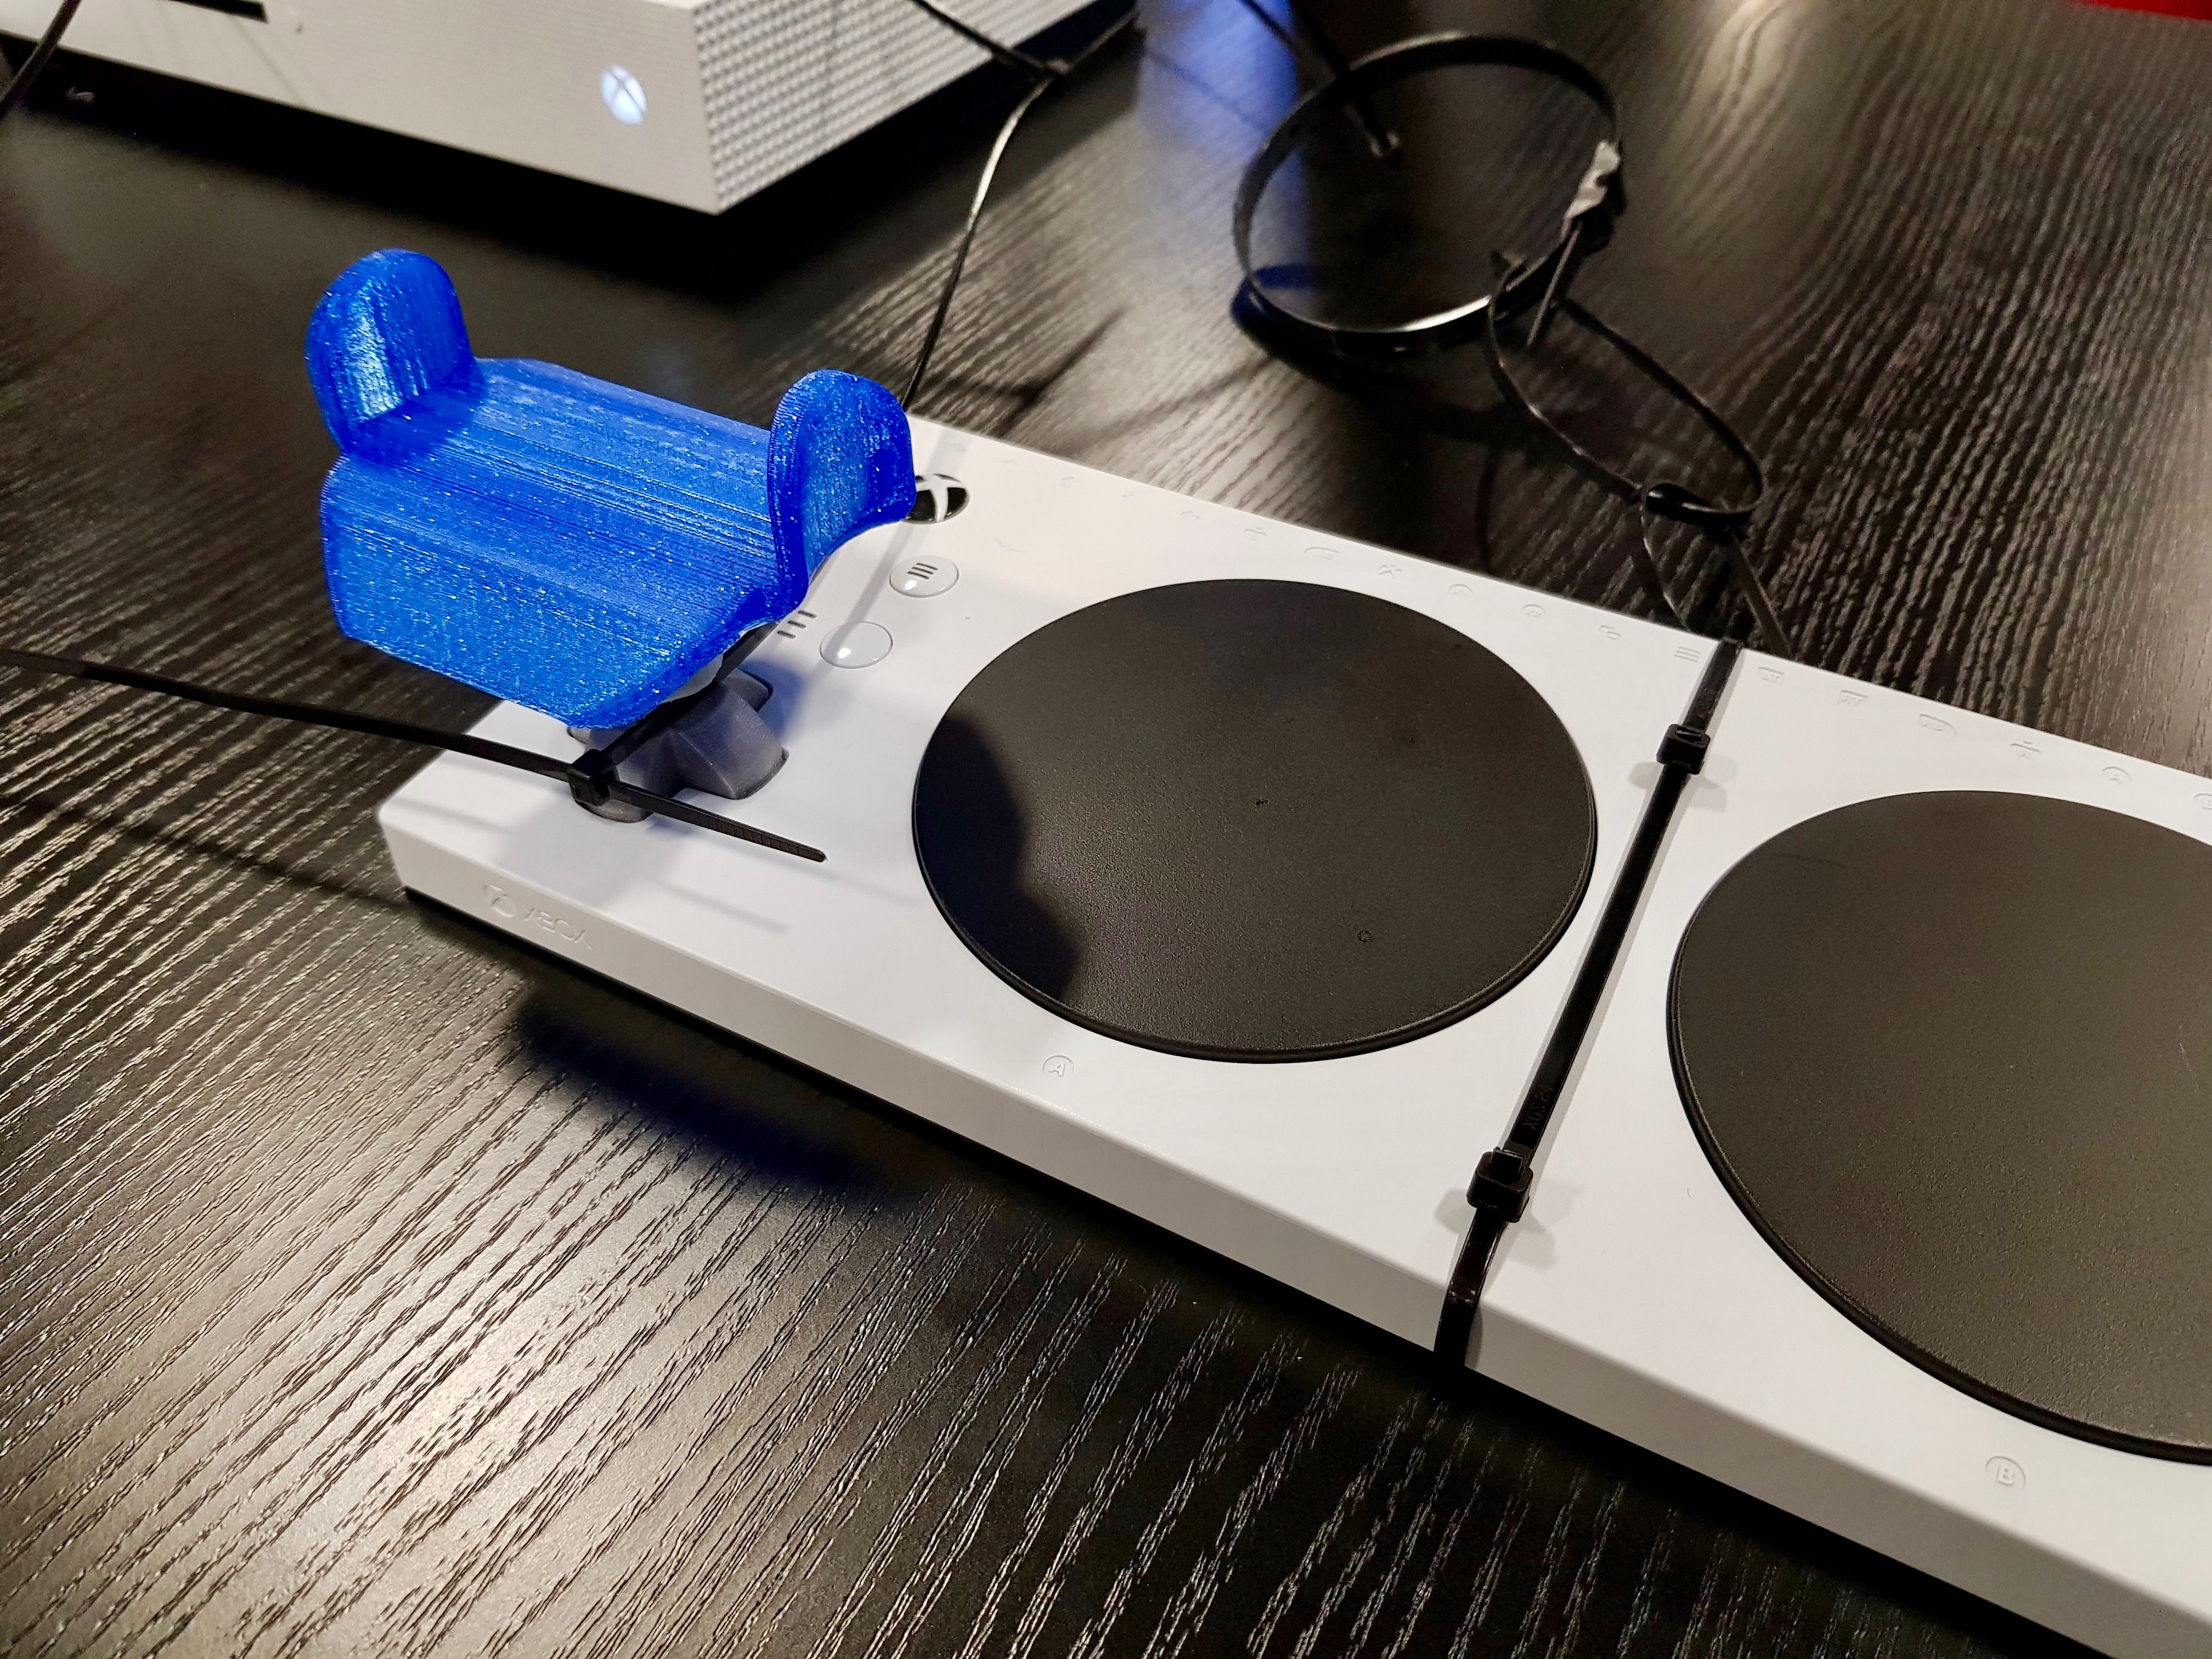
<p>Hi guys!</p><p>Well, <strong>clearly I should have uploaded this design a long time ago</strong>, but you know how it is, you chase time, then it passes, then you forget... But the controller contest made me think about it again and I hope it will be useful to many handigamers around the world.</p><p>[EDIT 02/01/2022] Added joystick and female spacers with tighter tolerance for those who have a very well tuned printer (see in <strong>Printing and post-processing</strong> chapter).</p><p>P.S. For the Snap On Controler contest, I know that this build doesn't snap on the regular controler, but as one dedicated controler exists for disabled people, I thought it might be also interesting if the handigamers are really the target of the designs demanded.</p><h3>Context:</h3><p>Before I start, I would like to mention that this design was made with the collaboration of the HandiFabLab of the <a href="https://iemdabbadie.fr/">IEM Dabbadie</a> based in Villeneuve d'Ascq (France). The HandiFabLab's vocation is to conceive and produce designs with the help of occupational therapists in order to help the young people of the institute to recover certain functions, and the video game is one of them. They do great work so don't hesitate to contact them if you have any ideas or questions (see <a href="http://novap.fehap.fr/candidats/handifablab-service-jeunes-situation-de-handicap/">here</a>).</p><p>Now let's get to the heart of the matter. In parallel to the release of the classic XBox controllers, the <a href="https://www.xbox.com/fr-FR/accessories/controllers/xbox-adaptive-controller">Xbox Adaptive Controller</a>, also called XAC, was developed. It is a system developed and maintained officially by Microsoft, which aims to give disabled players the opportunity to play the XBox, if possible with as many possibilities as able-bodied players.</p><figure class="image image-style-align-center"><img src="https://media.prusaprinters.org/media/prints/110455/rich_content/f71752c7-6b57-4a27-906a-4eb403860ec3/2022-01-02_00-17-38.png#%7B%22uuid%22%3A%22faff92cb-c2a8-4443-bc51-8eaac7a9eec2%22%2C%22w%22%3A1918%2C%22h%22%3A557%7D"></figure><p>For this purpose, the XAC is first equipped with a directional cross, as well as two large buttons that make it much easier to operate. But more than that, the XAC has a large number of ports, each corresponding to a programmable button, to which it is possible to connect large push buttons or various forms of actuators, which are easily usable by people with disabilities. The HandiFabLab has developed several of these switches, which are easy and cheap to make yourself. You can find details on how to make them on this Adafruit project <a href="https://learn.adafruit.com/diy-adaptive-game-controllers/xac-standards">webpage</a> for example (<i>credits to John Park</i>).</p><figure class="image image-style-align-center image_resized" style="width:50%;"><img src="https://media.prusaprinters.org/media/prints/110455/rich_content/7c72a2e1-1023-4a11-880d-04eb3400ee88/2022-01-02_00-32-13.png#%7B%22uuid%22%3A%22344caa61-7360-4de0-9758-4185012ab2ff%22%2C%22w%22%3A1039%2C%22h%22%3A585%7D"></figure><figure class="image image_resized" style="width:50%;"><img src="https://media.prusaprinters.org/media/prints/110455/rich_content/26b4a410-09cd-44be-bb3f-0fb5b7ae5331/2022-01-02_00-32-23.png#%7B%22uuid%22%3A%224e38c41d-304c-4439-ac16-ca383531d0ee%22%2C%22w%22%3A1040%2C%22h%22%3A585%7D"></figure><p>To sum up, the XAC is a very interesting (if a bit expensive) solution for handigamers, and many hacks have already been proposed by the community. However, after discussing it with several disabled gamers, as well as with several occupational therapists, <strong>a major problem remains: its directional cross</strong>. Indeed, it is too small and clearly not optimised for people with disabilities. So, during the 2019 Paris Games Week (yes, it's a long time ago ^^), the HandiFabLab asked me to try to find a solution to adapt joysticks, if possible ergonomic ones, onto the directional cross, and here is the solution I proposed. </p><h3>Description and assembly:</h3><p>To begin with, I designed a replacement directional cross on which it would be possible to fit multiple different tools with a universal magnetic system, a bit like my <a href="https://www.prusaprinters.org/fr/prints/16240-multitool">multitool</a>. This is the file named <strong>XAC_HandiAdapter_Base</strong> in the .stl download list. </p><figure class="image image_resized" style="width:29.95%;"><img src="https://media.prusaprinters.org/media/prints/110455/rich_content/6c44a58f-f416-4788-9d63-e2f1ac314c19/2022-01-02_01-53-42.png#%7B%22uuid%22%3A%2240e80c58-0158-43e3-ba25-dee99121c2e7%22%2C%22w%22%3A398%2C%22h%22%3A250%7D"></figure><p>Mounting it on the XAC is very easy. You just have to turn the XAC upside down, then remove the 4 rubber pads with a flat metal tool (knife, cutter, etc.). <i><strong>Be careful, the pads are glued with very strong double sided tape, be careful not to hurt yourself.</strong></i> Put the pads aside so you can reposition them after the operation, it works very well. </p><figure class="image image_resized" style="width:75%;"><img src="https://media.prusaprinters.org/media/prints/110455/rich_content/289ca147-1f15-40a1-82b1-5345b9b01927/2022-01-02_00-35-13.png#%7B%22uuid%22%3A%228800bae3-b04f-4cfa-983a-02fe8ac6aa7b%22%2C%22w%22%3A1349%2C%22h%22%3A757%7D"></figure><p>Once this is done, you can unscrew the 4 screws that were hidden underneath, and all you have to do is open the XAC by sliding a blade or your flat metal tool between the black and white part to remove the bottom part. <strong>Be careful not to lose the parts (buttons, etc.) located between the two parts</strong>. Normally there are no springs or other parts that can blow off, but the USB port and audio jack can sometimes be a little difficult to remove or reassemble. I searched on Youtube if there was a video for the dismantling but I did not find one. I don't have an XAC at home at the moment <strong>but I promise to make one soon to help those who can't open the XAC</strong>. Once the XAC is open, all you have to do is replace the directional cross with the base that you have printed beforehand. </p><p>Finally, close the XAC by carrying out the operations in reverse order. I advise you to start by inserting the top part of the bottom cover, with all the connectors, as the bottom part should clip on easily afterwards. </p><p>Then you have to mount on the base the universal adapter named <strong>XAC_HandiAdapter_Multitool</strong> (I can't help it ;-P). To do this you just have to screw it directly on the base. The little dot on the top of de <strong>XAC_HandiAdapter_Multitool</strong> should be at 45° from the vertical axe. This ensures that the joysticks will be correctly oriented afterwards. </p><figure class="image image-style-align-center image_resized" style="width:20.11%;"><img src="https://media.prusaprinters.org/media/prints/110455/rich_content/e1dc505a-24d8-46db-8cf9-3c68d9fd308f/2022-01-02_00-49-58.png#%7B%22uuid%22%3A%2273090e5a-1d7b-4d9c-9ad0-19be2a344c01%22%2C%22w%22%3A698%2C%22h%22%3A1004%7D"></figure><figure class="image image_resized" style="width:36.63%;"><img src="https://media.prusaprinters.org/media/prints/110455/rich_content/4329eec8-d0ed-43ae-b216-0efc724c1802/img_1131.jpg#%7B%22uuid%22%3A%2262522a54-f32e-494a-8807-d76ff45e2402%22%2C%22w%22%3A1960%2C%22h%22%3A1742%7D"></figure><p>Then simply select the joystick or tool you like from the following list and connect it to start playing! </p><h3>List of available tools (updated on 01/01/2022):</h3><h4>Single joysticks:</h4><p><i><strong>XAC_HandiAdapter_JoyStick_Standard</strong></i>: Basic joystick without much complexity but allowing to replace the directional cross with a bigger and easier to handle system. </p><figure class="image image-style-align-center image_resized" style="width:10.02%;"><img src="https://media.prusaprinters.org/media/prints/110455/rich_content/497c6a08-03d5-4584-b1ce-49c74d9b7b6a/2022-01-02_01-53-23.png#%7B%22uuid%22%3A%223843662c-988d-46eb-9058-06f7539bccd8%22%2C%22w%22%3A246%2C%22h%22%3A776%7D"></figure><p><i><strong>XAC_HandiAdapter_JoyStick_Sphere</strong></i>: Same as above but with a large sphere at the tip to make it even easier for people with little hand strength to hold. </p><figure class="image image-style-align-center image_resized" style="width:12.5%;"><img src="https://media.prusaprinters.org/media/prints/110455/rich_content/0d826532-fd17-4c15-833d-5991d64cc14c/2022-01-02_01-53-08.png#%7B%22uuid%22%3A%2246b1d56f-b7f0-440b-bfc3-8d5f3bbc136d%22%2C%22w%22%3A340%2C%22h%22%3A592%7D"></figure><h4>Twisted joysticks:</h4><p>Twisted joysticks allow for a joystick that becomes soft and flexible in use, yet strong enough to play with. They are available in two sizes (thin and large).</p><p><i><strong>XAC_HandiAdapter_JoyStick_TwistedThin</strong></i></p><figure class="image image_resized" style="width:7.03%;"><img src="https://media.prusaprinters.org/media/prints/110455/rich_content/cc0b0ef8-eedd-4e41-b053-0faaf70e9e98/2022-01-02_01-52-12.png#%7B%22uuid%22%3A%22058bf91b-a75f-4ca6-be14-26aab63e8724%22%2C%22w%22%3A184%2C%22h%22%3A828%7D"></figure><p><i><strong>XAC_HandiAdapter_JoyStick_TwistedLarge</strong></i>: I would recommend using the thin version of the flexible joystick if possible as it prints much better. The wide version has 60° overhangs and may be difficult to print without a stand depending on your printer's capabilities. </p><figure class="image image_resized" style="width:9.04%;"><img src="https://media.prusaprinters.org/media/prints/110455/rich_content/6b17200d-31e2-4f54-9a80-8dcf668fc480/2022-01-02_01-52-40.png#%7B%22uuid%22%3A%22bab31ddf-fd67-48d0-82f6-5b2c328a8d4a%22%2C%22w%22%3A250%2C%22h%22%3A820%7D"></figure><h4>Ergonomic joysticks:</h4><p><i><strong>Ergonomic joysticks are designed to allow an optimal grip, even for people with a severe disability, for example, who cannot close their hand at all. </strong></i></p><p><i><strong>XAC_HandiAdapter_JoyStick_ErgoDesign</strong></i>: Inspired by the U-shaped joystick <a href="https://www.bodypoint.com/ECommerce/product/pcpt04/u-shaped-joystick-handles">available</a> (and prohibitively expensive) for wheelchairs, this joystick will be very suitable for people with very little hand strength. The joystick can be printed in flexible filament for more comfort and a better fit in the hand. If the size is not suitable for you, please contact me. You can also modify the attached .step file. </p><figure class="image image_resized" style="width:40.49%;"><img src="https://media.prusaprinters.org/media/prints/110455/rich_content/c7a04233-d4c8-4562-b04e-f7ac2e6dc7fc/2022-01-02_01-51-49.png#%7B%22uuid%22%3A%22d6b8d900-5b3d-4c6f-9df2-cc60a7cbe4e7%22%2C%22w%22%3A730%2C%22h%22%3A482%7D"></figure><h4>Chin joysticks:</h4><p><i><strong>These joysticks allow you to play not with your hand but with your chin directly. They are made for people who have no mobility in their arms. In addition, they are very fun to use and offer a whole new gaming experience, even for able-bodied people! Great fun guaranteed! Give it a try! For more comfort, do not hesitate to mount the XAC on a stand, attached to the wheelchair for example, using the screw-in slots available under the XAC. Also, don't hesitate to use the printable spacers to raise the joystick to chin height if the XAC is to be placed on the table. </strong></i></p><p><i><strong>XAC_HandiAdapter_JoyStick_TwistedThin-ChinVersion</strong></i>: Chin version of the flexible joystick. Funnily enough, when printing this joystick, the three flexible arms move with the head (see the video here). You might as well make sure that the part sticks to the tray when printing.</p><figure class="image image_resized" style="width:14.95%;"><img src="https://media.prusaprinters.org/media/prints/110455/rich_content/75970feb-0447-4e55-a841-81478d06b2ef/2022-01-02_01-52-25.png#%7B%22uuid%22%3A%225038a3b4-9f8b-489a-af00-9ab1f0acb65d%22%2C%22w%22%3A388%2C%22h%22%3A890%7D"></figure><figure class="media"><oembed url="https://youtu.be/YzSbcXK8Tps"></oembed></figure><figure class="media"><oembed url="https://youtu.be/o3aIL9OOzY4"></oembed></figure><p><i><strong>XAC_HandiAdapter_ChinJoystick</strong></i>: This chin joystick fits directly onto a female spacer (see printable spacers in the next section). Note that this chin adapter works best when slightly tilted. For this use the "<strong>XAC_HandiAdapter_Spacer_Female-Curved</strong>".</p><figure class="image image_resized" style="width:25.04%;"><img src="https://media.prusaprinters.org/media/prints/110455/rich_content/e600b457-ffc6-47e4-8c59-6505cfe8062b/2022-01-02_01-57-07.png#%7B%22uuid%22%3A%2232e7925c-8397-4f2f-9bde-7d858868788b%22%2C%22w%22%3A388%2C%22h%22%3A368%7D"></figure><h4>Spacers for joysicks:</h4><p><i><strong>In order to best adapt the system to the player, this section contains spacers to be printed and nested in order to enhance the joysticks more or less. </strong></i></p><p><i><strong>XAC_HandiAdapter_Spacer_Female</strong></i>: Simple female spacer.</p><p><i><strong>XAC_HandiAdapter_Spacer_Female-Curved</strong></i>: Female spacer with an angle of 20° compared to the vertical axe.</p><p><i><strong>XAC_HandiAdapter_Spacer_Male</strong></i>: Simple male spacer.</p><p>Once fully assembled with the spacers, the complete system can look like this for example, with the chin joystick adpater:</p><figure class="image image_resized" style="width:20.02%;"><img src="https://media.prusaprinters.org/media/prints/110455/rich_content/4c155a90-225e-4708-a80a-fc84cd88499b/2022-01-02_00-06-20.png#%7B%22uuid%22%3A%228b4795ac-9664-4f7f-bc46-df76cadb74c0%22%2C%22w%22%3A566%2C%22h%22%3A1690%7D"></figure><figure class="image image_resized" style="width:28.7%;"><img src="https://media.prusaprinters.org/media/prints/110455/rich_content/009cf300-0e7d-4aed-bd4f-378bd0b2809b/img_1145.jpg#%7B%22uuid%22%3A%22612509e4-5ff7-489c-a709-6a84cd1adea3%22%2C%22w%22%3A3024%2C%22h%22%3A4032%7D"></figure><h3>Printing and post-processing</h3><p>In this section I will detail how best to print the different parts. Note that I did the printing on my MK3 to test the parts but <strong>it should work just as well on printers with a tolerance of at least 0.4mm</strong>. I also added a version of the female parts with a tolerance of 0.2mm for those who have well tuned 3D printers (see below). To know more about your Printer tolerance, don't hesitate to have a look at <strong>Maker's Muse</strong>'s videos on the subject, especially the one on his <a href="https://www.youtube.com/watch?v=XnJBpCWf9Mc&t=7s">tolerance test V2</a>, and the one on how to <a href="https://www.youtube.com/watch?v=YPAXeBuq9qU">improve your printer peformances</a>.</p><p>Only parts <strong>XAC_HandiAdapter_Base</strong>, <strong>XAC_HandiAdapter_Multitool</strong>,<strong> XAC_HandiAdapter_ChinJoystick </strong>and<strong> XAC_HandiAdapter_JoyStick_ErgoDesign</strong> need to be printed with supports, the others do not. For your convenience, I have prepared the files in .3mf format. </p><p>Normally, if your printer has the tolerance indicated above, the parts should not require significant sanding or post-processing. <i>Still, I just printed again the different parts on my Prusa I3 MK3 that I tuned for better printing over the past year, and for my printer the tolerance of the “standard” parts is a little bit loose and I get some wobbling in the assembly. Therefore I just added a copy of the joysticks and female spacers with a tolerance divided by 2 for those who have a very good printing quality. <strong>I advice you to test both tolerances by first printing the female spacers before printing the other joysticks.</strong></i><strong> </strong><i><strong>The parts with tighter tolerances are named with “_TightTol” in the end of their name. </strong>If you already printed your joysticks with the large tolerance and want to reduce the wobbling, you can use some electrical tape to artificially enlarge the male part as in the picture below. You can also glue the pieces together if you're sure they wont be disassembled again.</i></p><figure class="image image_resized" style="width:50%;"><img src="https://media.prusaprinters.org/media/prints/110455/rich_content/f86870c6-723c-4824-aac9-207b4ffc79e2/img_1130.jpg#%7B%22uuid%22%3A%227cd10ff9-3701-4ff5-a32d-ac6158f30acc%22%2C%22w%22%3A4032%2C%22h%22%3A3024%7D"></figure><p>NB: The provided .gcode files, as well as the .3mf ones, were made with the pieces having the larger tolerance.</p><p><strong>It is also advisable to insert neodymium magnets in the slots provided in each joystick, spacer and adapter for greater comfort</strong>. To do this, use <i><strong>5x2mm magnets</strong></i> (I buy mine <a href="https://www.supermagnete.fr/aimants-disques-neodyme/disque-magnetique-5mm-2mm_S-05-02-N40N">here</a>), and glue them with a drop of <i><strong>cyanoacrylic glue</strong></i>. </p><figure class="image image_resized" style="width:39.88%;"><img src="https://media.prusaprinters.org/media/prints/110455/rich_content/4db093c4-b64a-4547-bba8-22f09fa19824/img_1133.jpg#%7B%22uuid%22%3A%22b3d48e97-34a8-4150-ba53-978bcc19fd8e%22%2C%22w%22%3A4032%2C%22h%22%3A3024%7D"></figure><figure class="image image_resized" style="width:40.03%;"><img src="https://media.prusaprinters.org/media/prints/110455/rich_content/f29d4c50-f1d8-40db-8c3d-2c1397b4589d/img_1144.jpg#%7B%22uuid%22%3A%22a38e60bc-1c08-4f51-a36b-32d102d9b95a%22%2C%22w%22%3A4032%2C%22h%22%3A3024%7D"></figure><p>To help you place the magnets in the grooves of the joysticks, it is advisable to use a screw at the end of which to position it beforehand, and then to use this screw as a stick for positioning. </p><figure class="image image_resized" style="width:40.03%;"><img src="https://media.prusaprinters.org/media/prints/110455/rich_content/d7dc889e-0196-4cca-8dec-f5c2e0d18222/img_1134.jpg#%7B%22uuid%22%3A%22eb69402f-d94e-437c-942c-be87a2f03e95%22%2C%22w%22%3A4032%2C%22h%22%3A3024%7D"></figure><figure class="image image_resized" style="width:40.03%;"><img src="https://media.prusaprinters.org/media/prints/110455/rich_content/a6057996-6de2-48bd-8c77-e5dea6481338/img_1135.jpg#%7B%22uuid%22%3A%221d97d68a-58f0-45ce-be01-ebc8aabc49ff%22%2C%22w%22%3A4032%2C%22h%22%3A3024%7D"></figure><p><strong>Also pay attention to the polarity of the magnets before inserting them because once they are glued in place, they cannot be turned over ;-)</strong></p><figure class="image image_resized" style="width:39.85%;"><img src="https://media.prusaprinters.org/media/prints/110455/rich_content/eadb99cd-e8d1-4e61-8df4-6128e5e0fd9c/img_1132.jpg#%7B%22uuid%22%3A%22e8379887-87c7-4e73-87e1-dd8b699db439%22%2C%22w%22%3A4032%2C%22h%22%3A3024%7D"></figure><p>Finally, all files are also available in .step format so that anyone can reuse them to design their own joysticks and accessories. I would be delighted to see many more adapters of this type spring up, and I think that both the able-bodied and disabled worlds would have a lot to gain.</p><p>P.S. I'll try to upload few more pictures of the XAC with the adapter and the joystick once I'll have the possibility to put my hand on one. Stay tuned!</p><h3>End of the story:</h3><p>As a conclusion to this project, it was as expected presented and proposed for testing at the Paris Games Week 2019 (#PGW2019), on the HandiFabLab booth (see some details and videos <a href="https://myhumankit.org/actualite/jouez-comme-vous-etes-a-la-paris-games-week/">here</a>) and it was well appreciated by the handigamers. But it especially interested able-bodied players who were able to put themselves in the shoes of a handigamer for a while. The chin adapter was particularly popular, especially in the case of the car racing games, where the sensations were very fun to feel (see photos). </p><p>This gives me great hope that one day there will be many, many adaptations for people with disabilities, and not just in the gaming world. Then I would like to thank Prusa3D for highlighting the development of systems for people with disabilities, especially through this competition. By the way, if you like this kind of work and want ideas to help advance the cause of people with disabilities, don't hesitate to send me a message, I'll be happy to discuss it with you! Also, feel free to check out my <a href="https://www.prusaprinters.org/fr/prints/16240-multitool">Multitool system</a> and especially to create new tools for it! That would be fantastic!</p><p><strong>I would finally like to thank Clémence and Nicolas from HandiFabLab </strong>who asked me to solve this challenge, and whom I had the chance to accompany to Paris Games Week to try out this design on the "battlefield". </p>
With this file you will be able to print XAC joysticks and universal adapter with your 3D printer. Click on the button and save the file on your computer to work, edit or customize your design. You can also find more 3D designs for printers on XAC joysticks and universal adapter.