Xbox One controller mini wheel
prusaprinters
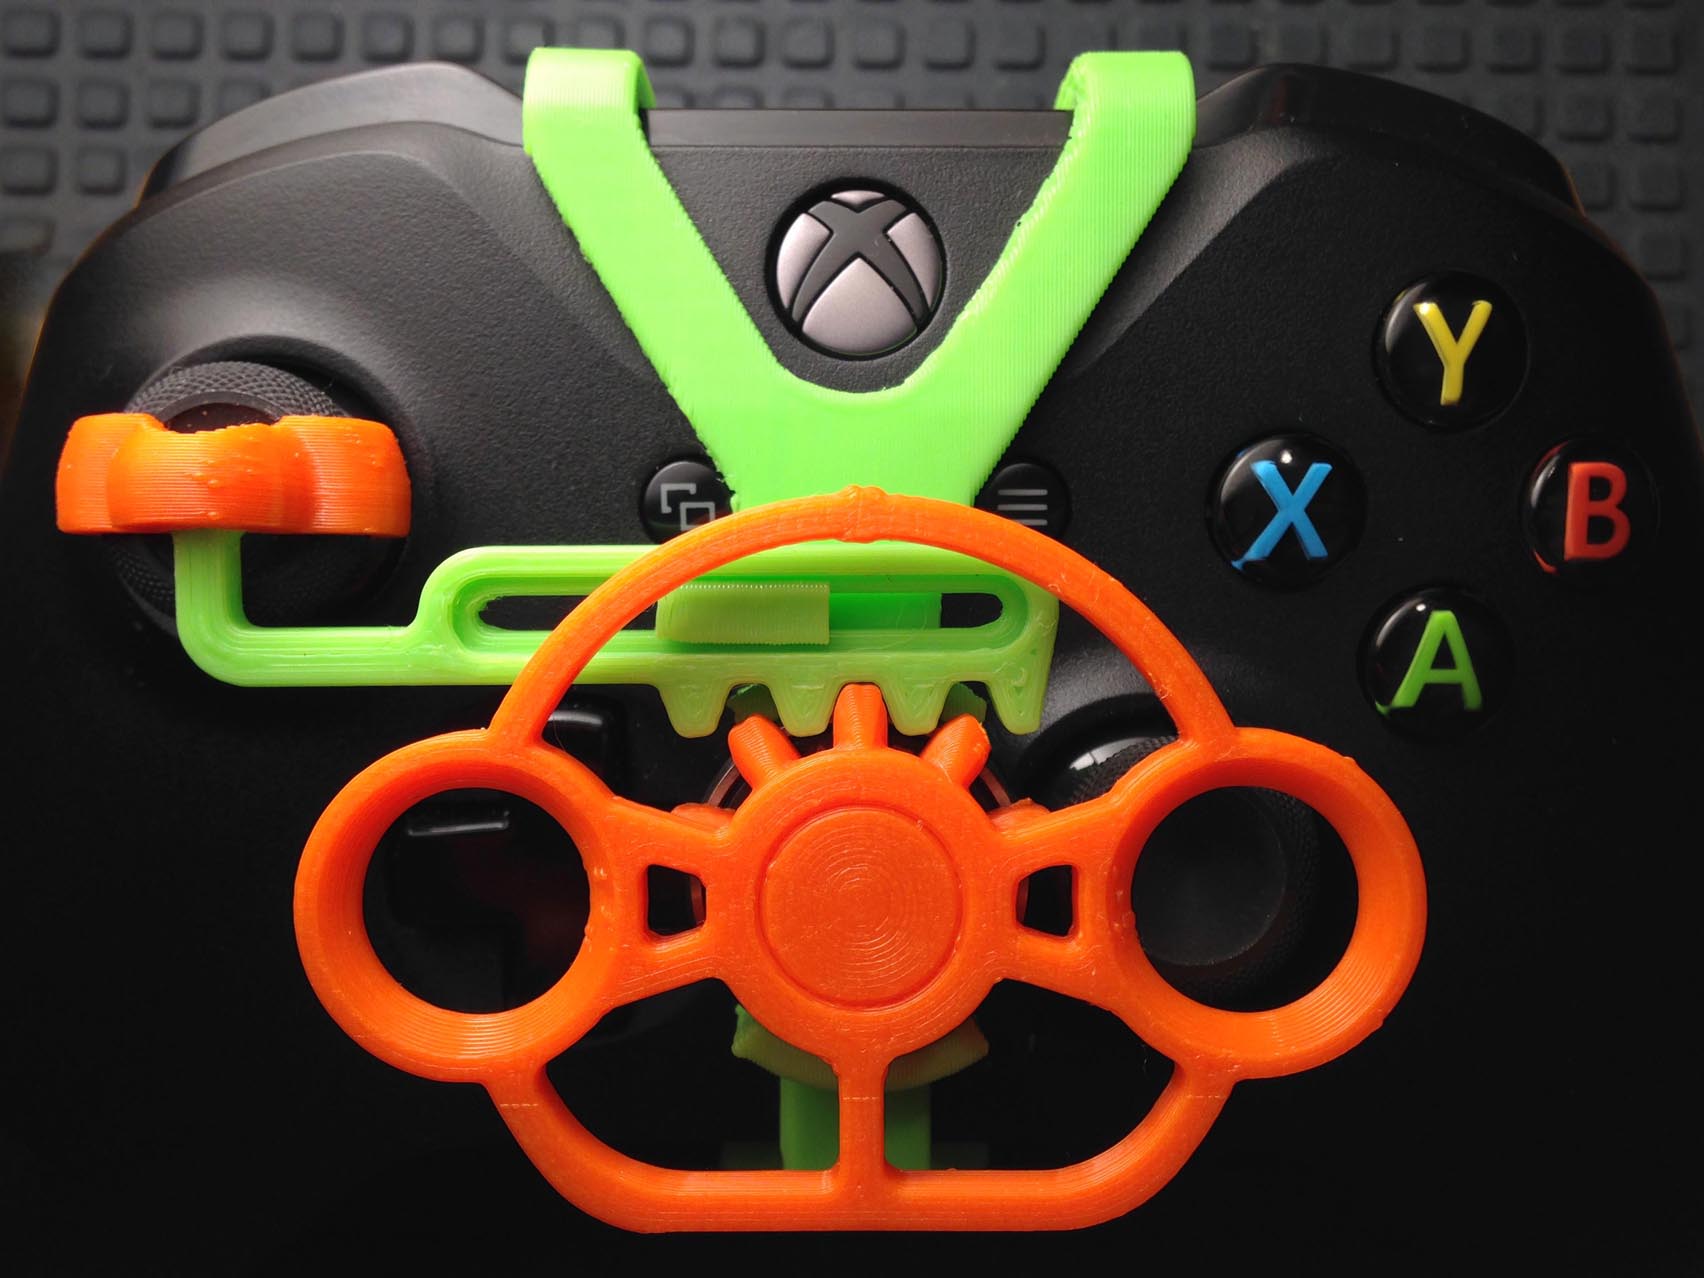
<p>Rack and pinion steering for your xbox controller. 100 degrees of rotation. Enjoy finer control in racing games.</p><p>Get the remastered version:</p><p><a href="https://www.printables.com/model/271330-xbox-one-mini-wheel-evolution">https://www.printables.com/model/271330-xbox-one-mini-wheel-evolution</a></p><p> </p><figure class="media"><oembed url="https://youtu.be/Zgiul4cFMUw"></oembed></figure><figure class="media"><oembed url="https://youtu.be/TQauUKt62Xo"></oembed></figure><figure class="media"><oembed url="https://www.youtube.com/watch?v=__txpfj70Nw"></oembed></figure><p>What you need:</p><p>608 bearing, 22mm diameter, 7mm thick, 8mm center. Get one from that dusty fidget spinner you have laying around...also skateboard bearings</p><p>superglue</p><p>*the lowProfile pivot requires a 1.2mm metal rod [paper clip/push pin/etc]</p><p> </p><p> </p><p>It's going to feel strange in the beginning because you probably have hundreds of hours driving with just the stick. Give it time to create new muscle memory.</p><p>project cars 2 settings:</p><p>steering deadzone 0</p><p>steering sensitivity 53</p><p>speed sensitivity 70</p><p>controller damping 3 (default=90[?] this made a world of difference)</p><p>*<strong>WARNING</strong>* Over time the frame will scuff the controller body. Adhesive felt on the underside of the frame might help.</p><p> </p><h3>Print Settings</h3><p><strong>Supports: </strong>Yes</p><p><strong>Resolution: </strong>.2</p><p><strong>Notes:</strong></p><p>Choose the correct frame for your controller [see image]. If the nexus button [big X in the middle] is surrounded by the face plate you have the modern version. The Older & Elite print may have supports hiding in the gap where the paring button is. Make sure to remove them.</p><p>.2 layer height (.4 nozzle)</p><p>0 top/bottom layers</p><p>16 walls - makes parts solid and stronger than using infill</p><p>supports are only needed for the frame</p><p>You only need to print 1 frame and 1 wheel.</p><p>*The lowProfile pivot and rack files work with the wide wheel.</p><p>Tolerances are tight on this model and good layer adhesion is a must. Make sure your printer is properly calibrated before attempting this project.</p><p>No one ever reads this far but printing all walls and no infill/top&bottom layers will give you the best chance for a strong print. Like wood, you want long continuous fibers in parallel for strength. Also the surface of the rack will be smoother, so less friction with the frame.</p><h3>Post-Printing</h3><p><strong>Assembly:</strong></p><ol><li>Snap the rack into the pivot.</li><li>Glue the top and bottom edge of the bearing into the frame. Wait for glue to dry. Superglue might leave a white haze on the controller if it's not dry.</li><li>Snap the rack onto the frame.</li><li>Pop the frame on the controller. It's good practice to hook the front on first and then lock in the back tab. Reverse when removing it.</li><li>Slide the pivot down on the stick. The ball joint should be in the center. Align the bottom edge of the pivot so it's parallel with the rack. The stick should return to the neutral position when pushed to either extreme.</li><li>Center the wheel on the rack and press it into the bearing.</li></ol><p>*<strong>lowProfile pivot & rack users:</strong>*</p><p>Put a 90 degree bend on the end of a paper clip [3mm tab]. Clip off 15mm from the bend. If you are using a small nail with a head just trim to length. Put the piece up through the rack and press fit into the pivot. If it's loose in the pivot, use superglue. You want some play in the rack side and tight in the pivot.</p>
With this file you will be able to print Xbox One controller mini wheel with your 3D printer. Click on the button and save the file on your computer to work, edit or customize your design. You can also find more 3D designs for printers on Xbox One controller mini wheel.