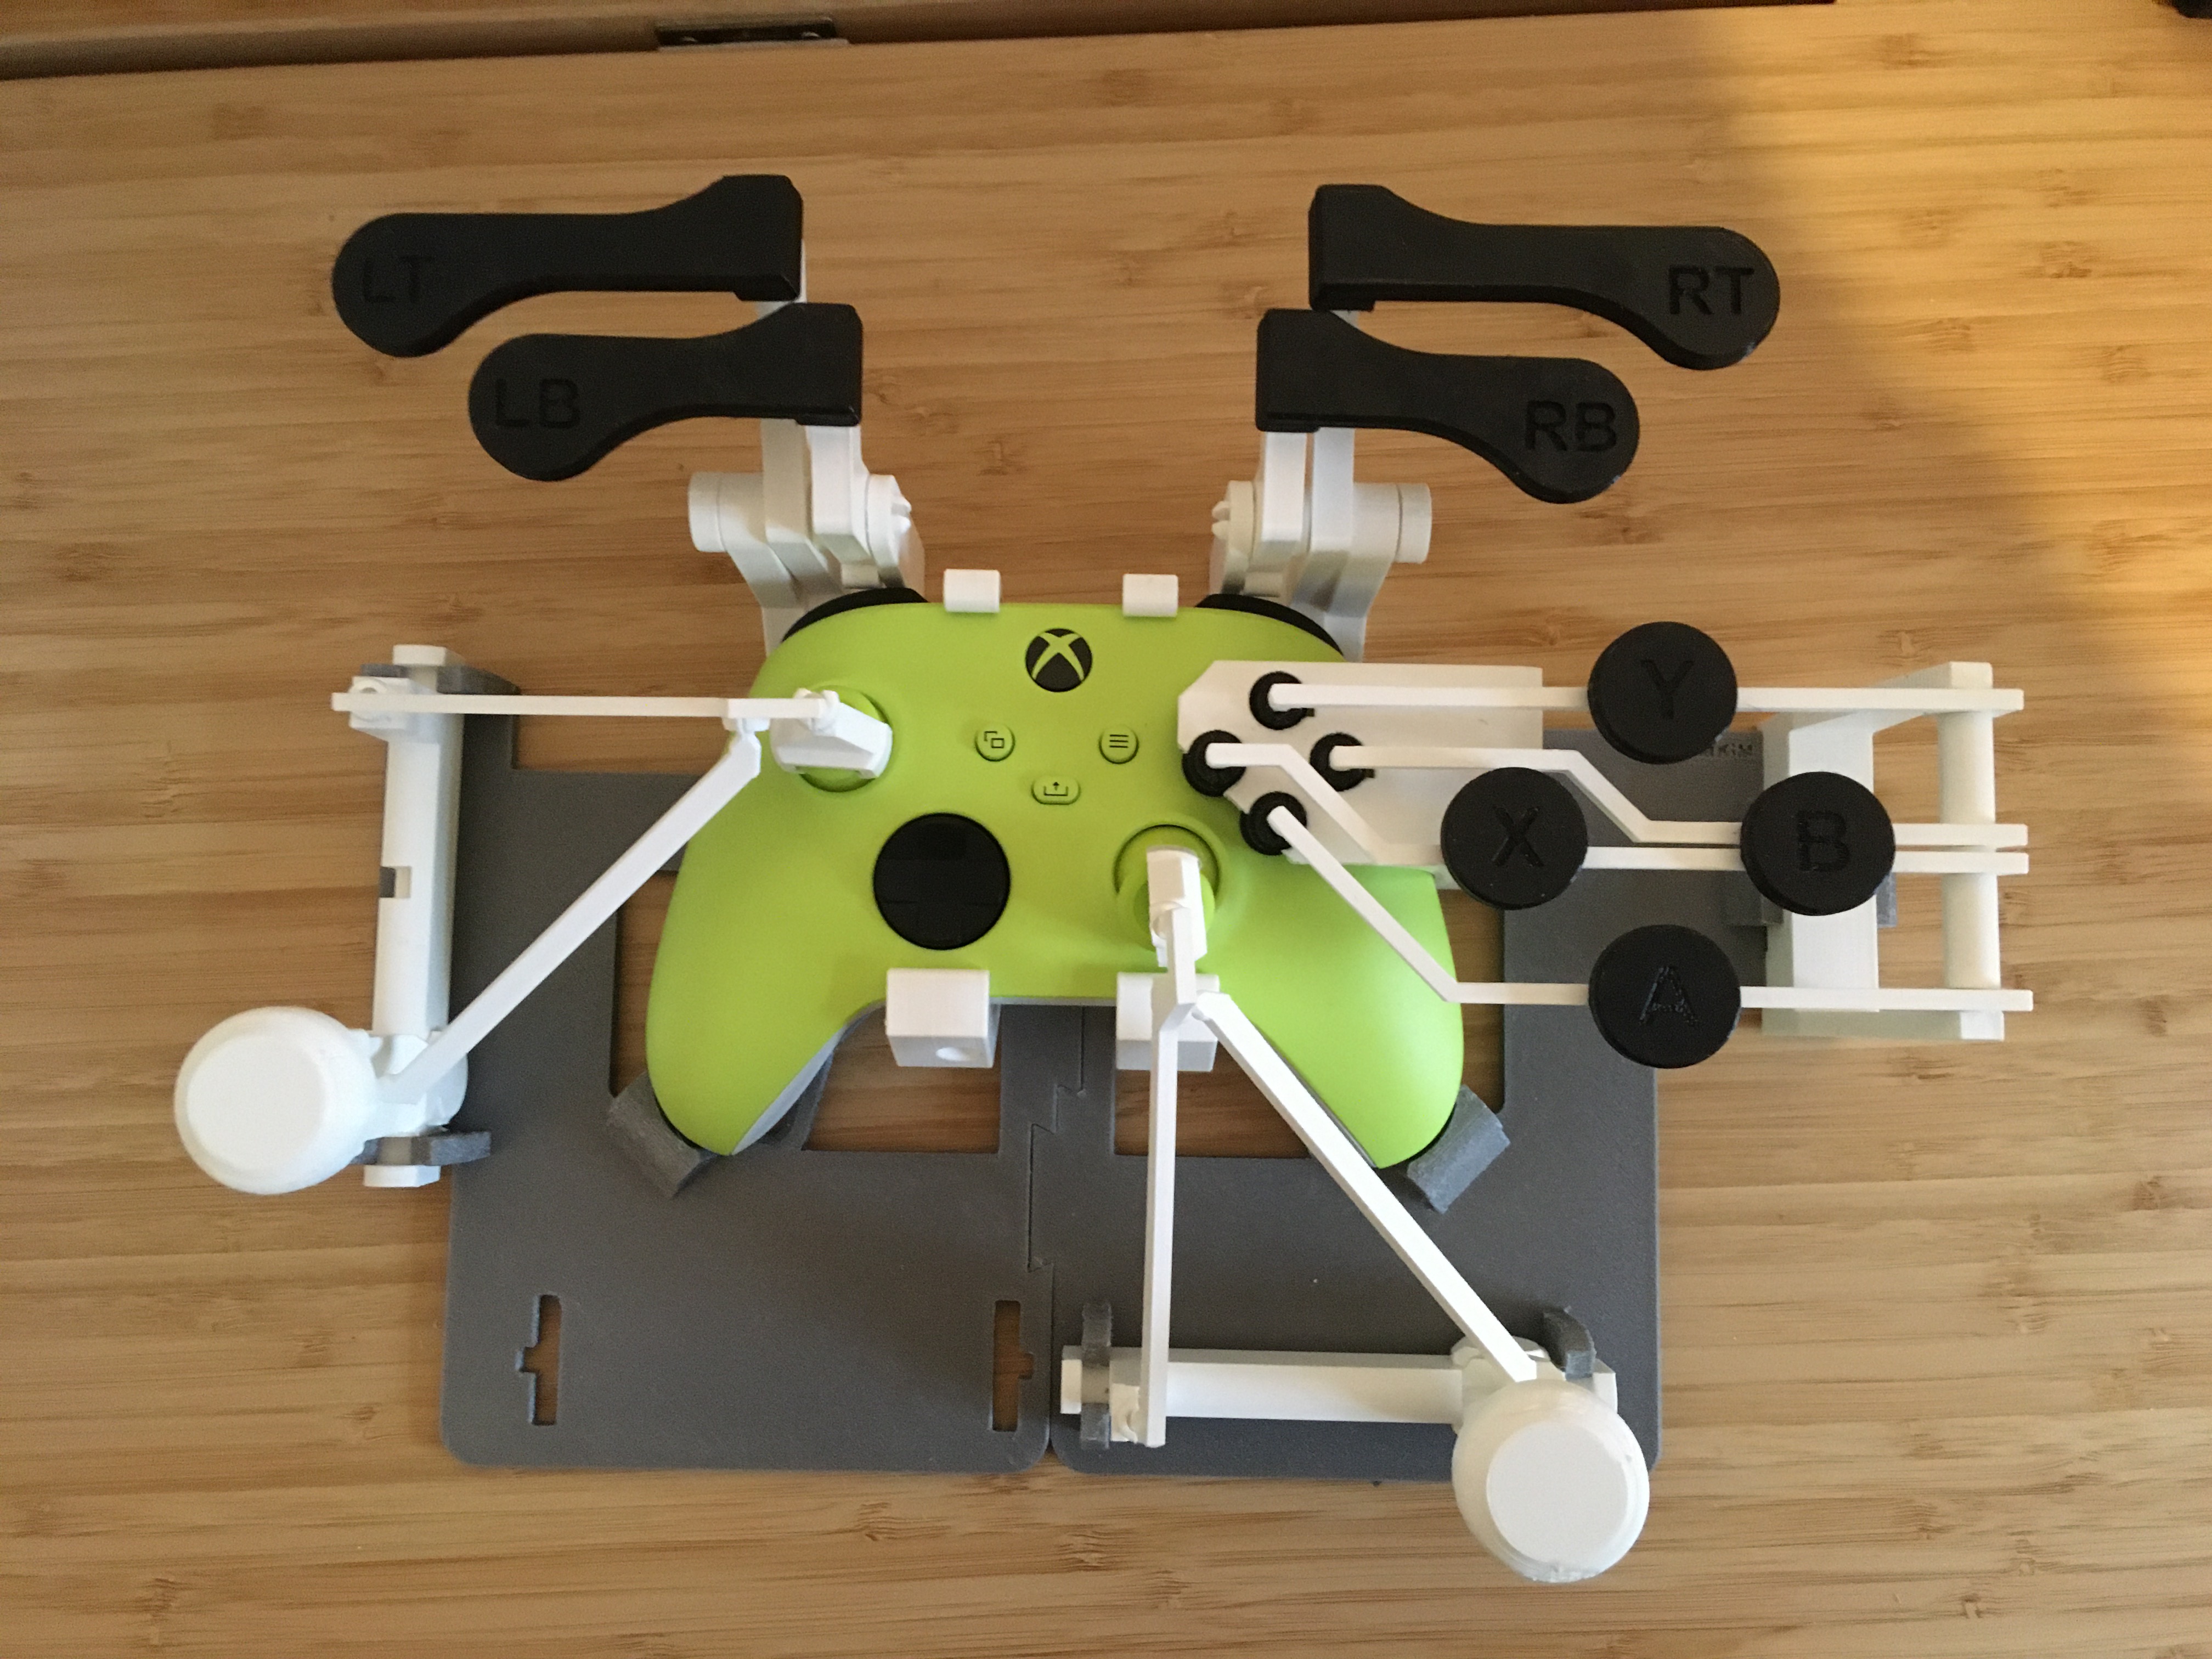
XBox One Controller Mod - Top-Down Play
prusaprinters
<p><strong>Description:</strong></p><p>This snap-on mod allows the Xbox One controller to be placed down and played from top-down.</p><p> </p><p>This mod was inspired by and is a remix of <strong>Akaki's Snap-On Xbox Gamepad HOTAS Joystick</strong>:</p><p><a href="https://cults3d.com/en/3d-model/gadget/snap-on-xbox-gamepad-hotas-joystick">https://cults3d.com/en/3d-model/gadget/snap-on-xbox-gamepad-hotas-joystick</a></p><p> </p><p>The contoller can be snapped on the base/mount assembly and placed down on the flat surface. The joysticks and buttons are extended outwards and enlarged for easier reachability. The levers for the RB, RT, LB & LT allow them to be pressed from top-down.</p><p>As I am not a gamer I think that this mod can be further optimized. I would really apprecriate your feedbacks and shared makes. Thanks a lot! :)</p><p> </p><p><strong>Assembly:</strong></p><p>Depending on the tolerances of your printers you might need a file to work on the connection points like the hinges or ball joints.</p><p>Optionally glue can be use for connecting the jostick grip, A, B, X, Y, RB, RT, LB and LT buttons.</p><p><i>Be careful not to snap off the ball heads when assembling.</i></p><p><i><strong>Pre-assemble the joystick extension.</strong></i></p><figure class="image image-style-align-center image_resized" style="width:75%;"><img src="https://media.prusaprinters.org/media/prints/111335/rich_content/78ceb2d7-39d4-46ef-8b35-a819adc2a53e/img_5815.jpg#%7B%22uuid%22%3A%2265d14669-b686-4252-9bf2-0ebaa421088b%22%2C%22w%22%3A3184%2C%22h%22%3A2296%7D"></figure><p>Snap in the roll arm to the joystick shaft.</p><figure class="image image-style-align-center image_resized" style="width:75%;"><img src="https://media.prusaprinters.org/media/prints/111335/rich_content/2e0229b1-b337-4204-a6d0-b5bce9b9e355/img_5816.jpg#%7B%22uuid%22%3A%2236594f03-befd-446a-bbf1-17e5cb0cedd7%22%2C%22w%22%3A3024%2C%22h%22%3A4032%7D"></figure><p>Snap in the roll arm to the pitch arm.</p><figure class="image image_resized" style="width:75%;"><img src="https://media.prusaprinters.org/media/prints/111335/rich_content/f98cf03e-7b9e-4231-be08-5a8da5647b96/img_5817.jpg#%7B%22uuid%22%3A%22f4c9b1d1-169b-4d8a-9f03-21bc0b889cd8%22%2C%22w%22%3A4032%2C%22h%22%3A3024%7D"></figure><p>Assemble the shaft and pitch arm with the joystick hinge.</p><figure class="image image_resized" style="width:75%;"><img src="https://media.prusaprinters.org/media/prints/111335/rich_content/8f01f5d2-0955-4c1e-b623-17b8014271ab/img_5818.jpg#%7B%22uuid%22%3A%226d176e7a-4195-4ed1-9eef-43f9b2d88ca4%22%2C%22w%22%3A4032%2C%22h%22%3A3024%7D"></figure><p>Push in the thunmstick collar and joystick grip to the rest of the pre-assembly.</p><figure class="image image_resized" style="width:75%;"><img src="https://media.prusaprinters.org/media/prints/111335/rich_content/cfbfee2d-c5a1-4e03-8980-bc20ed59518a/img_5819.jpg#%7B%22uuid%22%3A%22232e8829-7a1c-4e8d-b7d0-e7427472ef02%22%2C%22w%22%3A2848%2C%22h%22%3A2584%7D"></figure><p><i><strong>Pre-assemble shoulder button extensions.</strong></i> </p><p>Below the right side assembly.</p><figure class="image image_resized" style="width:75%;"><img src="https://media.prusaprinters.org/media/prints/111335/rich_content/6296011a-7864-4613-9dcb-9b0afcd28865/img_5820.jpg#%7B%22uuid%22%3A%2247ba8461-6816-4e8e-b3cd-aa1e0d624931%22%2C%22w%22%3A4032%2C%22h%22%3A3024%7D"></figure><p>Align the RB and RT levers accordingly to the bracket and push in the hinge pin.</p><figure class="image image_resized" style="width:75%;"><img src="https://media.prusaprinters.org/media/prints/111335/rich_content/04df7251-2681-4633-a2aa-0ab21be176a9/img_5821.jpg#%7B%22uuid%22%3A%2238607eef-96c8-445c-b89f-0be18612fd71%22%2C%22w%22%3A5288%2C%22h%22%3A3864%7D"></figure><p>Connect the RB and RT buttons. Repeat for the left side assembly.</p><figure class="image image_resized" style="width:75%;"><img src="https://media.prusaprinters.org/media/prints/111335/rich_content/e2f65d47-360b-4ef8-9c9c-4387cca43858/img_5823.jpg#%7B%22uuid%22%3A%22d3182ecf-792f-48aa-8aa8-4aa5af1fedd9%22%2C%22w%22%3A4032%2C%22h%22%3A3024%7D"></figure><p>Pre-assemble the action button extension.</p><figure class="image image_resized" style="width:75%;"><img src="https://media.prusaprinters.org/media/prints/111335/rich_content/36a5d014-2b13-40dd-ba48-3a777a449030/img_5824.jpg#%7B%22uuid%22%3A%222797aba6-9019-4e4b-9ee5-248efae1f7f4%22%2C%22w%22%3A4032%2C%22h%22%3A3024%7D"></figure><p>Connect the levers to the pushers.</p><figure class="image image_resized" style="width:75%;"><img src="https://media.prusaprinters.org/media/prints/111335/rich_content/5161a6f7-81f4-42e0-9dff-116de2edb302/img_5825.jpg#%7B%22uuid%22%3A%22ace3bb75-9e83-45c2-926d-3a00560320af%22%2C%22w%22%3A3024%2C%22h%22%3A4032%7D"></figure><p>Check the correct order of the A, B, X, Y levers.</p><figure class="image image_resized" style="width:75%;"><img src="https://media.prusaprinters.org/media/prints/111335/rich_content/4f2efcf0-4931-4e1d-94f3-eedb03781ab4/img_5827.jpg#%7B%22uuid%22%3A%22be5ea522-bd52-4d6f-afc1-f5a843a18a36%22%2C%22w%22%3A4032%2C%22h%22%3A3024%7D"></figure><p>Thread B and Y levers through the action button bracket.</p><figure class="image image_resized" style="width:75%;"><img src="https://media.prusaprinters.org/media/prints/111335/rich_content/4eed1c84-d651-4b5d-a646-88c74e404c30/img_5828.jpg#%7B%22uuid%22%3A%221adecdb5-163d-4819-a17b-f438a50d4d69%22%2C%22w%22%3A3024%2C%22h%22%3A4032%7D"></figure><p>Snap on the levers on the action button hinge according their order.</p><p>Thread A and X levers through the action button bracket.</p><p>Push on the A, B, X and Y buttons to the intended notches on the lever.</p><figure class="image image_resized" style="width:75%;"><img src="https://media.prusaprinters.org/media/prints/111335/rich_content/966f0ca0-128f-4993-9069-c8b964826530/img_5830.jpg#%7B%22uuid%22%3A%22bb318c69-35f7-47e6-961e-ba1c19884cf7%22%2C%22w%22%3A4032%2C%22h%22%3A3024%7D"></figure><p><strong>Finishing assembly.</strong></p><p>Connect right and left base plates and snap on the right and left controller mounts.</p><figure class="image image_resized" style="width:75%;"><img src="https://media.prusaprinters.org/media/prints/111335/rich_content/2c6f1e9a-857e-4d52-b24a-391c449a2657/img_5833.jpg#%7B%22uuid%22%3A%22dac44527-2364-4127-a4b0-48effaaec327%22%2C%22w%22%3A4032%2C%22h%22%3A3024%7D"></figure><p>Snap on the XBox One controller to the mounts.</p><figure class="image image_resized" style="width:75%;"><img src="https://media.prusaprinters.org/media/prints/111335/rich_content/e395da76-4298-4a12-80f6-20a5ecd94c71/img_5836.jpg#%7B%22uuid%22%3A%2292c96c6b-dcaf-45ad-9d05-782ce70a58a9%22%2C%22w%22%3A4032%2C%22h%22%3A3024%7D"></figure><p>Connect the pre-assembled joystick extensions to the base plate. Push the collars onto the thumbsticks.</p><figure class="image image_resized" style="width:75%;"><img src="https://media.prusaprinters.org/media/prints/111335/rich_content/0a77a436-ead8-4fa6-ac5d-f0ce3d98b7f5/img_5837.jpg#%7B%22uuid%22%3A%22a69333d6-484c-41e3-b4c3-c85ba7eb0d30%22%2C%22w%22%3A4032%2C%22h%22%3A3024%7D"></figure><p>Connect the pre-assembled shoulder button extensions to the base plates.</p><figure class="image image_resized" style="width:75%;"><img src="https://media.prusaprinters.org/media/prints/111335/rich_content/635e5e59-58e6-42ec-ac7a-f9ba41594a1f/img_5838.jpg#%7B%22uuid%22%3A%2260d1d77b-01e5-49bb-8d98-e33c14ecc6cc%22%2C%22w%22%3A4032%2C%22h%22%3A3024%7D"></figure><p>Connect the pre-assembled action button extension to the right base plate.</p><figure class="image image_resized" style="width:75%;"><img src="https://media.prusaprinters.org/media/prints/111335/rich_content/1950e188-3c68-410f-9958-241382480349/img_5839.jpg#%7B%22uuid%22%3A%2258676293-807e-489b-b073-f58caad1a629%22%2C%22w%22%3A4032%2C%22h%22%3A3024%7D"></figure><p><strong>Update 7th January 2022: </strong></p><p>I discovered few design flaws and updated the parts:</p><ul><li>Right base: pivot axis of joystick extension moved 6mm closer to controller</li><li>Left controller mount: position of jack audio port adjusted</li><li>Action button brackt: moved 3mm backwards for better alignment over buttons</li><li>Action buttom hinge: moved 3mm backwards for better alignment over buttons</li><li>Pusher for B, Y button: elongated 2mm downward for better connection with buttons</li></ul>
With this file you will be able to print XBox One Controller Mod - Top-Down Play with your 3D printer. Click on the button and save the file on your computer to work, edit or customize your design. You can also find more 3D designs for printers on XBox One Controller Mod - Top-Down Play.
