Xbox Series X Wall Mount
prusaprinters
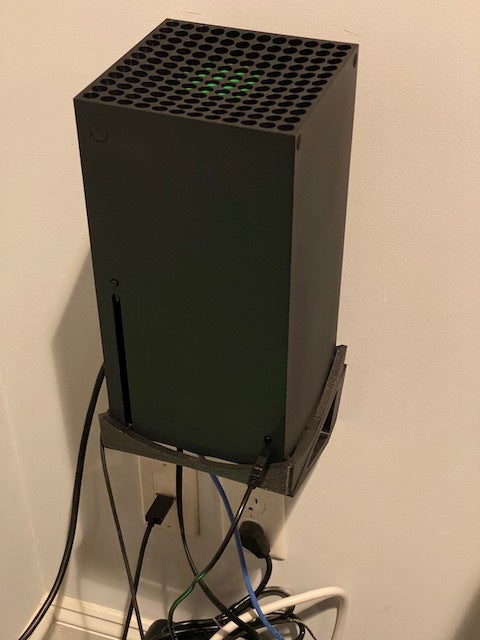
<p>This is a wall mount for the Xbox series X if you want it off the floor. I added some tiny silicone bumpers from Home Depot in the corners to keep it from vibrating the wall (not sure if that's a problem). The mount comes in 3 pieces so no supports needed and screws together with regular M3 button head screws and nuts. I used black ones so they blended into the black PLA and xBox case. For the wall I used 3" (7.62cm) Deckscrews as they are tougher than regular sheetrock screws. I made two of them go into a stud and the other 2 are in self-tapping anchors. Feels very solid (<i>the apparent forward tilt in the pics is parallax in the photo, it is perfectly upright when checked with a level</i>).</p><p>Of course the elephant in the room is: is PLA sufficient? (<i>OMG PLA isn't structural, etc, etc</i>). I did it in PLA (which actually has very high compressive strength) and honestly nobody better be beating on my expensive console. One help is by printing in separate parts the layer lines are on axis with the load so this is very strong (I used 4 perimeters) You could glue the top to the braces but honestly <strong>unless your house has less than 1g of gravity</strong> the xbox itself should hold that in place with the bolts.</p><h3>Tools</h3><p>Note I used a very long screwdriver bit on my drill to drive the screws as it's a long reach through the holes in front of the brace. For leveling you can put a bench level across the flat part once assembled and up against the wall and then mark your holes.</p><p>As always I have included the STEP file If you want to mod this (any real CAD package can import this - obviously it is metric since it was for 3D printing)</p><p>As an add-on I might add some cool looking inserts on the sides (just for aesthetics)</p><h3>Print Settings</h3><p><strong>Printer:</strong></p><p>Prusa Original i3 MK3</p><p><strong>Rafts: </strong>No</p><p><strong>Supports: </strong>No</p><p><strong>Resolution: </strong>0.15</p><p><strong>Infill: </strong>15%</p><p><br/><strong>Filament:</strong><br/>[Prusament PLA ](http://www.amazon.com/s?url=search-alias&field-keywords=Prusament+PLA&tag=thingiverse09-20) Galaxy-Black </p><p><strong>Notes: </strong></p><p>Prusament galaxy black looks really sharp with the xbox. I did 5 top/bottom layers and 4 perimeters and otherwise stock prusalsicer Prusament quality PLA settings.</p><h3>Post-Printing</h3><p>See the instructions above in the main section for setup:</p><p>Tools needed:</p><ol><li>M3 Button Head Bolts M3x20mm+ </li><li>M3 Hex nuts</li><li>Hex driver for m3 above</li><li>Long reach Phillips screwdriver bit (or long #2 Phillips screw driver)</li><li>2-4 wall anchors as appropriate - <i>see text</i></li><li>small bench level</li></ol><p>When mounting if you want to, you can run the cables down the back between the braces but then it's harder to swap them out later versus running them to the sides. But that is totally preference on your part.</p><h3>How I Designed This</h3><p>I designed this in OnShape CAD.</p><p> </p><p> </p><p> </p><p>Category: Toy & Game Accessories</p>
With this file you will be able to print Xbox Series X Wall Mount with your 3D printer. Click on the button and save the file on your computer to work, edit or customize your design. You can also find more 3D designs for printers on Xbox Series X Wall Mount.