XC-120 Patriot - Micro Brushless 2.5 inch "Monster Whoop" 3D Printable Quadcopter Drone
thingiverse
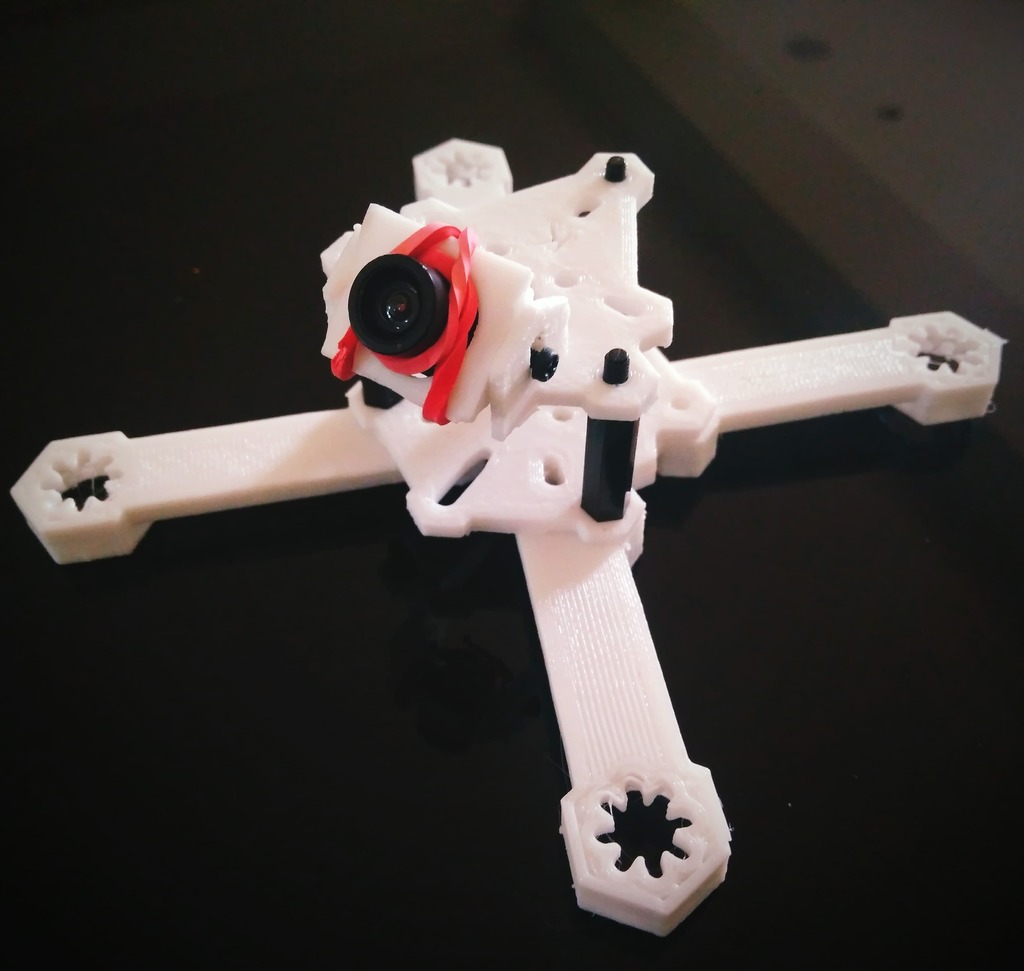
**Update - 13.09.2018** - 19 x 19 Camera Mounts This frame has an inbuilt mount and this is not affected by the update as there are no issues with clearance. This is for builds where you may want to use a separate mount and further adapters have been included. Files have been updated to that end. Otherwise clearances for this frame appear to be fine. Note: This mount is internally cleared for 20 x 20 mm to ensure a clean fit for the camera. The mount can easily be bend to accommodate for any looseness and or you can use thin washer to resolve any issues if you encounter any. Picking the right file: There are several files here, they are as follows: 1. RunCam 19 x 19 Mount - Has a M2 hole on each side to mount 19 x 19 cameras or the provided adapters. 2. RunCam 19 x 19 Mount - Has M2 slots on each side to mount 19 x 19 cameras or the provided adapters. 3. Drop Head RunCam 19 x 19 Mount - Is labelled as such and is smaller than the other mounts. It is such that you should be able to now mount off the roof. 4. Universal Camera Adapter - By looping a rubber band around the front of the lens, twisting, pulling behind and over your camera and back onto the lens will secure your FPV camera. This is suitable for Tiny Whoop style cameras and offers adjustable tilt. The lens is cleared for 13.8 mm lenses. 5. Universal Camera Adapter TPU - This is the same as the above file with a smaller lens opening. If printed in TPU you can push fit in your camera. The mount should stretch and grip it. If you have difficultly carefully and safely cut a small slit to expand the hole. Print Advice: Place the piece on the bed so that when looking directly down it appears as a C or a U. You should have the print lines running along the long edge of the piece where the camera bolts in. For the adapter print vertically with the lock points point up off the bed. Files have been updated and included. Separate files can be found at: https://www.thingiverse.com/thing:3098162 **Update: 11.09.2018** New RunCam 19 x 19 - Some users kindly reported that they were having issues with fitment of their RunCam cameras. This new mount has added clearance and should now clearance adequately. It mounts to the frame in the slot with M3 hardware. THIS IS NOT THE TOP PLATE WITH THE INBUILT MOUNT! FITMENT FOR THIS IS FINE. For the most strength, print so that the mount: 1. Appears like a C or U flat on the bed. 2. Has the layer lines running up the vertical edges with camera mount holes. real_darKing kindly made and shared an attractive mount to use on my frames. You can check it out at: https://www.thingiverse.com/thing:3094068 You can join the Facebook group at: https://www.facebook.com/groups/254825821981391/ **Update: 10.09.2018** **If you would like to use a Magnum Mini Stack (as in the Emax Babyhawk R) you will need to use the M2 to M3 adapters. You can mount via the arm holes or by rotating the stack to have one corner facing forward like a Tiny Whoop.** **Adapters: https://www.thingiverse.com/thing:3093369** **X-120 - Design Points & Spec In Full:** 1. True X 120.1 mm frame with perfect balance. 2. Fully modular: Arms are easily detachable and replaceable. 3. Multi-config: Can be built with the camera enclosed in the frame or mounted on the top plate. 4. Motors: 11xx in M2. 5. Propellers: Anything up to 2.5 inch will fit with clearance. 6. Stacks/4 in 1 ESC: 16mm x 16mm in M2 & 20mm x 20mm in M3. **Active Geometry Concept:** I’m a guitarist and if you play an instrument you know that the proportions of the instrument are key to the sound. Simplest example being a pitchfork, that resonates at a specific frequency due to its shape and density. I considered that if you design the frame with the appropriate proportions you should be able to cancel out unwanted vibration (what we hear as sound) akin to a pair of noise cancelling headphones. Specifically this relates to using the design to create opposing and equal vibration vectors points to naturally cancel vibrations in the frame. You can see this in action in nature if you observe two identical stones hitting a pond at the same and watch the waves they produce interact. Additionally, it should allow stresses to be routed in such a way that components are not damaged and to also importantly add inherent strength. For fun, if you in your splicer software put an excessive number of walls in a concentric pattern you can actually see the lines of how the stresses and vibrations should be routed. This is particularly noticeable if you print in a translucent material and gives a very cool effect. This is just something I noted from my observations in my designs and I wanted to work with and test for proof of concept. I call this Active Geometry. **XC-120 Patriot – Build Guide:** With this design I wanted to create something that was simple and easy to put together, but that was still flexible in its configurability. My frames have no strict form, they are designed so that you can choose different parts and build something that suits you best. To get the best build experience it is recommended that you briefly familiarise yourself with what each part does so you can then maximize its utility. Generally, they are simple enough that even without instruction you should be able to easily assemble them. The section below lists each part and explains how it can be used to build your XC-120 Patriot. - Bottom Plate: This is the core piece of the frame as it is the piece that all of your components and the other sections of the frame will bolt to. You will note that there is a slot on one part of this piece, this is for the camera mount. You will need to use long bolts to reach your flight stack, normally 11xx propeller bolts do a fine job if you cannot find any others to hand for M2 stacks. The arms mount on either side of the slot. - Linked Arms: There is one file that universally fits both sides of the quadcopter. The arms mount with M3 hardware and you should use at least two bolts to lock them to the bottom plate. These arms are to accommodate 11xx motors running up to 2.5 inches in diameter. - Top Plates: There are fundamentally two types of top plate. One which will accept a 19 x 19 Run Cam style camera and an adjustable adaptor for other cameras, and one which will accept the universal camera mount with a slot. The former comes in two forms, one with holes and one with a slot to allow for camera adjustment. You can flip this piece to drop the camera into the body to give it more protection if you like. - Camera Mounts: The top plates accept cameras in 19 x 19 mm configuration. To use the adaptor, put a rubber band through the hole and twist so it makes an eight when you look down at it. Pop your camera through and loop the front of the rubber band over the lens. Pull the remaining loop behind the camera, over and hook on top of the lens. Look at pictures for help. Otherwise there is a camera mount with a slot, which you can use to mount your “whoop” style cameras with the aforementioned rubber band method. You can use this to put a camera in the front for a lower profile or also on top for a more classic diy “whooped” look. This mount is at 22.5 degrees which should cover most of your flying needs. If you need different angles you can use the mounts for the X-132, X-120, X-107 and X-82 as they come in 5 degree increments. - Soft Mounts & Shims: Depending on the material that you use to print these, these can be either shims or soft mounts (or both). There are different thicknesses for you to choose from so that you can get the best fit for your motors. - Motor Mounting: People argue that holes are better than slots. I disagree completely. My frames are to be universal and future proof (as far as possible) so this takes that into account. Even within 11xx motors there are different screw sizes and also different mount diameters and styles. Additionally people often strip their mount holes for the motors and this can be a serious problem if you have a limited set of holes. Secondly holes are weak points and if you crack one hole, the arm is wasted. Having a slot means that in the unlikely event you do crack a slot (normally you will snap an arm first) you can at least rotate your motor and bolt it back in. Secondly people don’t realise that all motors don’t have wires coming out from the same side, which can be a serious problem if you have not got correct holes mounts as it leaves the weak point of the wire exposed. **YOU MUST USE AT LEAST 3 BOLTS FOR YOUR MOTORS! USING 2 BOLTS WILL CAUSE A MID AIR MOTOR DETACHMENT IF YOU ARE NOT CAREFUL!** I generally think that for the sake of a 0.5g bolt per arm you should risk your quad, Lock-tite or no Lock-tite. I have had this happen in “bolt hole” arms using 2 bolts and despite good advice many continue to do this. You will have to use three bolts whether you like it or not. You can thank me when you don’t see a motor fly off in front of your camera. **General Build Advice** - Be free: I made these frames specially so that they could be totally customised and could accept additional parts easily. This is why I have left holes in the top plate for accessory mounting or for you to run your antennas through. If you want to put in an LED light bar, or a buzzer, or a GPS, you know that you can use any of the standard mount holes provided and just quickly and easily sketch something up for yourself. Similarly, if you want to have holes instead of slots or just want to make the design specific to you, I have thought of you in advance. The shapes are relatively easy to modify and customise to your needs. - Fun: My aim was to make a frame that would let people have fun with their builds and let them build to their imagination. **Flying advice:** 1. Plastic frames are not carbon frames, its easy to forget that when you are flying. 2. When you first get it into the air, treat it gently like a whoop until you get used to it. Secondly, not many frames are designed to balance perfectly or are actually “true X” and if you are not used to this it might feel a little strange at first. 3. I would generally advice to bottom mount a battery for the longevity of the frame and arms and to generally at first treat it like a whoop. Of course, once you are proficient with the frame mount as you wish. 4. Plastic frame quads will protect your components very well, particularly from current and voltage spikes that normally kill components during crashes. Secondarily the frame breaking absorbs a great deal energy which would otherwise damage your components. The frames are designed to fully enclose the key components of the drone so you should hopefully enjoy parts that last for a long time. 5. If you want to build an absolute monster I would suggest using 3s-4s and 11xx motors. However I would also advise that if you do anything above 2s, be a careful, seriously, this will seriously haul ass and then some. 6. ALWAYS CHECK FLYING REGULATIONS AND RESTRICTIONS LOCAL TO YOU BEFORE ATTEMPTING TO FLY YOUR CRAFT. **Originality of Design** Of key importance to me is that my designs are original works. I want to my my frames the best that they can be. I always make my designs from scratch and try and make them as distinct as possible. If I see a good idea somewhere I do my very best to incorporate it in but still retain originality. I have taken great care to make a totally unique and original design that does not take from anyone else’s work or infringes on any copyrights or patents. The unique geometry of this design alongside its unique design features identifies it as an original design and also builds in copy protection. If there is any duplication of any part of this design, a measurement can be taken of any two points and by simple calculation it can be proved. I am a British citizen and this design was produced in the United Kingdom. The natural design rights reside with me as accorded by European Union law. Just as a polite warning to anyone, I am legally trained and have worked in the legal sector as paralegal for almost a decade. **Inspiration for this work** I like to spread good will and wanted to share my source of inspiration for this particular design. For this particular design I was inspired someone showing me kindness. I was looking for sponsorship to help me get some parts to design better frames. Its amazing how many companies will sponsor a pilot or a reviewer for parts but not someone who makes designs that actively supports and promotes the use their components. I was quite disheartened at the response I had received and to be honest, considered giving up my work. Christoper Davis from NewBeeDrone was one of the only, if not the only person who at least had the niceness to write me back. We got chatting and after talking with him I drew this little guy up for fun. In talking with him, hearing about his personal story, his relationship with drones and drawing up this quad, I was reminded why I enjoy doing this kind of work. I wanted to let him name it, he called it the Karma. Unfortunately GoPro already beat us to that mark, so I had to come up with something different. XC-120 designates: 1. The True X 120 mm motor motor distance. 2. C for the modular arm shape and to incorporate the first initial of his name. 3. Patriot because he informed me he was in the military. I currently don't have any parts to test this little guy out even for myself. I know it should fly like a beast. So please if you can, do post pictures and DVR online. I love designing things and I hope that this shows in the design. I hope that you really enjoy using it. **Legal Disclaimer:** In no event shall I the designer be liable for any direct, indirect, punitive, incidental, special consequential damages, to property or life, whatsoever arising out of or connected with the use or misuse of any of my designs. In using my work you acknowledge that any and all liability is with you the user. You use this design at your own risk and are responsible for any consequences as such. **With Love - Karamvir Bhagat**
With this file you will be able to print XC-120 Patriot - Micro Brushless 2.5 inch "Monster Whoop" 3D Printable Quadcopter Drone with your 3D printer. Click on the button and save the file on your computer to work, edit or customize your design. You can also find more 3D designs for printers on XC-120 Patriot - Micro Brushless 2.5 inch "Monster Whoop" 3D Printable Quadcopter Drone .