Xenoblade Chronicles 3 flutes
prusaprinters
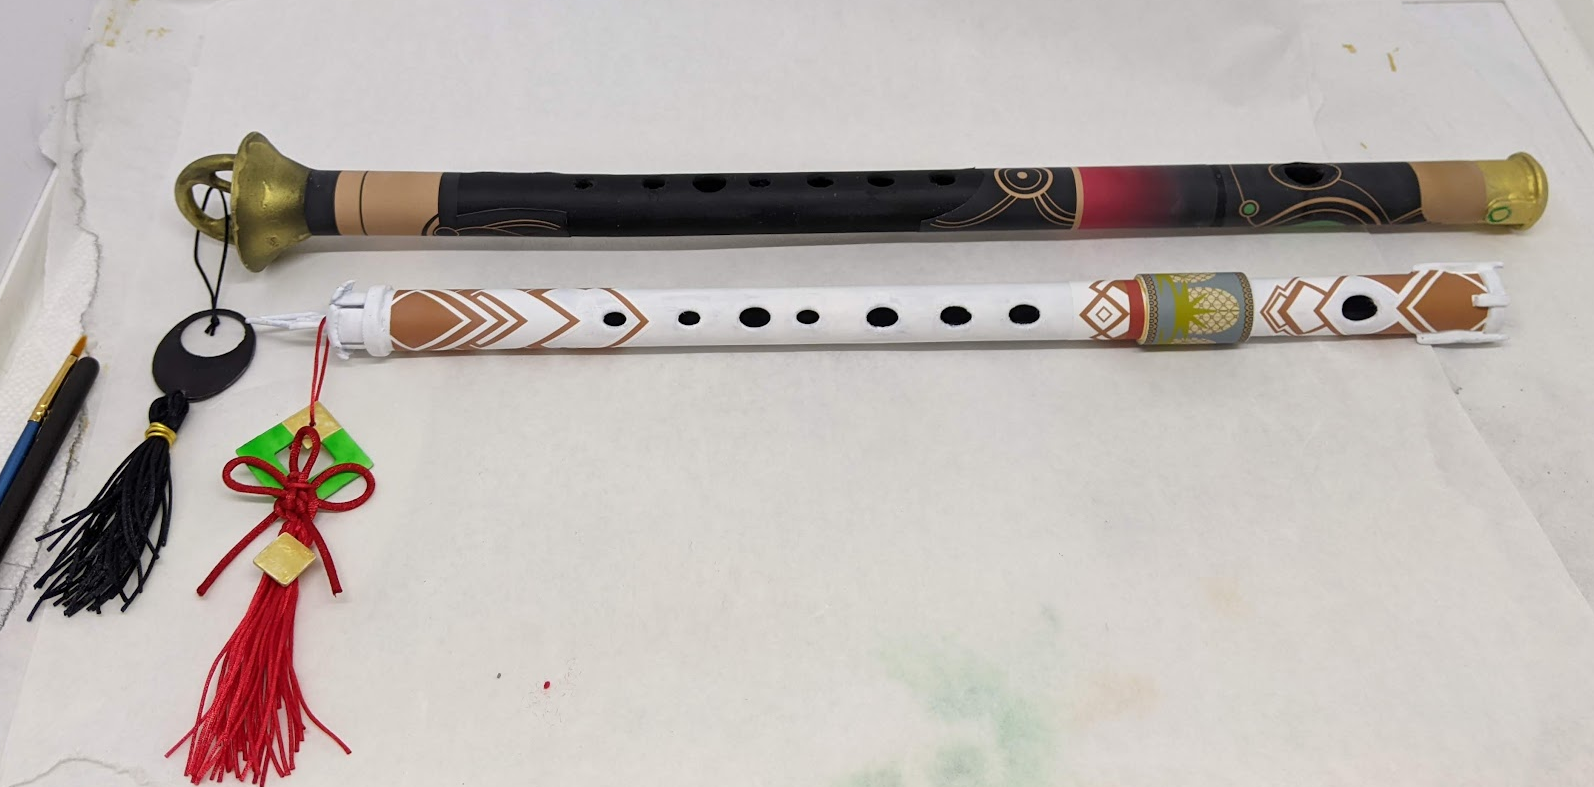
<p>These are mostly faithful recreations of the flutes used by Noah and Mio based on various in-game cutscenes and a couple of references images from Monolith Soft for the actual flutes used to perform the music in the game. They're bigger than you might think at around 400mm (Noah's is longer, Mio's is shorter due to the pitches they produce). I tried to split them up to fit on most printers, but smaller printers may require different orientations than what's in the model files and additional post-processing. The models themselves are largely untextured, relying on painting and vinyl stickers.</p><p> </p><h4>Supply List</h4><p>Printable vinyl sticker paper (at least 2 sheets) - https://www.amazon.com/dp/B082ZDZ894</p><p>0.8mm red nylon thread (a few yards/meters should be plenty) - https://www.amazon.com/dp/B09BQPV13F</p><p>2.5mm red nylon thread (maybe half a meter) - <a href="https://www.amazon.com/dp/B08763CV6N">https://www.amazon.com/dp/B08763CV6N</a></p><p>0.8mm black nylon thread (a few yards/meters should be plenty) - https://www.amazon.com/dp/B09BQQZR6W</p><p>Aluminum craft wire (gold painted) - <a href="https://www.amazon.com/dp/B086GFN485">https://www.amazon.com/dp/B086GFN485</a></p><p>Filler primer - something like <a href="https://www.rustoleum.com/product-catalog/consumer-brands/auto/primers/filler-primer-spray">https://www.rustoleum.com/product-catalog/consumer-brands/auto/primers/filler-primer-spray</a></p><p>Wood filler (optional, can make filling seams between sections easier) - I used <a href="https://www.amazon.com/dp/B08G5BHHS6">https://www.amazon.com/dp/B08G5BHHS6</a> because I had some but you may be able to get away without this</p><p>Sandpaper (80-240 grit) - just about any multi-pack should have these; can go to a higher grit if you want a really polished surface</p><p>Paint (black, white, gold, green, and about 2 drops of blue for Mio's, some sort of clearcoat to finish)</p><p>Painter's tape</p><p>Cotton balls - Use these to plug the flute holes while painting and such; Anything easily removable should work</p><p>Super glue - <a href="https://www.amazon.com/dp/B082XGL21J">https://www.amazon.com/dp/B082XGL21J</a></p><p>Hobby knife</p><p>Hobby cutting mat</p><h4>Printing</h4><p>I used black ABS, but PLA should be fine. Assuming you post-process with the filler primer, I recommend black filament so you don't have to worry about seeing the interior color through the holes.</p><p>The model files are oriented the way I printed them and have some recommended supports based on my experience printing them.</p><h4>Assembly</h4><p>Everything should just slot together with super glue. I recommend clamping the sections while the glue sets, but use something like a folded up paper towel between the the flute and the clamp in case some glue seeps out so it doesn't stick to your clamp. Pay attention to alignment of the sections.</p><h4>Post-processing</h4><ol><li>If there are any rough spots on the print from supports, sand that down a bit with some coarser grit</li><li>Patch the seams with the wood filler if you're using it and sand down a bit after it sets</li><li>Spray flutes with the filler primer - probably want to do it in two passes, one top, one bottom</li><li>Sand the flutes to make sure the primer is as smooth as you'd like (I mostly stuck to 240 grit, but it's up to you)</li></ol><h4>Painting</h4><h5>Noah</h5><ul><li>paint the body black</li><li>tape off the flare at the open end and paint that gold</li><li>closed end should be gold</li><li>there are small inset circles near the closed end that should be green </li><li>charm is black</li></ul><p>For Mio's</p><ul><li>paint flute white</li><li>two indentations on the raised parts at the closed end - a drop of blue on the bottom and a drop of black on the top</li><li>the bigger square charm - mostly green, top square (single hole side) is gold</li><li>the smaller square charm - gold</li></ul><h4>Charms</h4><h5>Noah</h5><ul><li>Cut about 15 lengths of the black nylon thread, exact length doesn't matter, but try to make them relatively equal. I think mine were roughly 9 inches/22 cm; longer is easier to work with</li><li>Cut a small length of aluminum wire and wrap around the center (this is just to hold everything together temporarily</li><li>Cut another length of the black nylon thread, exact length doesn't matter since it'll be trimmed</li><li>Thread the single length through the little hole in the charm, around the bundle of threads, and tie it off, trimming most of the excess</li><li>Take the aluminum wire off and fold the bundle of threads in half, then wrap the wire around the folded bundle to hold them in place</li><li>Cut a final length of thread, route it through the open end of the flute, then through the big opening in the charm and tie it off, trimming excess</li><li>Trim the thread bundle to even them out</li></ul><h5>Mio</h5><ul><li>Cut about 2 feet/half meter of the 2.5mm thread and tie into a jury mast knot; I found it easier to setup a longer length like this then cinch it down</li></ul><figure class="media"><oembed url="https://www.youtube.com/watch?v=EcRXDppQHXg"></oembed></figure><ul><li>Cut a short section of 0.8mm thread, route through one hole on the two-holed end of the charm, through a side loop in the jury mast knot, across the knot, through the other side loop of the just mast knot, then through the other hole on the two-holed end; tie tight and trim excess; don't trim the knot excess yet (do it last)</li><li>Cut about 15 lengths of the 0.8mm red thread, similar as for Noah's charm; use a small piece of aluminum wire to hold them together temporarily</li><li>Cut a piece of 0.8mm thread and route it through the jury mast knot, then around the thread bundle, tie tight and cut excess</li><li>Take the short piece of aluminum wire, run it through the back of the small square charm, then wrap the ends around the bundle to secure it</li><li>Trim the bundle to even it out</li><li>Trim the knot ends</li></ul><h4>Stickers/Decals</h4><p>The stickers are in the support zip as PNGs, but Inkscape SVGs are included as well the GIMP files that were used to make the PNGs. The PNGs are setup for 300 PPI. I recommend printing the PNGs with something like Irfanview so the sizing will be correct. Mostly just print, cut, and stick.</p><p><strong>Notes:</strong></p><ul><li>Beware of printer color correction settings</li><li>Sizing is finicky; Irfanview was the only reliable way I found to print them; other applications resulted in resizing</li><li>Some of the decals require cutting the interior, which can make them very fragile; I ripped a couple over the course of this</li><li>The top sticker for Mio's flute has a cutout pattern (black shapes in the PNG) that you can use to help cut around the protrusions. The way I used it was:<ul><li>Cut out the middle of the guide and check fit with flute</li><li>Peel the cut guide backing off and stick it to the back of the top sticker, aligning it as best you can; you may need to shift it left or right slightly depending on the alignment of that section of the flute with the mouth hole</li><li>Use the guide to cut out the actual sticker</li><li>Check fit</li><li>Peel off the sticker backing (the cut guide will come off with the backing)</li><li>Apply the sticker to the flute</li></ul></li></ul>
With this file you will be able to print Xenoblade Chronicles 3 flutes with your 3D printer. Click on the button and save the file on your computer to work, edit or customize your design. You can also find more 3D designs for printers on Xenoblade Chronicles 3 flutes.