XP Deus 2 Remote Case
thingiverse
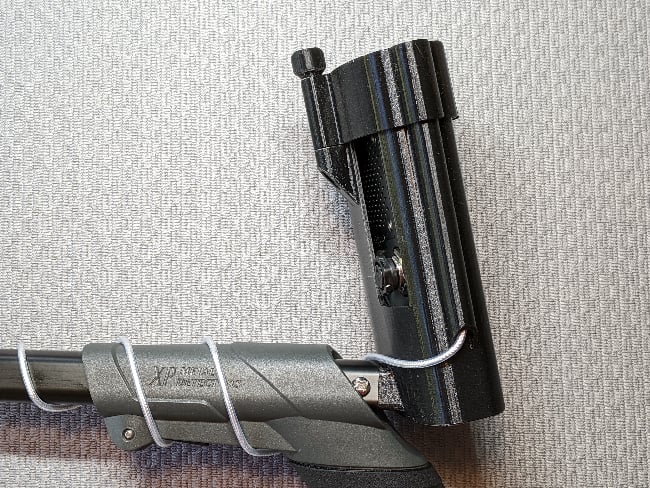
Edited October 27, 2022…..This is a remix of the case that was originally posted. In this version, the top slips-on over the case body and requires a single screw to hold it in place. There is a standard top and a top with an extended shield designed to protect the headphone connector when wired headphones are being used. The shield was inspired by Youtuber Calabash Digger who searches for relics and artifacts while SCUBA diving in “black water”. His detector often hits obstructions under water due to the extremely low visibility. The purpose of the case is to protect the Deus 2 remote and hold it securely to the shaft. There is the option to enclose the remote in a disposable plastic bag to protect the keypad and screen from dirt and scratches. A 4” x 6” bag made from polypropylene works best as polypropylene is tougher and more transparent than polyethylene. One of the photos shows a bag pulled tightly over the remote and secured with tape. The screw-in plug on the back of the remote can be positioned above the rear jack by flipping it 180 degrees when sliding the remote into the case. There are left hand and right hand versions of the case body. These versions are angled so that the remote’s display is pointed toward the person’s face. A standard case body without the angle is also posted. The tube on the left side is to enclose and protect the antenna wire. It is not necessary to loop the wire through the antenna clamp like XP suggests. Support is needed when printing the mounting stub on the rear of the case. The stub usually prints with rough edges, especially on the underside. An ordinary file works best at smoothing and reshaping the stub. CURA also wants to add support under the antenna tube, but this isn’t necessary and can cause problems . The small unattached pad will prevent this support from being printed when SUPPORT in CURA is set to “touching buildplate”. The case wall thickness is 1.6 mm. Set the outer and inner wall thickness to 0.8 mm or greater and the case will print with solid walls. Use # 6 x ⅜” long round head sheet metal screws to mount the case to the Deus shaft. Drill two starter holes ~ ¼” deep using a 2 mm or 5/64” bit. The round head screws also act as stops when adjusting the shaft. An M3 x 5 mm OD threaded insert is mounted in the case body. An M3 x 35 mm long screw is mounted in the knob. Epoxy seems to work best to hold these in place.
With this file you will be able to print XP Deus 2 Remote Case with your 3D printer. Click on the button and save the file on your computer to work, edit or customize your design. You can also find more 3D designs for printers on XP Deus 2 Remote Case .