XT60 Hailong Battery Case Mount
thingiverse
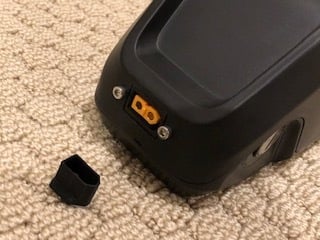
XT60 Hailong Battery Mounting Housing This allows you to upgrade your Hailong battery discharge to XT60 connector (instead of the DC 2.5 mm) and use a 5A or higher charger. After you printed the XT60 Hailong Battery Housing, install the XT60 female by press it through. Then, press some hot glue through the two small holes. And, put some on the solder side of the XT60 connector too. To install the M3 hex nut, press or clamp the hex nut in housing (the side inside the case). How to install: 1. Print the XT60 Hailong Housing Drill Plate 2. Place the drill plate on the front or any location that fits the XT60 housing. Then tape it down and draw a rectangle with a mark. 3. Remove the drill plate and cut out the rectangle area. For this, you can use a Rotary Tool. You can search on Amazon "Rotary tool". Then sand the area as required. 4. To drill the mount hole for the two screws, insert the XT60 housing from the inside and then insert the drill plate on the other side. If it is too short, reverse the XT60 housing end (one side is longer than the other). 5. Using a drill bit around 2mm or 5/64″ drill bit, drill two marker only (not all the way through). 6. Remove drill plate and XT60 housing. 7. Using the marker at step 5, drill through the two holes. Then using 3mm or 1/8" drill bit, drill a second time. 8. Insert the XT60 housing 7. Using two M3 8mm length screw, screw in the two screws
With this file you will be able to print XT60 Hailong Battery Case Mount with your 3D printer. Click on the button and save the file on your computer to work, edit or customize your design. You can also find more 3D designs for printers on XT60 Hailong Battery Case Mount.