XYZ da Vinci 1.0 Pro E3D V6 Drop-In Cartridge Mount
thingiverse
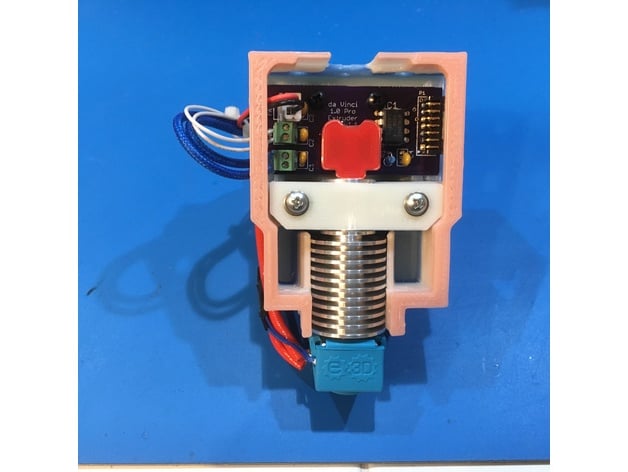
FALL THANK YOU PROMOTION: Anyone interested in buying one of my complete assembled/tested hot end cartridges I am offering $15 off at my Tindie store from October 14-31, 2019. Use promo code TYFALL2019 Tindie store: This thing makes it easier to install an E3D V6 hot end in a XYZ da Vinci 1.0 Pro printer by merely unclamping/unplugging the stock extruder module, transferring the PCB and fan from the stock extruder cartridge to this thing, assembling the E3D V6 with the heater cartridge and thermistor from the stock extruder, mounting the E3D V6 hot end in this thing and then plugging/clamping this thing into the daVinci Pro in place of the stock extruder module. Note that this design is specific to the E3D V6's dimensions. I have a hot end that purports to be an E3D V6 clone, but other than the mounting collar at the top the dimensions are all off. The overall height is about a centimeter more which is really too much to use with this configuration -- of course, I suppose you could make an extension for the Z-axis stop flag and just remember that you're z-axis print volume will be a bit less. However, the heatsink diameter is also a couple of millimeters larger which get's pretty tight in the Pro's carriage. AVAILABLE PRE-PRINTED If you are interested in purchasing this thing pre-printed, it is available from PrintIt Industries at: http://www.printitindustries.com/collections/featured-products/products/e3d-mount-for-xyz-davinci-pro You will still need to provide the hot end, fan, PCB and assembly hardware. ALSO AVAILABLE ASSEMBLED AND TESTED I sell fully assembled and tested replacement cartridges made with genuine E3D hot end components. If you are interested in an assembled cartridge you can look to see if I have any cartridges available in my Tindie store: PCB ONLY ALSO AVAILABLE I also sell just my replacement PCB for the hot end cartridge. These are also available via my Tindie store: Print Settings Printer: da Vinci 1.0 Pro Rafts: No Supports: Yes Resolution: 0.2mm layer height / 0.4mm nozzle Infill: 15% Honeycomb Notes: Material: ABS (Brand: CEL Robox, Color: Red) Extruder Temp: 228C Bed Temp: 85C For the main cartridge body I printed it flat on its back w/ brim and supports (standard density). You'll need to clear supports from: The M3 nut cavities on the back (if using nuts to secure PCB) The small holes on the bottom that engage the studs in the printer's carriage. The holes on the top that are engaged by the studs in the printer's carriage clamp. The side openings that provide access to the PCB connections.NOTE: If you can bridge fairly well, then the cartridge body can actually be printed without supports. This may also require a small bit of clean-up at the bridged sites, but still produces a nice cartridge. The cartridges I get from PrintIt industries are done without supports and work very well. The clamp and fan shroud I printed with brim but without any supports. The clamp should be printed with the part that holds the heat sink facing up. The fan shroud should be printed with the side that mates to the main cartridge down. Post-Printing After printing you may need to sand the back of the main cartridge and the side of the fan shroud that mounts to it. Then you'll need to assemble with appropriate hardware. PCB I used M3x12mm machine screws and M3 nuts for mounting the PCB. FAN SHROUD For mounting the fan shroud I used #6 x 1/4" screws made for plastic and Gorilla Glue; I applied a very small bead of glue just around the air path then screwed the shroud to the main body and clamped together until cured. FAN To mount the fan to the fan shroud I used #4 x 3/4" screws made for plastic or these phillips ones and #4 washers from Home Depot. HEATSINK CLAMP To secure the heatsink clamp to the main body I used the same #4 x 3/4" screws or or these and #4 washers I used for mounting the fan. ADDITIONAL NOTES When you mount the E3D V6 hot end into the cartridge be sure to route the heater and thermistor wires so that they go behind the cartridge and run up next to the fan shroud. If you try to put the cartridge into the printer with the wires running up the side of the main body it won't fit into the carriage properly. The nozzle on this will sit quite a bit lower than the stock nozzle. I had to bump my z-offset to about 8.5mm (from about 0.6mm on the stock nozzle), but I didn't have to re-level my bed. You could also make the adjustment by cranking the bed leveling screws tighter, -- in fact, if you wind up needing more than the 9mm max z-offset you'll need to adjust using the bed levelers. UPDATES 2016/03/09 As I was preparing to print v1.5 of the main body today I noticed there were some parts near the bottom that should have been trimmed off. I have updated the STL file for v1.5. 2016/02/26 I uploaded a new version of the main body (v1.5). This one brings a shroud in around the heat sink more like the fan shroud that comes with the E3D V6 kit. I have not yet had a chance to print and test fit this model, yet. If someone else wants to print it and let me know how it works, go for it. 2016/02/23 FINALLY! Last night I screwed/glued the fan shroud onto the cartridge body and let it cure overnight. This morning I assembled the rest of the pieces (the pictures have been updated to the ones from this latest build). This one fits into the printer and prints well. After saving this update I will update my print settings with what I used, but each of you probably have a better idea what settings work best for your printer/filament. If anyone runs into problems using this design please leave a comment. There may still be some tweaks needed to ensure it will work for everyone. To see a video of this thing in action click https://youtu.be/srfnkiDOFgI 2016/02/22 VERY CLOSE NOW! Yesterday I thought I had my design finalized, but after assembling it I found it wouldn't fit into the printer because the PCB was mounted about 1.5-2mm too high and the filament sensor/guide wasn't clearing the filament "funnel" on the carriage. So, back to 123D Design and I lowered the screw holes for the PCB, and also lowered where the heatsink mount is a bit. Last night I printed what I thought was the final version; unfortunately, when I was assembling it today I found not enough clearance between the PCB and the top of the heatsink. With a little persuasion I got things put together, but with everything so tight I found the filament just didn't want to make the transition from the sensor guide into the top of the heat sink (actually, into the short piece of copper tubing I'm using to help guide the filament into the heat break). With enough pressure it would go, but I didn't want to introduce that strain to the Bowden feed system. Today I made some additional adjustments and re-printed. I just test-mounted the heatsink and PCB into the latest print, and the fit is good. Tomorrow I will finish assembling the full drop-in cartridge, ensure it fits into the carriage properly and print with it. I have updated the STL files to the latest versions, but be warned they are not fully tested, yet. 2016/02/18 The design is almost ready for primetime. I printed my most recent design today, and assembled my E3D V6 with it. Fit is good. I am using a clone PCB I soldered up, and I need to print a filament guide to go over my filament sensor and guide the filament through the middle of the sensor and into the heat sink. 2016/02/17 I have been making lots of tweaks to my design. I have separated the fan shroud out to a separate piece to be glued/screwed to the main body. This simplifies printing the pieces without excessive supports. I have also extended the bottom of the main body to provide more airflow to the heat sink.
With this file you will be able to print XYZ da Vinci 1.0 Pro E3D V6 Drop-In Cartridge Mount with your 3D printer. Click on the button and save the file on your computer to work, edit or customize your design. You can also find more 3D designs for printers on XYZ da Vinci 1.0 Pro E3D V6 Drop-In Cartridge Mount.