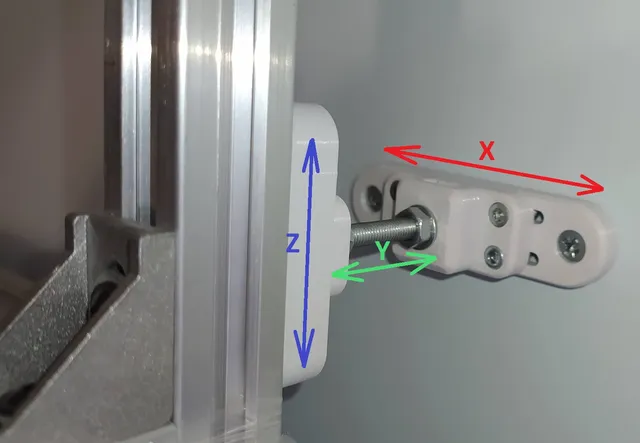
XYZ positioning wall mounting for 2020 extrusion shelf
prusaprinters
I am not so good in drilling holes in the wall, even with ruller and pensil ;), so I design this adjusted wall mounting. For my surprise, my shelf stands now like a rock, vibrations/oscilations of my MK3s reduced to minimum.PETG and 100% infil are recommended. It is recomended 2 kits to mount at the middle and 2 kits to mount at the top of your shelf. I test 4 kits with 230*100*65cm 2020 extrusion shelf, working fine for last month.Warning - check stability of your shelf, this mount is designed for not so much loads. If your shelf is going to fall down this mountings will not fix that.How to use:Assembly all parts according to visualizationSet all adjusting positions to the middleMount all kits to your shelf at final positionMark point for wall drilling. Drill the wall, insert plugs.Adjust mechanism “in air” it should tightly contact to the wallFix all of that with 2pcs of wall screw.Adjust a little if it needed. Counter all mountings after.If you need to adjust Y position some time later you could use provided parts (option - need 2 pcs).Demonstration of adjusting Bill of material:Screw M3*10 - 4pcsScrew M4*10 - 2pcsScrew M5*50 - 1pcs (length could be longer, depends on your case)Nut M5 - 3pcsT-nut M4 - 2pcs (metal strongly recomended)Nut M3 - 4pcsWasher M5 (d=10) - 3pcsWall screw with plug - 2pcs (plug - 6*40 / wall screw d=3mm)(optional) Screw M3*16 - 2pcs(optional) Nut M3 - 2pcsBenefits of design:Tested in real practiceOptimal orientations already configuredNo supports neededNo post processingLow weight / low price of production As we talked before - stands like a rock ;)
With this file you will be able to print XYZ positioning wall mounting for 2020 extrusion shelf with your 3D printer. Click on the button and save the file on your computer to work, edit or customize your design. You can also find more 3D designs for printers on XYZ positioning wall mounting for 2020 extrusion shelf.