Y-Axis Direct Drive for CTC Replicator Flashforge
thingiverse
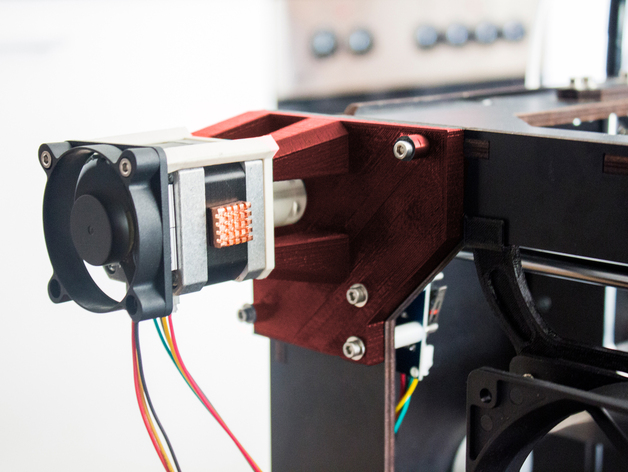
Recommended for heated build chambers! To protect your stepper from excessive heat, you should definitely consider this upgrade item for your replicator-like 3D printer. Hi folks! I've got another exciting upgrade to share with you that'll take your 3D printing experience to the next level. This mount lets you drive the y-axis' rod directly without an additional belt, which means no extra force on the y-rod and less chance of backlash due to a "loose" belt. Since I've implemented this upgrade, my prints have become more precise, especially when it comes to sharp corners - that annoying ringing effect has been reduced significantly on the y-axis! Now, let's talk about why I've mounted it on the left side of the printer. The original mounting point and the new one allow for the same direction of rotation for the stepper. You can also mount it on the right side, but then you'll need to invert the y-axis in your firmware config - not something I wanted to do. Moving on, you might be wondering why there are three versions of the base plate. All three versions have different positions for the upper hole of the y-endstop sensor. My CTC printer isn't laser-cutted as precisely as expected, and one hole is 2mm off! So, I've created two additional versions with 1mm and 0mm offset to cater to printers with more precise cases. Let me know if your holes are also off, and we can work together to create a version that fits perfectly. Do you need a fan for the stepper? No, but it's highly recommended to install one to keep the stepper cool during long print jobs. Hot steppers can lose steps or even be damaged. Now, about the space between the fan and the stepper for additional heatsinks... You've got up to 7mm of clearance. One more thing - why is there a non-round hole at the bottom of the coupler? It's because the side with the flat-sided hole is designed for the nema17 stepper's flattened rod to translate as much torque from the stepper to the y-rod as possible. Print Settings: Printer: CTC Dual (Replicator Dual) Rafts: No Supports: No Resolution: 0.2 - 0.3 Infill: 40% or higher Notes: Base STL file: I recommend printing the base with a stiff material like PLA, as it's not exposed to heat. Axis Coupler STL file: The coupler should be printed with a heat-resistant material, such as ABS, PETG, or other high-temperature filaments, since the stepper can get quite hot. Use a material that's not too stiff, like Extrudr Green-Tec, for optimal results. Heatbreak STL file | Heatbreak + 50mm fan mount STL file: The "heatbreak" and "heatbreak + 50mm fan mount" should be printed with heat-resistant materials, such as PETG or ABS, since they're in direct contact with the stepper. What you need (additionally): Hardware: (2x) 25mm M3 screws... to mount the base plate on your printer's case (2x) 35mm M3 screws... to mount the base plate and endstop sensor on your printer's case (4x) 40mm M3 screws... to mount the stepper (1x) new 5mm rod... which is longer than the original one to mount the coupler (at least 20mm longer) (1x) 1 meter (39 inch) nema17 stepper cable... since the original one is too short (2x) 5mm OR 10mm M3 screws... to tighten the coupler Additional Hardware: (1x) 50mm fan (2x) 10mm or 15mm M3 screws... to mount the fan on the holder (some) small heatsinks with heat adhesive tape... mine are 14x14x6mm
With this file you will be able to print Y-Axis Direct Drive for CTC Replicator Flashforge with your 3D printer. Click on the button and save the file on your computer to work, edit or customize your design. You can also find more 3D designs for printers on Y-Axis Direct Drive for CTC Replicator Flashforge.