Y-Splitter (2-3-4-way) direct and bowden to bowden E3D j-head
thingiverse
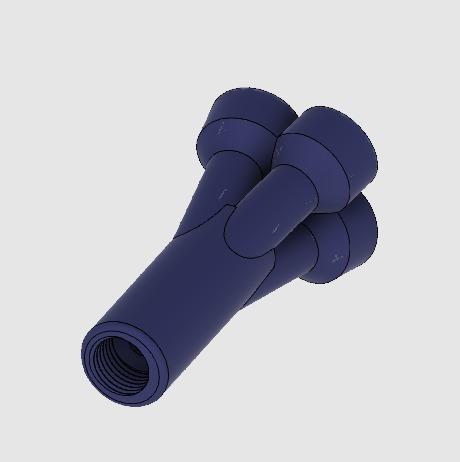
E3D j-head Y-Splitter (2-3-4-way) direct and bowden to bowden Watch(hear mostly) the video of it doing the swaps here, https://youtu.be/g-apfMQabjg (sry for the dark video, just made it to help someone, maybe it can help others.) all the code that is running in the video is below, you can tune it to make it faster but that should be safe to get people up and going. (Sorry I have to add this, but I will show anyone how to add more extruders to X, Y, & Z boards if you send me a board to show everyone and share all of the settings. I do not own all these boards. If not you may need to do a little research...) READ!!! Below is all the gcode needed, do not use cura retract on tool change just use the gcode, and normal purge/wipe tower. The speed can be tuned if the pull-out filament doesn't leave a nice end, this is the best speed I have found for my setup. also once you get everything tuned, you can reduce the retract length from 150(watch restart also, it slows at the end.) also the 4 way is better then the 3, even if you only use 3 extruders. I print in PETG(240c/85c on a glass bed) and print outside walls first for dimensional accuracy. I just set the walls to 30 and let them rip. Print with the finest setting you print is capable of (<= this will very printer to printer, and how well things are calibrated. the layer height I use is 0.20 but slow the print speed)its important that that its printed property; The filament path holes need to be the right size and round. The easiest way to print them is upside down and sink Z into the build plate ~-2.5mm. I personally print them straight up without and issue, that's why I didn't put a flat head on them. the only real one that is kind of difficult to print is the 3 way, but I noted that if I am not mistaken. if you are having issues with supports, try to change the support angle to 80-50 degree to where the supports only touch straight up. to the inner bowden tube. - if it helps anyone else. (T0, T1, T2, T3) adjust for splitter! if only using a 2 way, remove T3, T2. If only the 3-way, then just remove T3 For the tool gcode, just copy to each extruder and change the T# for each. Start gcode: ==== T3 T2 T1 T0 M190 S{print_bed_temperature} ;Uncomment to add your own bed temperature line M104 S{print_temperature} ;Uncomment to add your own temperature line M109 S{print_temperature} ;Uncomment to add your own temperature line G21 ;metric values G90 ;absolute positioning G28 ;Home G29 G1 Z3 F200 G92 E0 G1 E147 F2000 G92 E0 G1 E10 F100 G92 E0 End gcode: ==== G92 E0 G1 E-150 F5000 G92 E0 G91 G1 Z+5 F300 G90 G1 X180 Y180 F1500; home X axis and push Y forward M104 S0 ; turn off extruder M140 S0 ; turn off heatbed M107 ; turn off fan M84 ; disable motors Extruder/tool start: ===== T0 ;then prime T0 G90 G92 E0 G1 E140 F5000 G92 E0 G1 E7 F200 G92 E0 Extruder/tool end: ===== T0 ;then retract T0 G92 E0 G1 E-150 F5000 G92 E0
With this file you will be able to print Y-Splitter (2-3-4-way) direct and bowden to bowden E3D j-head with your 3D printer. Click on the button and save the file on your computer to work, edit or customize your design. You can also find more 3D designs for printers on Y-Splitter (2-3-4-way) direct and bowden to bowden E3D j-head .