Yashica 44LM Bay 1 Lens Cap
thingiverse
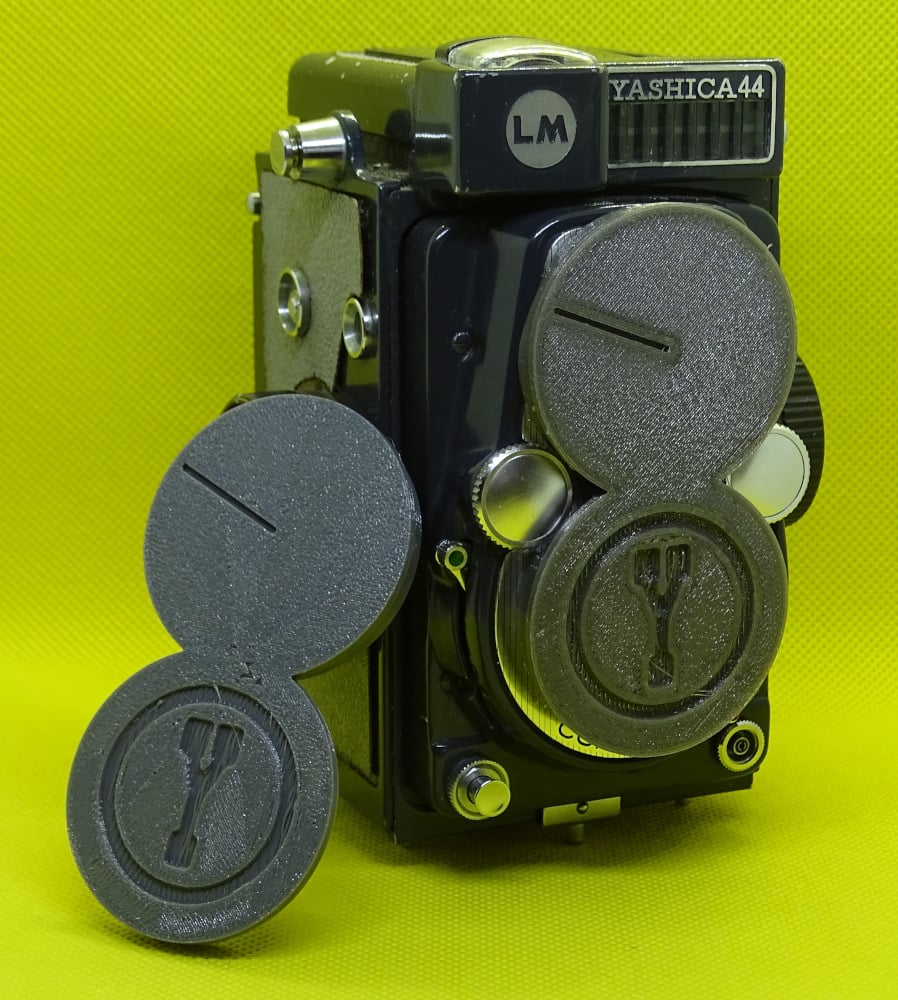
This object is a lens cap for the Yashica 44LM, and likely other TLR cameras using the Bay-1 (aka B30 or 30mm bayonet) lens accessory mount. Like most lens caps for these lenses, this design attaches to the outer bayonet ring. Description ----------- I designed this lens cap because I had problems with several others I found. A 3D-printed design didn't fit because its outer diameter was too great to squeeze between the two lenses on my camera; and although a plastic lens cap that I bought could be made to fit, doing so was difficult. There are four `.stl` file with this project. They vary on two dimensions: * Yashica logo -- Two designs (with `logo` in their filenames) feature the Yashica logo from ca. 1960 on the lower portion of the cover. The logo in question was used on most Yashica 44 and 44LM cameras sold. The other two designs (with `plain` in their filenames) are logo-free, in case you want to try this design on a Baby Rolleiflex or other camera that uses the Bay-1 lens mount and don't want a Yashica logo on it. (See below for information on replacing the logo with another one.) * Lower cap attachment -- Two designs, with `flex` in their filenames, feature near-complete gripping circles to fully secure the cap to both the viewing and taking lenses. The trouble is that these designs are impossible to fit onto a lens when printed in a hard plastic such as PLA, PETG, or ABS. This design is intended for printing in a flexible plastic such as TPU; it then becomes possible to stretch the lower cap around the taking lens's bayonet. The other two designs, with `rigid` in their filenames, feature a partial gripping circle along only the bottom edge of the taking lens. These designs can be slipped over the taking lens by rotating the top element, but offer less protection of the bayonet and lens itself from the sides. On the other hand, they're intended to be printed in a hard plastic like PETG or ABS, which may provide better protection against some types of frontal impact. The rigid design is also a little easier to put on and take off the lens. Printing This Object -------------------- The lens cap should print on an FDM/FFF printer in the orientation in which it's loaded into your slicer. It needs no supports or other special printing features. Be aware that the first layer will face outward, so you can use your slicer's first-layer pattern options to give the cap some visual style, if you like. Modifying The Lens Cap ---------------------- I've provided the source OpenSCAD file with this project. The change you're most likely to want to make is to swap out the ca. 1960 Yashica logo for another one. This is easily done: Replace the `logo.png` file with the logo you want. The existing file is 94x100 pixels, and the new logo should be a PNG file of approximately that size. (If it's square, it may need to be a bit smaller, though.) Make the part of the logo you want to be recessed white and everything else black. DO NOT use a file that's much bigger than 100 pixels squared; not only will it be the wrong size, but OpenSCAD will consume a lot of memory, and perhaps eventually crash, as it tries to render the oversized image in 3D. If necessary, resize and/or convert the file to PNG format. Once this is done, rebuild the object in OpenSCAD. You can choose whether to build the rigid or flexible variant by adjusting the `doFlexible` variable near the top of the file: Set that variable to `1` to produce the flexible version, and to `0` to produce the rigid variant. Using This Lens Cap ------------------- It's a lens cap; how hard can it be? Seriously, though, there is an alignment mark on the top portion of the design. When attaching the lens cap, point it up and the upper portion of the lens cap will slip over the viewing lens. You can then rotate it and the lower portion will fit over the taking lens. If you print the flexible design, you'll have to lift up the lower portion as you rotate and then slip it around the bayonet ridges for a good seal. With the rigid design, it should rotate into place with just a bit of friction. To remove the lens cap, reverse this procedure. Removing the flexible cap is a little bit tougher, since pulling the lower portion up around the bayonet take more effort than pushing it into place.
With this file you will be able to print Yashica 44LM Bay 1 Lens Cap with your 3D printer. Click on the button and save the file on your computer to work, edit or customize your design. You can also find more 3D designs for printers on Yashica 44LM Bay 1 Lens Cap.