YASL
thingiverse
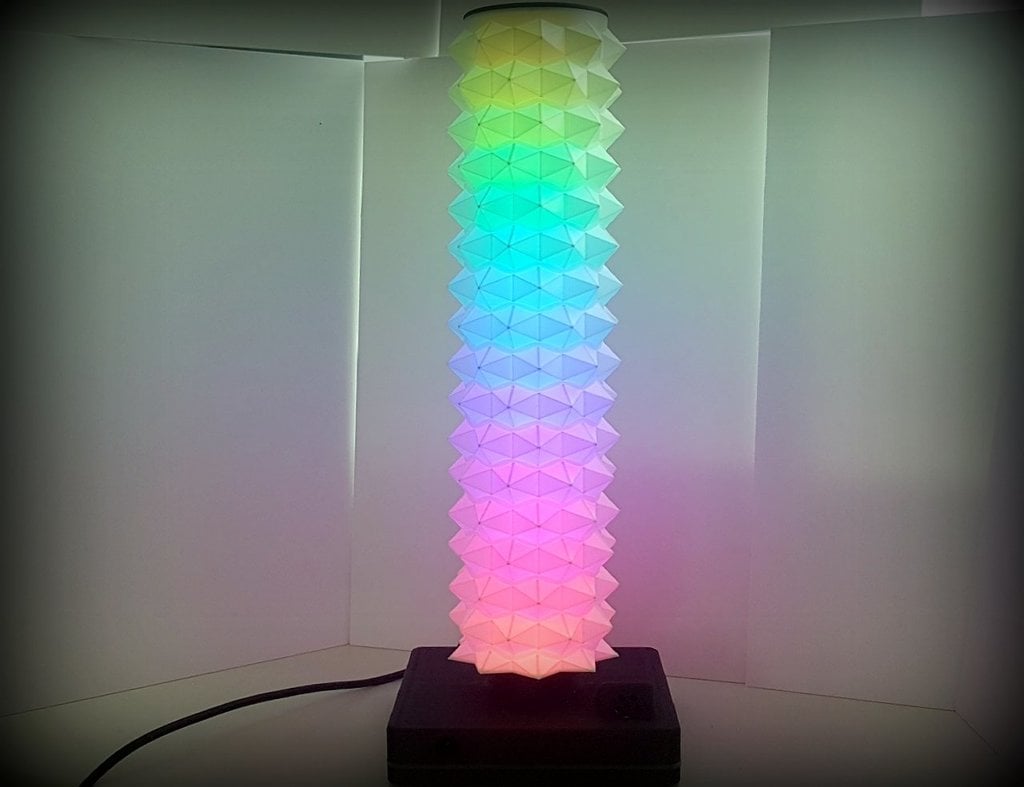
# YASL No, this is not a fancy IKEA product, as the name might imply. YASL stands for "Yet Another Shelf Lamp". This thingy I've designed a long time ago and I needed to beef it up a bit recently, so I decided to publish it as well. Basically, YASL is what the name says, a (shelf / desktop) lamp using NeoPixel (WS2812) strips for illumination, just as a few dozen others you'll find out there in the wild. But this lamp comes with a bit of a twist: - First an foremost, the lamp shades (which are [published separately here](https://www.thingiverse.com/thing:5136606)) can be screwed on, so you're able to pick the one you fancy most. Or replace them whenever you want depending on your mood. - Secondly, it features an IR receiver in order to be controlled by a standard (RC5) IR remote. - Thirdly, it also features an microphone and thus, it doubles as an FFT Music Visualizer. - Last but not least, it comes with its own web interface, which allows you to connect to your home WiFi network and control it via a browser. Moreover, if you build more than one and connect them to your network, they will be kept in sync if one of them changes the current effect (of which is has 29). # BOM To build one of these, you need just a hand full of parts, as there are: - 1 x WEMOS D1 mini controller - 1 x IR Receiver type TSOP 4838 - 1 x Microphone module MAX4466 (Adafruit or others) - 2 x WS2812 strips a 15 LEDs (EFFECTS) - 1 x WS2812 strip 1-3 LEDs (STATUS) - 1 x Threaded rod M6 x 280 mm - 2 x M6 Nuts - 2 x M6 Washers - 4 x Heat shrink tubing (40 mm long, min. 6mm diameter) - 3 x Heat set inserts M3 - 3 x Screws M3 x 8mm - a couple of wires (3-core) - 2 with a length of 100 mm (IR and WS2812) - 1 with a length of 150 mm (MIC) - 1 with a length of 50 mm - 1 with a length of xx mm (STATUS) - optional - 1 x Micro USB power supply 5V (1.5A - 2A) # Printing the STLs Do it as usual and use supports as shown in the slicer picture above. For the Lamp-Shade(s), which you need to print in vase mode with 5 bottom and 0 top layers, I'd recommend printing with an extrusion of 1.5 the nozzle size (i.e. 0.6 mm with a 0.4 mm nozzle). This makes the shades far more rigid. After printing the shade (tube) and the thread/cap, you need to glue them together. Using superglue works best. # Assembly The assembly is pretty straight forward. Make sure you solder the wires directly to the WEMOS D1 mini / microphone / IR Receiver pins, as shown in the pictures above. For the NeoPixel strips, it's easiest if you first solder the wires to the strips and then route them into the base and solder the other end to the controller. At the lower end of the M6 threaded rod, glue one of the M6 nuts onto the rod with Loctite (or similar), approximately 12 mm from the bottom. After that screw the LED clamps onto the rod. Make sure the first is located about 30 mm from the bottom of the threaded rod, all others spaced out every 40 mm. Put a piece of heat shrink tubing between each of the clamps in order to isolate the threaded rod from the bare contacts of the WS2812 strips. To glue the Thread onto the shade(s), use the Shade-Centerpin for the correct location. The "LED-Clamp-Threaded_3.stl" you may use if two WS2812 strips don't satisfy you and you'd like to have 3 instead. Be aware that this setup will draw more power from the power supply. The Status NeoPixel (the one in the base) is optional. It blinks smoothly if the lamp is powered down (i.e. "Off") or the mic is muted. The STL has room for up to 3 Status LEDs but you may equip it with only one. When mounting the WS2812 strips, they're supposed to be press-fitted into the LED clamps. If that's not the case, use a bit of superglue to keep them in place. # STEP file For those who like to modify this thingy, the STEP is included. # Firmware And eventually, the most important part can be found in my Github repository: [The firmware](https://github.com/technik-gegg/YASL). Feel free to modify the firmware in order to change existing or add your own effects to the YASL. #Showcase Here's a [video](https://youtu.be/49lWYzhv3io) of the integrated effects.
With this file you will be able to print YASL with your 3D printer. Click on the button and save the file on your computer to work, edit or customize your design. You can also find more 3D designs for printers on YASL.