Yet another AA/AAA battery case 1x4 2x4 3x4 4x4 2x3 2x2 6x8 8x4 10x4 12x4 - Mk2 - Mk6 parametric
thingiverse
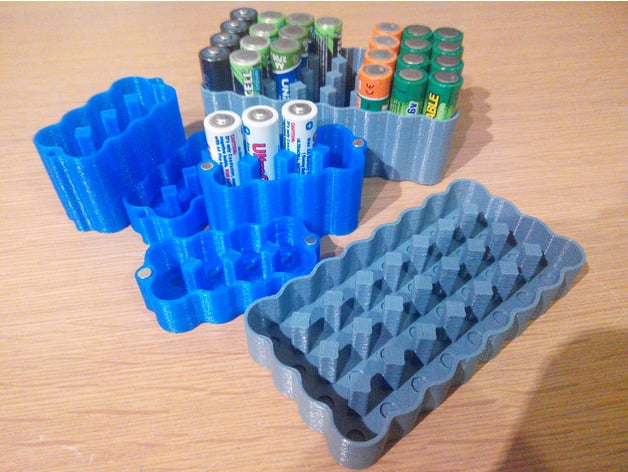
UPDATE Mk6: Same inner columns lip/groove approach as mk5, so the case will stay closed even when it's empty. However, now the female looking part is on the bottom of the case and is sticking out, while the male is recessed and on the top part. This should remedy the issue on the bigger cases when sometimes a battery can get lifted from the bottom when it gets 'stuck' in the top part of the case is opened. Now the top part has less meat/plastic in the inner columns and not requiring the top to be perpendicular to lift open the case. While giving more plastic to the bottom part of the columns holding the batteries even better. Now the top part is flush so it's easier to put it down on the table without risking it getting damaged, while the bottom columns are sticking out giving even more support to the batteries. Download in the files section find these ZIPs:battery-case-v6.zipmagnetic-battery-case-v6.zip UPDATE Mk5: The middle columns have a lip/groove features so they keep the case closed even without batteries inside. The lip/grove are under 10 degree angle and has 0.25mm margin so no postprocessing should be necessary for them to fit easily and well together. All the v5 files are combined into two ZIPs, first for the regular AA and AAA cases and for the magnetic AA and AAA. UPDATE Mk4: Attempt to make the bottom and top stay together even when the case empty, making lip/groove on the outer shell doesn't produce good results, it's too fragile, too small, no margin for various 3d printers and very sensitive to angles (needs to be opened in perpendicular motion). I was not happy with this version and never uploaded the files. UPDATE Mk3: AA and AAA variants. Let me know in the comments if you want different variants. Bigger variety of combinations 1x4 2x4 3x4 4x4 2x3 2x2 6x8 8x4 10x4 12x4. If I missed your desired combination then please let me know in the comments and I will add it. Bottom vs Top variants are split 65% vs 35% of the battery height, while the Middle variant is 50%. The Top variant can be used as the Bottom if you do not want full enclosure. If you want full and asymetric enclosure then print Bottom and Top. If you want full and symmetric enclosure, then print the Middle variant twice. Added the parametric source files so people can edit them if they want Magnetic variants do have slightly smaller 4mm magnet (as the previous magnet was unnecessary strong). Slightly smaller outer walls on the magnet cause it to "stick out" less. 1mm cap protection (mk2 had just 0.3mm single layer which created gaps for people with not perfect first layers) Has all the options of Mk1 and Mk2 combined and is superseding the previous versions. This newest version is recommended for all new prints. Features of the older Mk2 files: Smaller 2x4 case has support for 5x3mm magnets. (i think the magnets are not great for some batteries, so for the longer storage the bigger 8x4 box has no support for the magnets) Can store a decent amount of batteries 8x4 If you want to save on filament and don't need a firm and steady case, then you can use the top case to hold the batteries, as shown in the photo above. Should be printer friendly (no holes like last revision), the printer does nice continuous movements and no sharp turns, so it's easy to get first layer sticking and to make all layers adhere well. Probably it should be possible to print at faster speeds from Mk1 the marking which indicates what batteries are full or empty was removed, it's pretty easy to remember that when the battery is upright it will be ready to use, while upside down needs to be recharged. Changed from Mk1 the top and bottom are not equally high, but the bottom is around3/4 of the battery size. So if I want to store batteries at home in a drawer and will not travel probably I don't need to print the top and still, the batteries will be stored well enough (one side is always insulated so no short circuits / other damage is possible). The casing fit nicely around itself, should be possible to print multiple of them and glue them together like hexagonal cells to allow different combinations tried few attempts to get the dimensions just right, now it's tight enough to keep them firm and steady, while still have them lose enough to allow the batteries be removed with ease. Because to conceal the holes only 1 layer is used, to save on filament where you don't need it, it's good to have verified that your 1st layer will print well and you don't need to do any rafts or anything. Some designs have holes for the dimples, this is similar only it prints better and cover the batteries. Mk1 is here: http://www.thingiverse.com/thing:1796360 It has some different design decisions, after while I don't like them, but somebody maybe will so have a look, but I still think this is a better version to print. Print Settings Printer Brand: Prusa Printer: Prusa Clone Rafts: No Supports: No Resolution: 0.3mm Infill: 15% Filament: various PLA any Notes: 3 bottom, 3 top solid layers 3 perimeters 0.4mm nozzle with 0.3mm layer height Post-Printing No extra steps should be necessary, only removing strings if your printer has stringing issues.
With this file you will be able to print Yet another AA/AAA battery case 1x4 2x4 3x4 4x4 2x3 2x2 6x8 8x4 10x4 12x4 - Mk2 - Mk6 parametric with your 3D printer. Click on the button and save the file on your computer to work, edit or customize your design. You can also find more 3D designs for printers on Yet another AA/AAA battery case 1x4 2x4 3x4 4x4 2x3 2x2 6x8 8x4 10x4 12x4 - Mk2 - Mk6 parametric.