Yet Another Fingerboard (Boards, Moulds, Shapers, Wheel Nut)
thingiverse
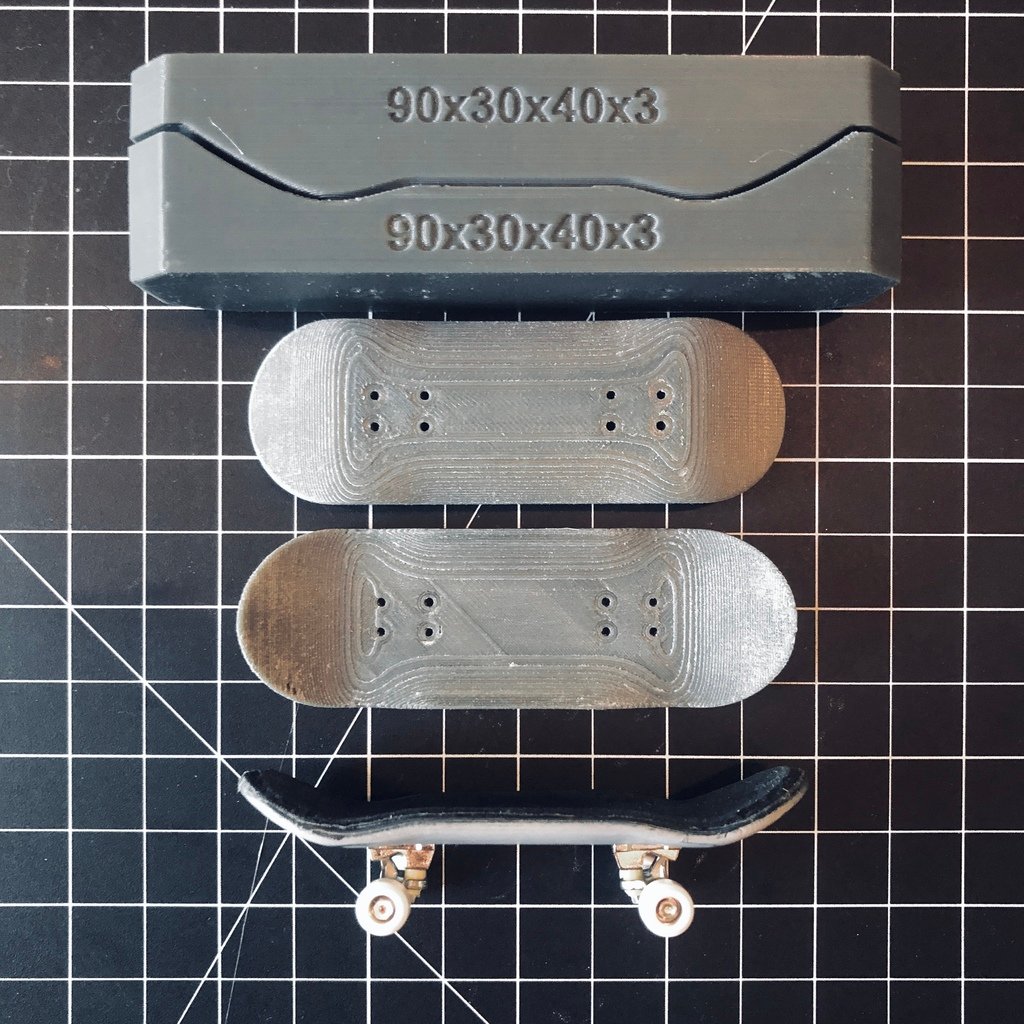
#Overview# Yet another fingerboard/fingerboard mould collection. I'm not a fingerboarder. I can't even skateboard. This is just an interesting project for me to tackle. That means that, in my ignorance, I've probably not nailed the perfect board configuration. I've included the boards the moulds are modelled on, so I'd recommend printing those out first and seeing if you find their shape, size, and wheel base to your liking before deciding to print the moulds and shapers. There are two boards, one of a more normal/standard size and one that likely falls well outside of what's considered typical or desirable, but which may be good for those with smaller hands. Here are their approximate specs: **Smaller Board:** 90mm x 30mm, 40mm wheelbase, 18mm nose/tail with 25º kick, deck concave is 3mm x 30mm **Larger Board:** 98mm x 32mm, 50mm wheelbase, 18mm nose/tail with 25º kick, deck concave is 3mm x 36mm #Bonus Content# I've included .step files which will hopefully allow people to make corrections/modifications. I've included .stl files both of the models themselves, as well as the models arranged for printing (in particular this applies to the boards, as they really should be split lengthwise and printed in two halves, then glued). Wheel nuts and wheel spacers … what can I say? The "hardware" I bought to test out these designs had one axel where the included nuts just would not fit. Not at all expecting success, I modelled and printed a wheel nut and was absolutely stunned to find that it worked. It's ridiculous. I don't expect it to last or stand up to rigorous use, but it's stayed on there so far. I went ahead and made some wheel spacers, too, because the wheels were pretty sloppy on the axels. I decided to throw these in in case anyone else wanted to give them a try. #Unsolicited Advice and Recommendations# **For the boards:** Recommend printing in two halves and gluing together. Have included STLs with boards already split and ready to print. Recommend using ASA (or ABS) so that the two halves can be glued together with cyanoacrylate. Use a brim. Print with sufficient perimeters (3 on my printer) to ensure board is printed solidly. I printed at 0.15mm layer height and used a 2mm brim to ensure the print stuck to the build plate. You will want to want to glue the two halves together as evenly as possible. You will inevitably fail to achieve perfection, but it's nothing sanding cannot fix. It's important to be sure to sand the areas under the trucks flat and even with respect to each other, otherwise you will end up with a wobbly board. I experimented with wet-sanding using 150 followed by 220 grit, then some filler primer, followed by more wet-sanding with 220. Then I got tired of sanding and just stuck some hardware on it to see how it felt. You can see the result of my half-assed ministrations in the picture with the cat. **For the moulds:** I used PETG for strength/durability. Recommend 3 perimeters and 20% infill minimum for strength **(see update below)**. Ensure you have adequate bottom layers, as that will be the area in direct contact with the clamp. I used 5 bottom layers, giving a 1mm thick base, and feel I could have gone higher, but it's working well-enough as it is **(see update below)**. Adding a piece of scrap wood between each side of the mould and the clamp jaws would be a great idea when clamping to help disperse the pressure and protect the mould, but I didn't have any laying around, so... uh, but you should definitely try to do that. I printed at 0.2mm layer height, but you may want to consider either a higher resolution or sanding down the ridges post-print as they will leave impressions in the wood if it is soft enough. You can see examples of those dents in the photos if you look. I found that sanding down the most prominant ridges in the mould mitigated much of the issue. **[UPDATE] I have managed to crack one of the moulds during clamping.** It can be repaired with glue and didn't interfere with its ability to form a board, but between that and the dents left in the mould by the clamping process, I would suggest considering a higher infill than I used (which was 20%) and/or a greater number of bottom layers than I used (I ended up with a 1mm thick bottom layer, but doubling that probably wouldn't hurt). Also, putting some scrap wood between the clamp jaws and the mould would be a terrific idea. Perhaps I should poke around for, or design and print, some vise jaw attachments specifically for this purpose. Yes. Good plan. O hai: https://www.thingiverse.com/thing:1376177, https://www.thingiverse.com/thing:1516335, https://www.thingiverse.com/thing:11614, https://www.thingiverse.com/thing:1237711, and just so many more. I love you, clever people. **For the shapers:** You can cut and bend a large-ish paperclip to use as a way to ensure proper alignment of all pieces (see pic). Again, I used PETG because that's what was already loaded, but likely other materials would work as well. That said, it's probably best to stick with whatever material the mould is printed with so that both objects end up with similar amounts of shrinkage. **For the wheel spacers** The diameter of the axel hole is 1.65mm, the outer diameter of the spacer is 4mm, and the spacer is 1.5mm tall. You can probably scale the z axis to get the height you need. I printed with a 1mm brim to help them stick to the bed, then used a hobby knife to cut the brim off. I used PETG, but I suspect anything would work well enough. **For the wheel nuts** Dude, I don't know how I managed to successfully print these. They're roughly the size of glitter, yet I printed them with a standard 0.4mm nozzle. They really probably need a smaller nozzle diameter, but here we are. I used a 1mm brim and then removed it post-print with a hobby knife. I used PETG because I imagined that PLA or ASA would be too brittle. I printed them at the highest resolution my printer could muster, which is about 0.07mm. Either that, or it was 0.1mm. **Creating A Board** I used what I had to hand, which happened to be some quite-thin hickory veneer. Obviously, maple would be the preferred way to go, but this'll do in a pinch. It's pretty soft, though. I had some walnut veneer I used for the base. I didn't make a board fully from walnut, as this veneer is a bit thicker (perhaps too thick for this application) and also happens to be paper-backed, which you don't really want. If you poke around on, say, Amazon, you can find some nice, thin, maple veneer which would be well-suited to this task (at least according to the reviewers). Five pieces of that hickory veneer stacked up to be about 2.65mm, which is close to the 2.75mm board thickness I'm shooting for. I wouldn't go thinner than 2.65mm, I think, nor would I go much over 2.75mm. The mould was designed with a 3mm "gap" between top and bottom to acommodate the veneers for pressing, so 3mm is probably the maximum thickness one would want to try (plus, you have to consider whether the bolts for the trucks will reach adequately through the board). For the smaller board, I cut 100x35mm pieces of veneer. The minimum size required would be approximately 95x32mm, so you want to be over that, but still be able to force the veneer between the pegs on the mould, and 100mm is, in my experience, as far as one can reasonably go. For the larger board, I used veneer pieces at 107x40mm. The absolute bare minimum would be about 102x35mm. Again, it gets a bit tricky to fit the veneer between the mould pegs. I may consider tweaking things to give more room, but I was attempting a balance between "making it work" and "minimsing the print time/amount of material used". The veneers were arranged with three pieces with the grain running lengthwise (bottom, middle, and top layers), and two pieces with the grain running widthwise (2nd from bottom, 2nd from top). The adhesive I used was, again, what was to hand: Titebond III. It happens to be what I use when I make full-sized skateboards (e.g. [here](https://infinitemonkeytheory.tumblr.com/post/95929748697/ive-made-some-skateboards-3mm-baltic-birch), [here](https://infinitemonkeytheory.tumblr.com/post/96483348387/some-more-diy-skateboards-baltic-birch-titebond), etc.). I've wondered if epoxy wouldn't be a better idea, yielding a more-durable board. Clamp that sucker for a good while. The glue sets up in about 30 minutes, but I found that these boards really needed to be clamped for a few hours before I considered them durably glued and formed. It could perhaps be due to the softness of the hickory I was working with absorbing more moisture from the glue and requiring longer to dry. Maple would likely yield better results and, so too, would perhaps epoxy. I lack the experience to answer these questions. I use a 1.5mm drill bit in a drill press (because I can) to drill the holes. I keep the board in the mould while doing this for maximum accuracy. After, I take the top off and carefully use a countersink bit to finish things off. 1.5mm is pretty much exactly the size of the bolts, so you will likely need to ream out the hole a bit to get things to fit. I have a needle file I could be using for that, but I've just been lazily pushing a dental pick into the holes until they're large enough and that seems to work fine, but the wood I'm working with is pretty soft, I think.
With this file you will be able to print Yet Another Fingerboard (Boards, Moulds, Shapers, Wheel Nut) with your 3D printer. Click on the button and save the file on your computer to work, edit or customize your design. You can also find more 3D designs for printers on Yet Another Fingerboard (Boards, Moulds, Shapers, Wheel Nut).