YZ Case
prusaprinters
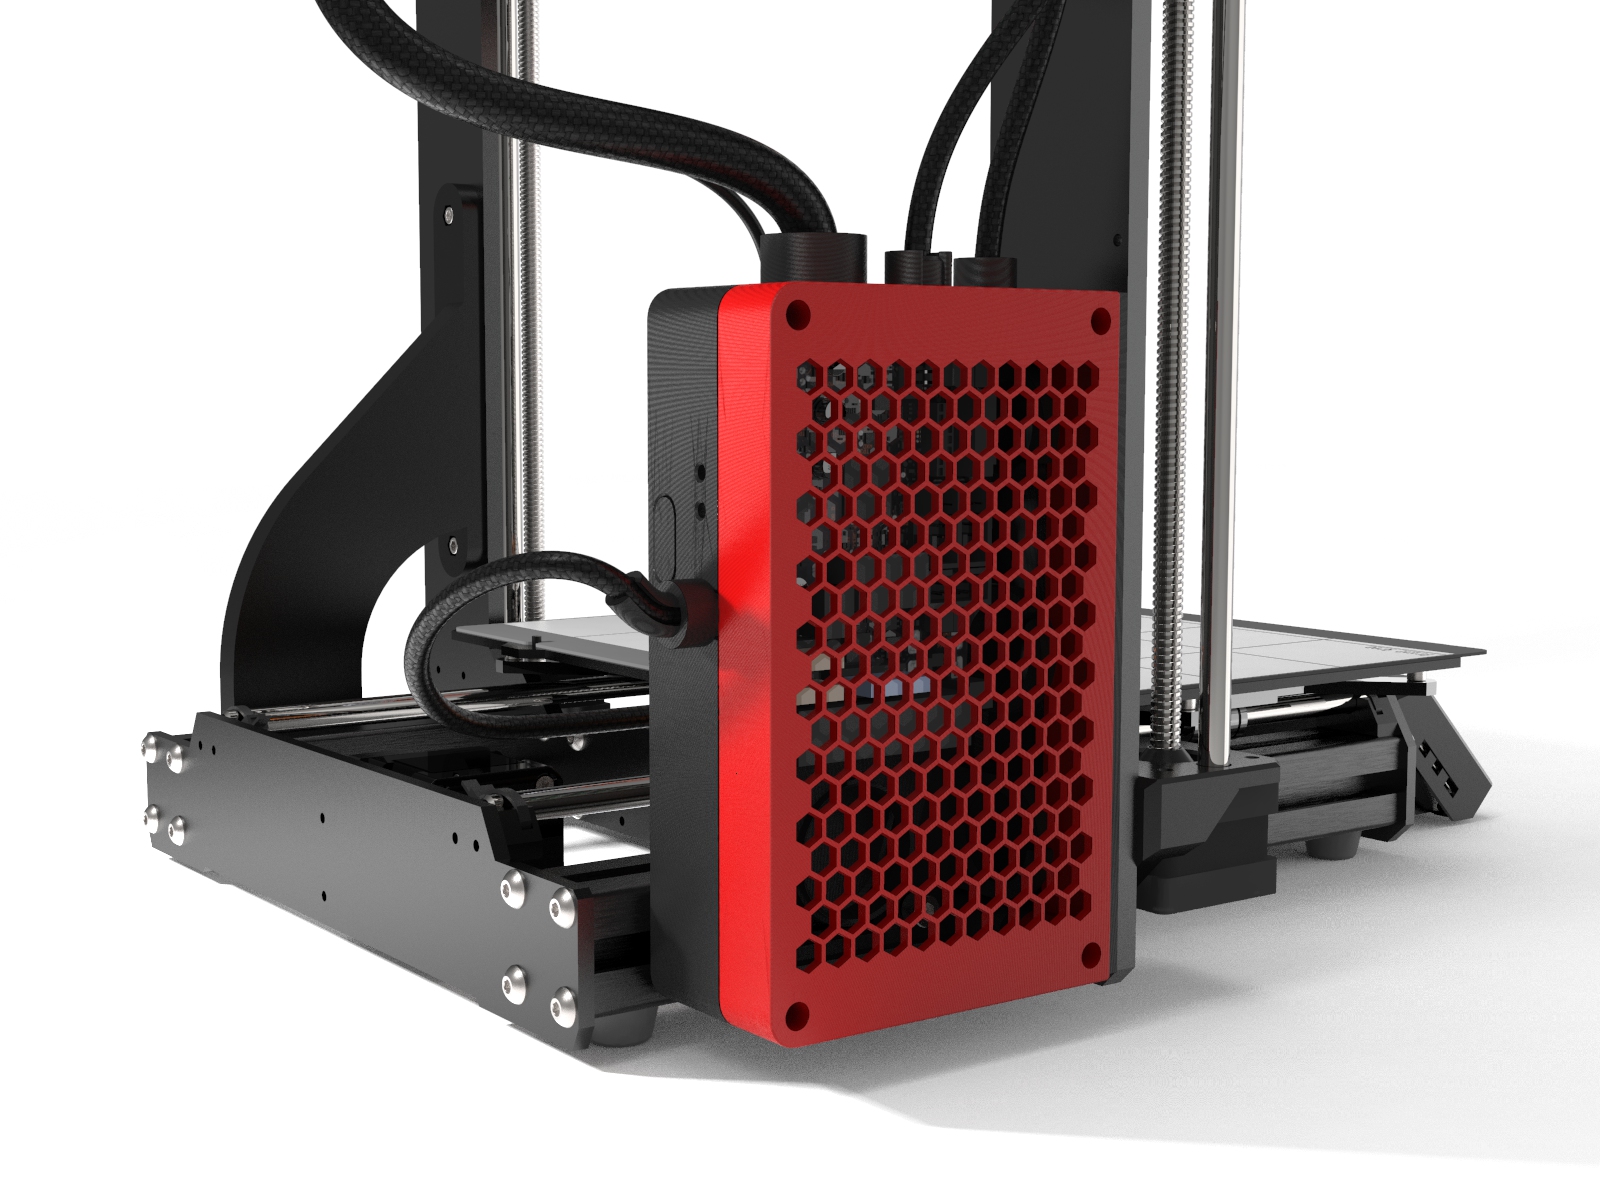
<p>Why YZ Case ?</p><p>I wanted to create a Bear Upgrade, at no cost... once the Power Supply was removed, (Keeping it out of the heated enclosure) I needed a bracket to tie together the missing structure that the Power Supply provided.</p><p>The YZ Case supports the other side...</p><p>This case holds the vertical Z axis frame and the 30x30 aluminum Y axis ... it matches the Power supply bracket (See <a href="https://www.thingiverse.com/thing:3454092">https://www.thingiverse.com/thing:3454092</a>) for the same reason... tying the frame together.</p><p> </p><p>…………….</p><p>Print in PETG because you will get less distortion and cleaner parts.</p><p>Parts list…</p><p>M5 x14mm long screws 2x</p><p>M3 x 10 mm long screws. (4 for door, 4 for Einsy, 4 for YZ Case to Z axis Frame attachment to leading plane of the case (recommend low profile for inside screws.)</p><p>M5 Slot Nuts for 30x30 Aluminum extrusions</p><p>M3 nuts 10 square. (Brass inserts or Hex nuts can be used for the door and board).</p><p>A. Remove Einsy Board from printer, open manual and photograph location of all connectors. (I remove all connectors.). </p><p>Note there are often 2 or three ways to attach nuts for assembly. Brass Inserts, Hex nuts from the back, or slots in posts for M3 square nuts.</p><p>1. Prepare Case </p><p>A. You need 2 M5 T-Slot nuts and 2 M5 x 14mm Hex Cap screws for the Y axis attachment to the 30x30 Aluminum extrusion to Case (Ebay)</p><p>B. Insert M3 Hex nuts (4x) or square nuts, or brass inserts for the Einsy Board. (Note use tape or glue to avoid nuts falling out).</p><p>C. You need to insert four more brass inserts, or square M3 Nuts for the door screws on the outer perimeter (Note, use tape or glue to retain nuts during assembly).</p><p>D. Likely run a drill bit thru most locations to make sure holes are circular and clear screws.</p><p>2. Place the M5 x14mm screws into the correct locations at the base of the case, You will see an oval window between the screw locations which will help you rotate the T-Slot Nuts so that they engage the slots vertically. Screw the T Slot nuts to the back side of the case and then insert the T nuts into the 30x30 frame, tighten the M5 screws from the front, loosely to make it easy for assembling the case to the Z axis in the next step.</p><p>3. Screw Case into Z axis with M3 x10mm screws (I only use three as I don’t carry low profile screws for the top inside. Outer 2 screws mount for the back through the case into the Z axis holes drilled and tapped by Prusa. When tight a few mm of threaded screw will be exposed. Screw third and last screw from front side of Z axis frame, into the case at the lower from corner where you had inserted a square M3 nut.</p><p>4. Tighten M5 screws, use the oval slot to adjust the Tnuts up and down. Also make sure the extruder slides over the M3 screw heads and screws… the four in the front.</p><p>5. Screw in the Einsy Board. (You should have the Case firmly attached to the printer, and the board attached, no wires installed yet.). Screw on the door and check fit. Remove door.</p><p>6. There are wire guides that can be glued in, I glue in these after attaching wires but this is the time to do it easily. I use ABS or acrylic glue but if that is not available, I use a small amount of superglue- cyanoacrylate.</p><p>7. FAN Version… (the power cables need to be bent 90 degrees to clear the fan shroud as it clears them.). You will need a 40x40x10 fan and correct cables to attach to the extruder fan). I use phone splicers and splice into the power and ground. This way the driver chips are cooled when ever the extruder is running. Of course there are 4 M3 x10mm screws for the fan, I use two, and everything else slides together tight enough does NOT require fastening with glue. Attach heat sinks over Vias on back of board.</p><p>8. Wire Strain Reliefs Snap together and fit between the door and case.</p><p>Hopefully reattaching the cables is ready to happen and you have the manual and photos to guide you. There are printed wire strain reliefs that fit between the door and case, they slip over the wires and snap together providing a way for the wires to be protected. Often this takes time to get to know, I often use a cloth wire cover, slip the wire strain reliefs over the bare wire and once all the wires are inserted, slide the cover into the slot and add a small tie wrap, making sure everything is a the correct location to fit the case.</p><p>9. Z door snaps on, It fits proud, to clear heatsinks and Pi Zero board attached at the back of the Einsy.</p><p>You should be able to notice that the case and frame are solidly attached, if you have removed the power supply use the support arm I have on the site to keep that side together.</p><p>For an improved version of the cable strain reliefs…<br>https://www.prusaprinters.org/prints/92462-yz-case-kabelmanagment-upgrade<br> </p><h3>Print instructions</h3><p> </p><p>PETG Prints better, less warping.</p><p>GCODE files for ABS. The name indicates the type of filament. STL files also included..02 steps, 255x105 temperature, 25% Gyroid fill, for ABS, 8mm brim</p><p>No temperature change due to the crash causing bed temp error.</p><p>Dry filament... I was getting warping of the main body and had a little difficulty screwing to the frame.</p>
With this file you will be able to print YZ Case with your 3D printer. Click on the button and save the file on your computer to work, edit or customize your design. You can also find more 3D designs for printers on YZ Case.