(z)Orbiter 2.0 Extruder Lite
prusaprinters
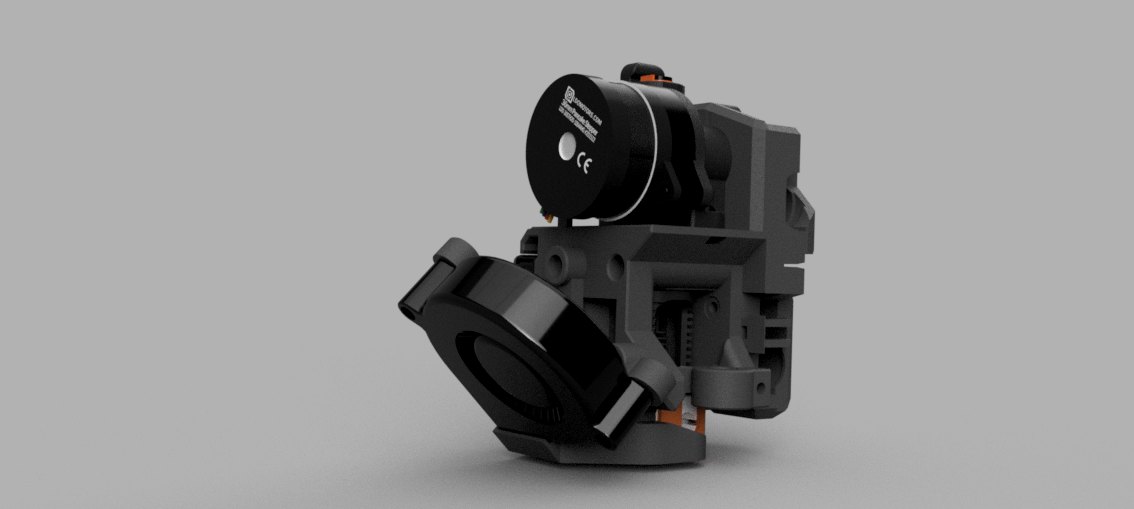
<h3>(z)Orbiter 2.0 Extruder Lite with RHD Fan Duct and optional Rigid Mounting for the TL Dragon Hotend for One-Handed Nozzle Changes</h3><p> </p><p>This is a remix of the <a href="https://www.prusaprinters.org/prints/68982-zorbiter-v15-geared-extruder-by-zaribo">ZOrbiter V1.5 Geared Extruder by ZARIBO</a> (the CAD files for ZARIBO's own V2.0 extruder aren't publicly available at the time of writing) for use with an <a href="https://orbiterprojects.com/orbiter-v2-0/">Orbiter V2.0. </a><br> </p><h4><br>Key Changes from ZARIBO's Design:</h4><ul><li>I <strong>replaced their fan duct with a remixed </strong><a href="https://www.thingiverse.com/thing:3249344"><strong>RHD (rev c) duct</strong></a>. My remix only affects the outside of the RHD duct / how it attaches to the extruder, and not how air flows through it. I replaced the print fan support with a new support specific to the RHD fan duct. I edited the extruder cover to better attach to the RHD print fan support. The fan support is designed to be durable and help counteract some of the ringing potentially associated with having angled blower fans. For a more secure mount, I recommend putting nylon washers on the screws that hold the fan to the fan support. You'll be able to tighten the screws down further this way without risking damaging the screw holes in the fan.<br> </li><li>I added the <strong>option to use heat-set inserts for the hotend fan</strong>. One screw still attaches to a square nut inserted into the top of the fan duct, but the other three screw into brass inserts, rather than plastic. This design is more durable and allows for affixing the fan more securely without risking rattling or accidentally widening the plastic holes through even mild overtightening. The holes for the inserts have an outer diameter of 4.2mm, are 7mm deep, and have a -8 degree taper. They're made specifically for <a href="https://smile.amazon.com/gp/product/B07KP86T8G">these heat set inserts from Amazon</a>, but should work fine with other stepped or tapered inserts that work in 4.2mm holes.<br> </li><li>I added the <strong>option to use an integrated rigid mount for the Phaetus/TriangleLabs Dragon Hotend</strong>. The fan placement is specific to the standard flow version, and I can't speak to whether this would work with the high flow variation. The rigid mount is a remix of <a href="https://www.prusaprinters.org/prints/90925-bearexxa-delta-p-v2-r2-for-dragon-hotend">BearEXXA Delta P V2-R2 for Dragon Hotend</a>. This mounting solution allows for one-handed nozzle changes without having to hold the heater block still with a spanner.<br> </li><li><strong>I removed the filament sensor to offset the added weight</strong> of the larger fan duct and print fan support, brass heat-set inserts, and rigid dragon hotend mount. The extruder is now significantly shorter. This change <strong>also allows you to feed a bowden tube directly into the extruder</strong>, which is useful if you're using an MMU or printing hygroscopic filament from a drybox.<br><ul><li>If you still want or need the functionality of a filament sensor (like me), you can look into a frame-mounted solution. <a href="https://www.prusaprinters.org/prints/54545-afterbearner-the-prusa-bear-afterburner">This extruder comes with a mount that attaches to the Bear frame, or to the frame of any printer with 2040 extrusions</a>. I've created <a href="https://www.prusaprinters.org/prints/148572-bear-frame-mounted-filament-sensor-with-pc4-m10-co">my own remix</a> of that particular mount with an extra bowden connector, so you can print from a drybox without your filament ever being directly exposed to air</li></ul></li></ul><p> </p><h4>Versions:</h4><p>There are multiple versions of this extruder to choose from depending on your needs and preferences.</p><ul><li>V6/Dragon groove mount <i><strong>without</strong></i><strong> </strong>heat-set inserts</li><li>V6/Dragon groove mount <i><strong>with</strong></i><strong> </strong>heat-set inserts</li><li>Dragon ONLY rigid mount <i><strong>without</strong></i><strong> </strong>heat-set inserts</li><li>Dragon ONLY rigid mount <i><strong>with</strong></i><strong> </strong>heat-set inserts<br> </li></ul><h4>Print Settings</h4><h5>Extruder body, cover, and carriage:</h5><ul><li>Material: PETG-CF, ASA, or other high-temp-resistant filaments are recommended for the extruder body and cover, regular PETG might work depending on your requirements. PETG should work for the carriage.<br> </li><li>Layer height: 0.2mm<br> </li><li>Infill: Gyroid, 30%<br> </li><li>Perimeters: 4<br> </li><li>Top and bottom layers: 5</li></ul><h5>Print fan support:</h5><ul><li>Material: PETG or stronger<br> </li><li>Layer height: 0.2mm<br> </li><li>Infill: Gyroid, 30%<br> </li><li>Top and bottom layers: 5<br> </li><li>Supports: Maybe, depending on your printer's ability to handle overhangs. Supports certainly won't hurt</li></ul><h5>RHD Fan Duct</h5><ul><li>Material: ASA, ABS, PC, or comparably heat-resistant filament<br> </li><li>Layer height: 0.15mm<br> </li><li>Infill: 20%</li></ul><h4>Notes:</h4><h5>The Design</h5><p>I'm very much learning 3D design as I go, and with no prior experience. It's likely you'll run into some things that you think could have been done differently or better. If so, please let me know so I can try to make changes! I'll also be uploading the CAD files for these versions as soon as I get the projects cleaned up a bit.</p><h5>Assembly</h5><p><br><a href="https://zaribo.com/blog/zorbiter-v2-0-extruder-for-zaribo-and-prusa-mk3s-series/">Please refer to ZARIBO's manual for the ZOrbiter V2.0</a>. Aside from skipping the filament sensor steps and potentially mounting your hotend differently (the necessary screws should have shipped with your dragon hotend, the instructions are more-or-less the same.</p><p>There's an extra screw that connects the top of the extruder body to the carriage. You'll want to makes sure to insert this before attaching the Orbiter V2.0 to the printed parts. I recommend attaching the Orbiter V2.0 assembly to the extruder cover before screwing the extruder cover and body together. The tolerance between the Orbiter motor and the back of the extruder body is on the tighter side and you'll want to be able to slide the Orbiter into place (there's an indentation in the extruder body it pops into).<br><br>If you're using the TriangleLabs Dragon hotend with the rigid mount, you'll need a 24mm long PTFE tube and <i>unchamfered. </i>I can't speak to the Phaetus Dragon, but the TL version doesn't have a chamfer where the PTFE tube meets the heatbreak. </p><p>If you're using a V6 hotend, you'll need a <i>chamfered</i> 38.5mm PTFE tube.</p><p>If you're using a groove-mounted Dragon, you'll use an <i>unchamfered</i> 40.7mm PTFE tube.</p><h5>To do:</h5><ul><li>Upload STEP files</li><li>Link to custom firmware. <a href="https://zaribo.com/blog/DOWNLOAD/#elf_l1_Lw">ZARIBO has published a version of the Prusa firmware that will work with this</a>. You should be able to roll your own or make the necessary changes via GCODE commands using the instructions that come with an LDO Orbiter V2.0. I made and run a version of the Prusa firmware customized for the Orbiter V2.0 and which includes <a href="https://github.com/scottmudge/OctoPrint-MeatPack">MeatPack</a>. I'll try to add the GitHub repo here soon</li></ul>
With this file you will be able to print (z)Orbiter 2.0 Extruder Lite with your 3D printer. Click on the button and save the file on your computer to work, edit or customize your design. You can also find more 3D designs for printers on (z)Orbiter 2.0 Extruder Lite.