Zentrierständer für Fahrrad-Laufräder / bicycle wheel truing stand
thingiverse
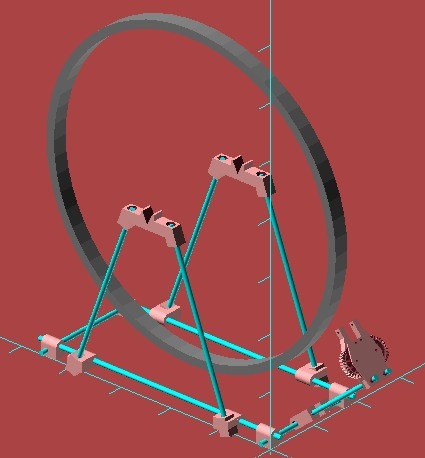
# GENERAL This is a centering-stand for bicycles (https://youtu.be/lWbWG2VxNOA). Good ones are very expensive and I thought to help me and others by building one on my own. I'm using the self-centering gears from Catarina Mota (Helical Gears / https://www.thingiverse.com/thing:1339). Feel free to improve the Design: https://github.com/VirToReal/Centering-Stand-for-Bicycle/ Its fully customizable with the help of parameters in OpenSCAD. The Thingiverse-Customizer wont work here, because the "gears_helical.scad" must be in the same directory of the "Zentrierstaender.scad". Simply download them or clone from the Git-Hub Link. # CONSTRUCTING Add the Parameters to fit the size of your wheel. You can be clumsy with that, because the turquoise colored rods in the OpenScad-Preview are threaded-rods and can be easily adjusted to your needed distances. Because of that, better give some more than having to less at the end. The variable "printmode" help you switch between OpenSCAD-Preview and Printmode. The Preview shows your Adjustments on the Parameters. The "printmode = true" with it's following variables will prepare a print-ready layout of your parametered Structures. The length of each (not printable) Threaded-Rod will be "echoed" in the OpenSCAD-Console. They can be cut in exact that length. Following things have to be considered while building: - RIM-GRABBER: - All other small holes can be drilled up to 4mm for 20mm long M4 Screws to assemble the whole Rim-Grabber altogether. - You have to pull a shell with the length of 10.15mm inside the two gears The Diameter of the shell should match the size of appr. 5-5.9mm, it doesn't have to be exact that size, tolerance to the Hole in the Gear is desirable. You have to drill up the Hole in the Gears up to appr. 6mm too, because your printer won't work that exactly. For Example: I used 2x 3mm² end sleeves which fits perfectly. There must fit a 3mm Screw inside that shell to fix these two gears together with fewer tolerances. Be sure the screws just fix the shell with the other two structures (cap/baseplate), not the gears! Some grease will help, too! The two arms of the Grabber should touch in the center before mounting. You can rotate them altogether to fix them afterwards. Just be sure they're in the right teeth of the gear. ITS IMPORTANT THAT THESE GEARS HAVE NO TOLERANCES TO EACH OTHER. - The two big holes are for the Threaded Rods. They're also fixing the "cap" on the "baseplate" with the Gears between them. - Cut a thread into the two Grabber-Arms for M5-Screws and place some inside them. They should look out the structure the same distance. If you failed with assembling the Grabber-Arms correctly, you can adjust here. ALL OTHER PARTS: - Not much to consider, just use Nut-Traps if there are one. Washers may prevent the plastic from damage. Locknuts on some points may help against self adjusting. The OpenSCAD Preview with "printmode = false" may explain everything to you. # USING Consider following things before start working with this tool: - Be sure to tighten the Axis by clamping them in with the two Impeller-Holder. - You have to measure in your Rim first before start working on it. You're able to rearrange the "Rim-Grabber" on the Threaded Rod for this. - If all Threaded Rods are tightened, the whole Structures may move during work on your rim, but they'll always move back in they're original position. The position will stay the same even after reinserting the rim after removal. - You'll detect the wrong position by the sound when the rim touches one of the screws. Measuring right at the Rim-Grabber makes it easy to adjust the spokelength. Always Adjust 3 spokes before/after the one with the strongest swing to get a smoother result. You're also be able to add a metal-plate to detect runouts of the rim. Just use the upper two screws of the Rim-Grabber to mount one.
With this file you will be able to print Zentrierständer für Fahrrad-Laufräder / bicycle wheel truing stand with your 3D printer. Click on the button and save the file on your computer to work, edit or customize your design. You can also find more 3D designs for printers on Zentrierständer für Fahrrad-Laufräder / bicycle wheel truing stand.