Zephyr Garmin Edge bicycle mount
thingiverse
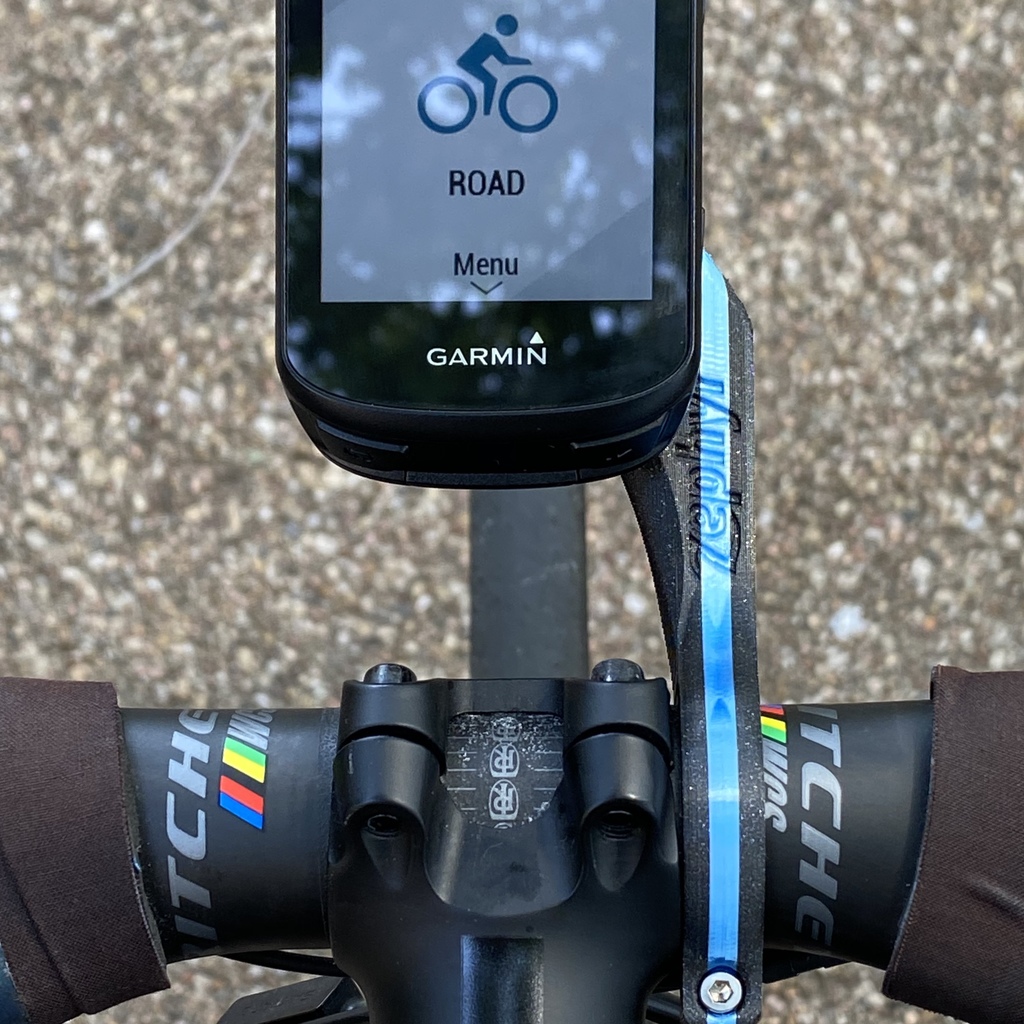
The Zephyr mount is similar to the Out-Front mount by Garmin to attach their Edge computers to your road bike. Some of the benefits of this version: + Print your own for as many bikes as you want + 1/3 the weight of Garmin mount - only 14 grams! + Mount left or right of your stem + More aerodynamic, saving you minimum 3 ms over 40 km! Guaranteed! ;-) + Print colors to match your own style There is a left and right version for which side of the stem. The direct version mounts directly to a 31.8mm road bar (standard stem mount diameter). The gasket version needs a 1 to 1.5mm thick rubber strip between the clamp and handlebar. Do not use the Garmin gasket because it has ribs which won't work here. [more cycling parts](https://www.thingiverse.com/jltx/collections/cycling) ###Printing I designed this for either PLA or PETG. If you go with PLA, I strongly recommend the gasket version as PLA is less grippy and will slide after it "settles" on the bar for a day or two. Print at 0.15 layer height and I recommend 3 perimeters. No brim or supports needed. **Print this slow!** There is a lot of detail and overhangs and the part is small which is a cooling challenge. Slowing down solves this. I recommend 20mm/s perimeters. Also, orient the part on your build plate so that the overhang is aimed squarely at your strongest part cooling. This will achieve a cleaner print. Have fun with colors! I added two stripes in my test print to match my bike theme. For reference, the center of the mount is 32.5 mm from the bed and center of clamp is 5mm. ###Clean up You must remove the two supports on the clip face. Simply knock out with your thumb nail. There is a third support at the bottom of the clip. Press on the inner spring to hear it snap free. You can leave it or remove it, but I always remove it. Also, inspect the top rim of the clip. There is a bridge and if it sags too much you will have trouble inserting the computer mount. It's designed to allow for a little sag. If too much, just trim off a *very* tiny bit with a knife. ###Mounting Insert an M3 hex nut into slot on the lower clamp. Slide clamp over bar. Use a 12mm or longer M3 socket head screw to tighten it to the bar. Leave the head out of the recess to allow it to angle correctly to catch the nut when you are first starting. It will slide into the recess as you screw it down. There is a 1mm or so gap to allow for some variability. For PLA, be careful not to over-tighten. Best to screw loose, let sit overnight to allow the arms to relax, then tighten the rest. ###How I Designed This I put a lot of focus in my designs to the realities and limitations of 3D printing. I pay attention to the orientation of layers and how that will affect the strength of the part or resolve detail. I also strive to have parts easy to download, slice and print with minimum special settings or need for supports, etc. Though occasionally some extra steps are required. I spent some time getting the clip to have a good snap and feel tight. I had to come up with some new design techniques. The other big challenge was reducing flex. My first prototype was a vibration nightmare but now it is rock solid. I came up with a good skinning solution that also works for aerodynamics. I'm really happy with how it turned out.
With this file you will be able to print Zephyr Garmin Edge bicycle mount with your 3D printer. Click on the button and save the file on your computer to work, edit or customize your design. You can also find more 3D designs for printers on Zephyr Garmin Edge bicycle mount.